Showing posts with label Easy Events. Show all posts

Tuesday, July 31, 2012

A Clean & Simple Easy Events Mistletoe Card

Pin It
Hey y'all. Happy Tuesday! I hope you're having a great week so far. Not feeling too good today so just a quick post.

Most of you know that Clean & Simple, (C&S) or Even Quick & Easy cards are not ones that seem to come to me very easily...but I am trying. In keeping with my goal of a C&S card each week, here is this week's offering-

C&S Christmas Card featuring
Easy Events Stamp Set
I'm pretty happy with how this turned out. Whenever I see this stamp it always seems like it should be hanging instead of reaching across the stamp like it does. So, I fixed it! Lol! I colored the stamp with my  Stampin Write Markers in Soft Suede, Garden Green and Real Red, omitting the greeting and stamped it on a piece of Whisper White c/s. I then used my Blender Pens and Garden Green Classic Ink Pad to color in the leaves. I added a little Cherry Cobbler Dazzling Details and set it aside to dry. 

*Tip*- When using Dazzling Details, if at all possible do this portion of your project at the beginning because it will require drying time.

I used a base of Riding Hood Red simply because that was the only color red ribbon I had at the time. Even though it's not as vibrant as the Garden Green it still coordinates wonderfully. That's one of the things I love about SU products. They all coordinate so beautifully together. I topped this with a piece of Whisper White c/s that I ran through my Big Shot with the Perfect Polka Dots Embossing Folder, which I adhered with Tombow. 

Once my Dazzling Details was dry I attached a small Riding Hood Red Ribbon to the top of my branch with a Mini-Glue Dot. This panel was mounted with Tombow to my Garden Green layer and this panel was then adhered with Dimensionals. Here's a closer look-


 Didn't it turn out pretty? How simple to make this and hope for a sweet kiss from your special someone? Guess everyone knows where my mind is. HAHAHAHA

Here's the inside-

Inside of Christmas Card featuring
Easy Events
I stamped the image a second time without re-inking it, to give a lighter image to the inside of my card. Doing that makes for a nice effect and it means I don't have to re-color the whole image. Yeah, I'm lazy like that. Why do it twice when once will suffice. Hey lookie there...I'm a poet and didn't know it! HAHAHA, ok, so I'm probably the only one laughing right now, but then I'm silly like that. The sentiment is from the same stamp as the mistletoe image. I stamped it in Garden Green. Oh, and as you can probably tell, I let Tink have just a little fun to brighten up the inside of my card.

Just because I need something else to smile about and wanted you to be able to smile some more too, (Yeah, I'ma Great Friend like that) here's a picture of my little studio assistant/fur-baby, Bitty Kitty, helping out in the Stampin Studio-

Bitty Kitty Studio Assistant Extraordinaire

Isn't it sweet how she's holding down my light box so nothing happens to it? Yeah, she's a great helper when she's not head-butting me, and chattering at me to remind me that it's dinner time... an hour in advance just so I don't forget!

That's all I have for you today. I hope you liked my C&S Christmas Card and that it inspires you to make some C&S of your own. If you liked today's card or have any questions, I'd love it if you dropped me a line. I read all of my comments and they really do make my day. If you'd like to +1 or Pin today's card I've put the buttons here on my blog for your convenience. Friends and Followers are always welcome too!

Thanks so much for stopping by today. You are very appreciated! I hope you'll come back soon to see what I've got in store for you. Till next time-

Remember- Life is often more about the storms than the peace they seek to overwhelm. It's not about Waiting for the storms to pass, but Learning to Dance in the rain.

Be Safe,
Shan
Pin It

Tuesday, July 3, 2012

Sending You Love SSC #261 / My Challenge #28

Pin It
Hey y'all. Happy Tuesday. I hope you are cool and getting ready for a Fabulous 4th of July tomorrow. I'm planning on spending the day with friends. It's nice to get a little mid-week break but it's kinda hard to plan on going out to see the fire-works knowing I have to be back at work bright and early on Thursday morning. I guess I'll either watch them on t.v. or catch up on my dvr'd shows. :)

It's time for another challenge card. I'm so excited to know that I have done at least one challenge a week this year which means I'm keeping up with my New Year's Resolve for a least one thing. I really feel like this has been such a positive thing for me to do and that I'm growing creatively and becoming more confident in my designs and my design choices. I challenge you if you are not doing challenges (wow, I challenge you to challenges.....hahahahaha) find some you like and do some on a consistent basis. It doesn't have to be weekly like me. Even if you do one challenge a month, I'm sure you'll find a difference in how you look at things creatively.

This week's challenge card is another Stamping 411 card. These ladies are Amazing! They have great sketches and the design team samples are great. Of course I try not to look at the D.T. samples until after I have my card in mind, so I feel like I'm coming up with my own idea and not influenced by their work. I know I say this all the time, but not only are the sketches wonderful, but they take all the guess-work out of the equation by giving you measurements to get you started. The OCD in me goes a little wonky when I have to figure out measurements, especially if there are multiple layers. In case you missed the posts, I have been known to mathematically figure out the correct dimensions by measuring the sketches and then figuring out the correct proportions. :( Like I said, it gets a little wonky sometimes.  Here's this week's card-

Challenge Card Featuring
Easy Events Stamp Set and Twitterpated DSP

Other than the fact that I can see that my ribbon is somehow not level, I'm really pretty happy with this card. For those of you that are new here- I'm a little inept at mixing and matching DSP papers even though I know they all go together. It literally gives me anxiety. Since I know the OCD is not going anywhere (completely), I figure the least I can do is try to conquer small bits of it. Hey, I'll take small victories wherever I can! When I saw this week's sketch I knew it would be perfect for lots of mixing and matching. Although I'm not sure just how well I succeeded, I did try and it doesn't look like a "Hot Mess" so, I'll take it as a small win. I know it's hard to see in this picture but the scalloped pink layer is DSP, meaning I have 5 different pieces of DSP on this card. Woo-Hoo! *Happy Dance* Flowers and Patterns and Stripes, Oh My!

I took my color inspiration from the main DSP panel with the flowers and then went from there. I used a base of Baja Breeze with a layer of Island Indigo to hold all of my DSP. That layer is raised up with Dimensionals. I used my Scalloped Border Edgelet on the pink DSP and then used my Adorning Accents EF on it as well. I love the added touch, plus the top of the embossed area gave me a level area to mount my floral piece to. :) *Bonus* I inked up the sweet little birds from the Easy Events stamp set with Black Staz-On so I could color with my blender pens. 

Ok, truth be told I did it with Staz-On the second time. I almost always forget the first time. Do you do that to or is it just me? I didn't even think about it until my Bashful Blue birds turned a weird violet color because it was mixing with my Classic Black Ink. *Head-desk* So I had to start again. I also switched the sentiments and used one from another stamp in the set. Love how that worked out. This was punched out with my 1 3/4" circle punch, sponged lightly with Island indigo and then mounted with Dimensionals to a piece of Baja Breeze c/s that was punched out with my Large Scalloped Circle Punch. I sponged it lightly with some Island Indigo as well and mounted it with some Dimensionals. A little love from Tink made the little heart and the bird's wings sparkle just a bit. Oh, the wings on the birds are Pacific Point and the heart is Primrose Petals.

Here's the sketch-


Oh, I miss that cute little butterfly! The new one is very pretty, but this one always made me smile.

Here's the inside-


What a pain to stamp those little birds separately! The branches are so close together. This was my 4th attempt to get them just right. It sure would be nice if there was a Staz-On Pen like the Versamark one! You can't tell but their wings and hearts got Tinked here on the inside too. Although it was a pain, I think the inside turned out so pretty. The sentiment is from Teeny Tiny Wishes and is stamped in Island Indigo. The edges of the W.W. c/s were sponged with it as well.

I hope you liked today's card as much as I enjoyed challenging myself during the making of it. LoL! I really do love hearing from you and I read all of my comments, so if you get a second to drop me a line, it would make my day. If you liked today's card and would like to +1 or Pin it, I've put the buttons on my side-bar for your convenience. Friends and Followers are always welcome too! :)

Thanks so much for taking the time to stop by today! I hope I've inspired you today to try something that you don't feel comfortable with. I wish you all a safe and happy holiday full of Family, Friends and of course time for creativity. Hope to see you back here real soon. Till next time-

Remember- Life is often more about the storms than the peace they seek to overwhelm. It's not about Waiting for the storms to pass, but Learning to Dance in the rain.

Be Safe,
Shan


Pin It

Friday, June 8, 2012

End of the Week Technique #35 - Brayered and Embossed Checkered Background

Pin It
Hey y'all. It's Friday! (Oh Noes! I just said that to my self and now that awful "It's Friday" song is swimming around my head on auto-repeat! Help, someone quick...ear-worm!!!! AUGH ):  ) Oh well, I hope your week's been great and I haven't just shared my ear-worm with you. LOL :)

I have a really simple technique for you today. It can go from a simple background to a Wow focal point, depending on your color combinations and other card elements. I probably see this technique once a month or so during my blog reads. I first tried it last fall, with my upline Robin, I think it was at a team meeting, on a holiday card. I thought I'd try it today on a fun, bright, baby card.

Here's today's card-

Brayered and Embossed Checkered Background Baby Card
with Easy Events Stamp Set
I showed this to a friend the other day and she just loved it. I started with a base of Certainly Celery. Next came my checkered background using Certainly Celery and Daffodil Delight. I knotted a piece of our new stitched ribbon in Daffodil Delight and secured the ends under the card with a little SNAIL. My sweet little ducky is popped up with dimensionals. So quick and easy!

Here's what you need for this technique- Brayer, Big Shot, Stripes Embossing Folder, Ink Pads (I used two colors but you can also use just one color for a more tone-on-tone look) and of course cardstock, your choice of colors, I used Whisper White.

Here are the steps-

1- Pick out your colors. I chose two, but like I said you could choose one and it would still give a nice effect. (I'll try to do this soon and post it.)
2- Ink up your brayer with the first color and roll it on the inside cover of your Stripes Embossing Folder (this is the side that has "Sizzix" written on it. Make sure that you have even coverage on all of the raised portions.
3- Position your c/s, wherever makes you happy in the folder. (I lined mine up with the top and side so everything my lines would be straight, but then you all know I'm a "little OCD" hahaha) Carefully Close it and run it through your Big-Shot. Remove your c/s. 
4- Re-ink your folder. If you're going to use the same color, go ahead and re-ink your brayer. If you're changing colors, rinse your brayer and embossing folder, tap water is fine, until the water runs clear. This won't take long. Dry both well, then re-ink your brayer with your new color and ink the folder again.
5- Turn your c/s 90 degrees (1/4 turn), position your c/s and run it through again. You will now have the checkered, or plaid look you see above. Because I used such a large piece of c/s it didn't get colored completely when I ran it through, so I just inked it up again and moved my c/s up making sure to line up with the previously embossed areas so my spacing stayed even.
6- Enjoy your new background or accent piece. Smile when you think of the joy and smiles it will bring to the face of your card's recipient. (Always the best part for me!)

***TIP*** You may want to try running a piece of your c/s dry through your Big Shot with this embossing folder first. You may need to adjust which platform level you use on with your machine. I did this with one tab down. If you look real close, you can see a little "wrinkling, for lack of a better word" in some of the white spaces. I think my machine is a little tight. Everyone's is different. Next time I will do it with no tabs. It's still a beautiful card, but the OCD in me wants it perfect of course. :)

Here's my sweet little ducky-

Easy Events Duck and Labels Framelet
How Stinkin' Cute is he?!? Love him. I stamped him in Staz-On  on a scrap of Whisper White c/s. If you look closely you can see the sentiment below him. I had actually intended for it to be seen, but my water turned out darker than I had planned. *blush* *SMH* Don't you love it when people post things that aren't "perfect" and then admit it?!? I know I sure do.  I used my second smallest Labels Framelet to cut him out. He fit perfectly. It makes me so happy when things work like that. I used my Blener Pends and Classic Ink Pads  to color. Here's what I used- So Saffron, Daffodil Delight, and Tangerine Tango for my little cutie-pie. Certainly Celery and Baja Breeze for the umbrella, Baja Breeze and Marina Mist for the hat and Marina Mist for the water. Once I had the water colored in though I realized I had made a little "Ooopsie" or as we like to say "I had created a design opportunity." What to do, what to do? Yep, I channeled my inner Pooh Bear. Think...Think...Think and not my inner Eyeore (Oh, Bother!) I had a lightbulb moment, love when those happen. Let Tink come out to play. Well I did and I think the results are fabulous. You can still make out the "for baby" if you look close, otherwise it just looks like extra shading in the water. "Thanks Tink!" 

Here's the inside-


The sentiment is from Petite Pairs. Seriously, if you only get one sentiment set, get this one. I use it all the time. I think it's probably one of my best stamp purchases. I actually mounted them both on the same block and stamped just one time. ***TIP***  If you do this, please make sure to do a test stamp on your grid paper (or other scrap paper) to ensure everything is lined up just like you want it. I got lucky and had it right the first time. Yea, Shan! My precious little froggy is from last year's Ronald McDonald set. It's retired now, but it wasn't when I made the card. I colored him in with Wild Wasabi, that was an In-Color when I first did Stampin' Up years ago. A little love from Tink and he's so handsome you just know he's really a prince.  If these two cute little fellas don't make you smile, well then I'm just at a loss.

So what do you think? I hope you liked today's card and I hope it inspires you to try something new. If you liked today's card and would like to +1 or Pin it, I've put the buttons on my sidebar for your convenience. Your comments always make me smile, so feel free to let me know what you think. Friends and Followers are always welcome too! :)

That's all I have for you today and for this week. I hope you'll come back and see me soon.
Thanks for stopping by. You are so appreciated. Till next time-

Wishing you a weekend filled with Family, Friends and of course lots of time for creativity.

Remember- Life is often more about the storms than the peace they seek to overwhelm. It's not about Waiting for the storm to pass, but Learning to Dance in the rain.

Be Safe,
Shan
Pin It

Friday, May 25, 2012

End of the Week Technique #33 - Clear Block Background Stamping #2/ Let's Try Again

Pin It
Hey y'all. Happy Friday! I hope you've had a great week and are looking forward to a spectacular 3 day weekend. :)

For those of you that are new here, or for some reason missed last weeks EWT, I'm giving this technique a second try. How could others get such pretty results and projects and mine stink!?! (Ok so that's just my opinion and I'm told it didn't really stink, but by now most of us know I'm a little hyper-critical of my own short-comings and last week made me want to tuck my little Scaredy Cat tail between my legs and I just couldn't have that!)

Here's today's card-

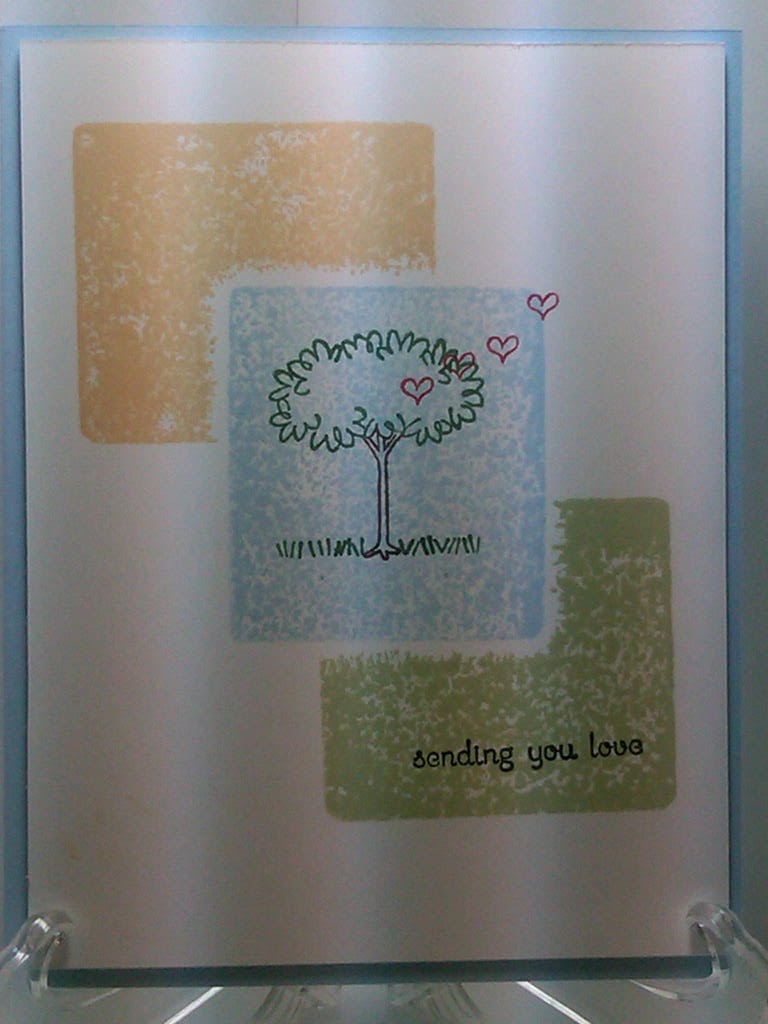
Clear Block Background Technique with Easy Events/ Clean and Simple
Can I just say I am sooooo much happier with this card!

There are two new elements to this weeks card, but I believe I would have been happy even if I had not added them.

Here's last weeks card-


 For this weeks card, instead of making it a one-layer card I added a base of Bashful Blue, still C&S though. I also added a few extra hearts floating above the tree. Looking now, as I just added the second picture, I also see I changed the orientation on the blocks, however that was un-intentional.

If you look back at last weeks post, you can check it out HERE, my biggest complaint with this technique was my inability to get even coverage on the blocks, especially the accent colors, and being unable to mask the center one to make it appear to be layered above the other two blocks of color. Every time I tried the mask, even as thin as it was seemed to make it even harder for me to get decent coverage. :(

After I posted last week and thought about what could have been causing my problems, I thought I remembered reading somewhere to use a soft mat to stamp on instead of a hard surface. That the mat would have some give and allow for more even coverage. So I decided to try again. I got my computer mouse-pad and used it under my c/s and the difference was Unbelievable! The coverage was nice and even and I got beautiful edges around my masked center piece.

SCORE!!!!!! Ok , so now this won't have to be considered my Least Favorite Technique any longer.

Here's the inside of my card-


I inked up the little heart from a new stamp-set I got as a bonus for recruiting during SAB. (And for the love of me, I can't remember the name of it right now!) Any-whoo - its a sweet little solid heart image, the one that's all red above. For the other two hearts, I simply used my Stampin Write Marker's brush tip and outlined just the edge of the stamp by holding my marker almost parallel to the stamp and lightly stroking it over just the edge of the stamp. I think it's the first time I've tried this and I have to say it gives the look of two stamps from one. Love that! I then let Tink have her way for just a moment. I'm a firm believer that the inside of a card should be pretty too. Why should the outside have all the fun?!? :D

Here's how to do this technique-

1- Start with a clean block and tap it on your ink pad until you get it covered completely.

2- Lay your cardstock over a soft surface- this could be your Mat-Pack pad or computer mouse pad or something similar just so long as it has some give. This is definitely the key to consistent coverage with this technique! It made all the difference!!! :)
3- Stamp on your cardstock with your block, applying firm pressure and lift straight up.
4- If you want to add multiple layers of colors, stamp your first section again on a post-it style note and use that to "mask" your stamped area so no new ink gets on it.
5- Ink up your chosen image, either by inking it in all one color with a pad or by coloring it in with your Stampin Write markers (like I did) and stamp your image.
6- Smile and be happy when you think of the smile your card is going to bring to someones face


That's all I have for you today. Hopefully you thought it was worthy of a re-do. Now I feel like this is a technique I will try again. Thanks to those of you that encouraged me to not give up after last weeks attempt!


If you liked today's card, please feel free to leave a comment. I love hearing from you! Also, if you liked it and would like to +1 or Pin it, I've put those buttons on my sidebar for your convenience. Friends and Followers are always welcome too. :)


I hope you all have a safe holiday weekend and come back to check out more projects soon. May you have a weekend full of Family, Friends and of course plenty of time for creativity!


Till next time-


Remember- Life is often more about the storms than the peace they seek to overwhelm. It's not about Waiting for the storm to pass, but Learning to Dance in the rain..


Be Safe,
Shan
Pin It

Thursday, May 17, 2012

Well...I Finally Found my Least Favorite Technique! / End of the Week Technique #31- Clear Block Background Stamp

Pin It
Hey y'all. Happy Thursday! Just one more day to go till the weekend. I'm actually really excited about tomorrow, because I have an interview for a job I've been trying to get for over 2 years. Five candidates are being interviewed so, for those of you that believe in a little divine intervention, (via prayer), or just good energy, I'd appreciate it if you were able to send a little my way. :)

***Disclaimer*** If you're not new to my blog you know I always try to be honest with you. I've often said how easy it is to be frustrated by the seeming perfection of other stampers blogs. You know what I mean, how the cards always look just right and no-one ever seems to have any difficulties. Well, I can assure you if perfection is what you're looking for you've stopped at the wrong site. Don't get me wrong, I'm pretty happy with most of my creations. My gold standard is "would receiving this card put a smile on my face?" If the answer is yes, than I feel good about posting it. While I would definitely be happy to receive today's cards from someone else (because they had taken the time to create something just for me) my OCD is simply not allowing me to be overly happy with my results. I realize this is in all likelihood, a fault in my own reasoning and hope you will try your hand at this technique anyways. I am posting both cards today even though they are not my favorites because today's blog is about the technique and not my ability to be happy with the results produced by an inherently, non-consistent technique. At the end of the day though, my blog is about trying new things and stepping out of my comfort zone, both of which I did with today's technique.

On to today's End of the Week Technique. This is #32 for me, or about 8 months worth of techniques. I finally found one that I really didn't enjoy making. :( When I came to this realization last night it made me very sad. I wasn't sad because I had a least favorite (they can't all be favorites, right?) I was sad because I have loved so many cards done with this technique. However, I guess I shouldn't be too surprised, it's not new information that I'm a little OCD (have you seen the title of this blog?) and this technique does not lend itself to precision or predictable outcomes. I even did two samples and still ended up with the same sense of dissatisfaction. Hopefully though, when you try this technique you will enjoy yourself.

Here's today's card-

Clear Block Background Stamping

In addition to using this as my EWT, I am using this as my Clean & Simple card of the week. I was hoping to be able to get a one-layer WOW card with this technique, but it didn't quite happen that way, for me at least.

I really had high hopes for this when I stamped my center, Bashful Blue section. The coverage was so even and even looked a little textured. I was doing my little *happy dance* and then I stamped the Certainly Celery, and So Saffron blocks and I stumbled and felt like "Elaine" from Seinfeld doing her dance. *tear* 

I had initially masked off my B.B. section and it seemed like even that little bit of elevation was throwing off the ability to get even coverage. I laid the block back down without the mask to try and get a little better coverage which is why you can see just a small line of C.C. below the leaves of the tree and S.S. in the middle of the leaves. I stamped my image from Easy Events by coloring my image with my Stampin Write Markers in Real Red, Garden Green and Chocolate Chip.

I decided to try again without the masking. Here's the second attempt-

Clear Block Background Stamping

While I'm much happier with the fact that these are all more consistent in their appearance, I really liked the idea of the center section being just B.B. so that it, in my mind at least, looked like it was lifted above the others giving it a layered effect. Perhaps I just need to do a single block or a single color. I'm hoping some of you will chime in and let me know if I'm being totally off my rocker on this. The more I'm looking at the second one, it's starting to grow on me a little.

Here's what you'll need to for this technique-
Clear Blocks,Colored Classic Ink Pads (I think light colors would probably work best for this) and the stamp of your choice.

Here's how to do this technique-

1- Start with a clean block and tap it on your ink pad until you get it covered completely.
2- Stamp on your cardstock with your block, applying firm pressure and lift straight up.
3- Ink up your chosen image, either by inking it in all one color with a pad or by coloring it in with your Stampin Write markers (like I did) and stamp your image.
4- Do one of two things, a- admire your creation and think of the smiles it's going to bring or b- curse loudly at your inability to be content with what you consider to be non-symmetrical, un-even, not perfect results. Three guess as to which one I did and the first two don't count. :)

In my defense I don't even do things like "Tie-Dye" because of the unpredictability of the results and the irregularities inherent in the process. :(

I do however think I will try this at least once more but maybe on a smaller card where I only feel the need for one color.

I don't have an inside to show you today. :( I feel like such an "Epic Failure" with today's post. *SMH*  In my despondency over what I felt to be my failure to create a beautiful card, I kinda lost my Mojo and couldn't think of anything for the inside. I stamped a sentiment from the now retired P.S. I love you (I had really hoped this would carry over, it had such nice "loving" sentiments) and just couldn't think of anything else to put inside. I think I'll go back later and maybe put a few punched hearts inside.

Can I just say this technique drove me to chocolate last night! AUGH!!!

Well, that's all I have for you today. I hope you, at least, liked today's card. I really hope my dissatisfaction with my inability to produce a card I was thrilled with doesn't keep you from trying your hand at this technique. As always, I would love to see what you're able to come up with. Like I said, I've loved others cards with this technique, just not my own.

Till next time-

Remember- Life is often more about the storms than the peace they seek to overwhelm. It's not about Waiting for the storm to pass, but Learning to Dance in the rain.

Be Safe,
Shan 
Pin It

Friday, May 11, 2012

A Quick and Easy Thank-You

Pin It
Hey y'all. Happy Friday! I hope you have had an Amazing week and are looking forward to an even better weekend. I've got one last card for you this week, I hope you're going to like it.

A while back, I said I was going to try and do more Clean and Simple type cards. The goal was to do one a week and I've been getting some done but they sure are hard for me. :) hey're just way outside my comfort zone. Today's card is more of a Quick and Easy than Clean and Simple. I call it that because it has just a little-bit more going on with it than your regular Clean and Simple card. At least I think it does. You be the judge-

Here's today's card-

Quick and Easy Thank-You featuring Easy Events Stamp Set

I started with a base of Garden Green c/s, which I actually had to open up for this card. Such a pretty color, but it sure doesn't get used much. Now with the cute Gumball Green, who knows when it will get used again. LOL.

Next I ran a piece of Whisper White c.s through my Big-Shot with the Perfect Polka Dots Embossing Folder for a little added detail. I topped this layer with a piece of Daffodil Delight Seam Binding that I secured under the W.W. c/s with a little SNAIL. Love me some SNAIL... (for securing ribbon, HAHAHA)...bet you never thought you'd hear me say that did you!?! I added a sweet little double bow to this that I secured with a Mini-Glue Dot.  I then adhered this layer to my base with Tombow.

My focal point was actually inspired by our new catalog. In the accessories section they have a container with framelets that have a little heart punched out of them with DSP showing from underneath. I decided to step it up a little by making the DSP layer a mat as well. To do this I colored my flowers from the Easy Event Stamp set with my Stampin Write Markers in Garden Green and More Mustard. I positioned my #2 (next to the smallest) Label Framelet over this so there was extra space to the left where I would punch my flower. (I used an old retired punch, but the flower in the Bitty Punch Pack or Boho Blossoms would work just as well.)

Here's where I tell you to do as I say and not as I do-
****Punch your design first and then attach your DSP to the back. Don't attach your DSP and then punch through both.*****

I didn't think about this (it was at the end of about 2 1/2 hours of stamping after a full day at work) and had to punch through both layers. Even though the DSP is thin it was still a little tough to punch. It actually almost tore the W.W. piece since it was so close to the edge. Thankfully, it still looks good enough to give or sell, but I don't recommend you do it that way. I made the DSP mat by cutting two DSP labels and then cutting them both in half (opposite ways) to form the mat. I adhered this over my Seam Binding with some leftover dimensional pieces. For me this extra punching and matting is what moved it from a C&S to a Q&E card, but I may be a little weird like that.

Here's the inside-


For the inside I inked up the sentiment portion of the stamp in Basic Black with my markers and stamped. I then inked up a single flower from the image on the front of the card with my markers and stamped it. I let Tink come out and play to give my flower and leaves a little sparkle and my card was done.

The most time consuming part of the card was the stamping. I'm really happy with how this card turned out. What do you think? I hope it will make someone's day just a little brighter.

Well, that's all I have for you today. I hope you liked today's card and I hope it inspires you to make something just a little outside your norm. If you liked it I would love to hear from you! Also if you liked today's card and would like to +1 or Pin it, I've put the buttons on my sidebar for your convenience. Friends and Followers are always welcome too! :)

Don't forget to check out the RETIRED LISTS in my ONLINE STORE. The Accessories are going quickly and they are While Supplies Last ONLY! You're favorite Retiring Stamps will only be around until the end of this month.

I hope to see you back here soon for all new projects. I wish you a fabulous weekend filled with Family, Friends and of course, plenty of time for creativity.

Till next time-

Remember- Life is often more about the storms, than the peace they seek to overwhelm. It's not about Waiting for the storms to pass, but Learning to Dance in the rain.


Be Safe,
Shan
Pin It