Showing posts with label Lattice Folder. Show all posts

Monday, August 13, 2012

Wonderful Wonderfall / SSC #268 / My Challenge #34

Pin It
Hey y'all. Happy Monday! I hope you had a good weekend. I spent all day Saturday stamping, first at a team meeting then in a techniques class. I'm getting new ideas for you, cuz I'm a good friend like that. Didn't get anything stamped to post here but whatcha gonna do? Watched a little Olympics both days and in between laundry and yard-work and what-not around the house yesterday, I finally got two cards made. Woo-Hoo! Not as many as I had hoped to get done, but hey I'll take whatever I can get! I hope your weekend was productive. Oh and I found out my daughter's getting married. Married? Yes, Married. Geesh! HAHAHAHAHA! Everytime I say that it takes me to 16 Candles with Jake and Long Duck Dong. ROFL!!! Are you laughing too? I hope so! Oh and I have about 2 weeks to get the invites done. Guess what you'll be seeing soon on here? :)

OK...slightly less traumatic than the whole getting married is today's card. I used our new leaves set WonderFall and our new Autumn Accents, Leaves, Die. I have to say I really wish they had done this as a framelet and not a die. Getting the stamped image cut out with the die was easy enough, getting the stamped image in the right spot, not so much. Let's just say I was saying some not very nice things while I was making this card last night.

Here it is-

Thank You card featuring
WonderFall Stamp Set, Day of Gratitude Stamp Set
and Autumn Accents Bigz Die
This is a fairly simple card and I think it would be especially good as a masculine card. I started with a base of Soft Suede. I layered on a piece of Crumb Cake and our new embossed DSP, Natural Composition Specialty. If you haven't checked out this DSP yet I highly recommend it. It has beautiful embossed patterns on one side and a slightly textured feel to the other side. I sponged both pieces with Crumb Cake ink, wrapped a length of Linen thread around them three times and knotted it on the back. This layer was then secured to the base with Tombow. Next came the leaves....oh, the beautiful, pain in my **** leaves. I ended up, after multiple times of not getting the stamped image centered even with the Stamp-A-Ma-Jig, (it's harder to use when you don't have an edge to use) coming "close enough" on the two larger images and just fussy cutting around to make it as even as possible. Very frustrating. When I figure out the best way to use this combo, and I will, I'll let you know. I used Tombow to secure the lower 3 leaves under my linen thread and Dimensionals to secure the Always Artichoke leave and the acorn. I also stamped/cut the acorn twice, once in Crumb Cake and once in Soft Suede. I then cut just the top off on the Soft Suede one and ran it through my Big Shot with my Lattice E.F. I used a Naturals Button and some more linen thread for a little accent. I threaded it through, knotted it and then tied a little bow. This was adhered with a Mini-Glue Dot. For the banner, I stamped a sentiment from Day of Gratitude in Soft Suede on a scrap of Very Vanilla,  flagged the end free-hand, and then sponged all the edges in Crumb Cake.

Here's the sketch I used for my inspiration-


I did something I rarely ever do. I totally changed an element. I generally incorporate all of the elements in a sketch and have only recently started changing the shape of the element. For today's card I omitted the framelet shape completely and used my cut-outs to create kind of a free-form shape there instead. I have to say, I'm pretty excited by how it turned out.

Here's the inside-

Inside of Thank You Card featuring
Day of Gratitude and WonderFall Stamp Sets
Pretty Clean & Simple here. I stamped my sentiment in Soft Suede and my leave in Always Artichoke.  A little sponging to the edges and my card was done. No glitter, no bling, nada. What do you think? 

That's all I have for you today.Pretty simple for one of my cards, but I'm trying to make some of them a little easier for my beginners to recreate.

I hope you liked today's card. I love hearing from you, so if you liked it or have questions or comments I'd love to hear from you. I read all of my questions and they make my day! If you'd like to +1 or Pin today's card, I've put the buttons here on my blog for your convenience. Friends and Followers are always welcome too!

Thanks so much for taking the time to stop by my little corner of the world today. You are very appreciated! I hope to see you back here real soon for more cards and projects. Till next time-

Remember- Life is often more about the storms than the peace they seek to overwhelm. It's not about Waiting for the storms to pass, but Learning to Dance in the rain.

Be Safe,
Shan


Pin It

Thursday, August 2, 2012

End of the Week Technique #41 (A Two-Fer) Coloring/Un-Coloring Stamps / PP106

Pin It
Hey y'all. Happy Thursday to you! I hope you're having a fabulous week. Just one more day to go until the weekend. Yea!!!

I've got lots of pictures for you today, so I'm just gonna jump on in. :) This card didn't start out with the intent to be a EWT. In fact, I was looking through my reader this weekend to get some challenge ideas and decided on The Paper Players Challenge. I went down to the studio to make my card and had a little "oopsie". Well, you know what they like to say about stamping..."There's no mistakes just creative design opportunities. That's what happened here. Gotta say I love when that happens and you end up loving your creation.

Here's today's card-
Masculine Card featuring
Forever With You
I know I talked yesterday about the only card as hard for me to do as Sympathy cards were Masculine cards. Luckily as I was reading through my feeds, I saw this challenge over at The Paper Players and thought I would give it a try. I usually like a little more structure to my challenges, which is one reason I don't often do Color Challenges.


 I decided on the Masculine, Dry Embossing and Blue options. I really love this stamp set, but I think it's easy to make a beautiful, romantic card for a female with it and a little bit harder to make one that's masculine. You know...all those flowers. :)

I started with a base of Midnight Muse (Check, Blue). Next came a Crumb Cake layer that I embossed with my Stripes Embossing Folder and my Big Shot (Check, Dry Embossing). I gently sponged over this with some Crumb Cake Classic Ink to make the embossing stand out more. Oh, I used my new Windows Framelets to cut all of my layers out. I then decided to layer on a piece of DSP from the new Comfort Cafe Collection. Even though this piece has a floral element, I don't think it's frilly or feminine with this card so, I think it works. Oh I also ran it through my Big Shot with my Lattice E.F. and sponged over it with more C.C. (Check Blue and Dry Embossing). Hey this might not be so difficult after all. :) Or at least that's what I was thinking at the time.

For my focal point I decided to color in the stamp with my Stampin Write Markers. I guess I could have inked it up all in Midnight Muse for an even more "Masculine" look, but you know me, always adding a little something more. Coco Channel would be so disappointed. I used my Stampin Write Markers in Midnight Muse, Primrose Petals, Raspberry Ripple and Wild Wasabi to color in my image and stamped it on Whisper White c/s. You know this has really been a week where none of my cards have been created  easily and without some little Oopsie happening. Well, I went to mount it to the C.C. mat (I cut a piece of C.C. c/s with the same framelet twice, and  cut it so I could layer it behind my W.W. panel to give just a narrow mat instead of a wider one) and realized that I should have used Very Vanilla instead of W.W. AUGH!!!! It was def way to bright against that card. What to do, what to do? You know what to do here..... Think, Think, Think, say it in your best Pooh-Bear voice. Why, I know I'll just add some C.C. ink to it and make it look a little antiquey/vintagey. So definitely not my normal style, but I definitely didn't want to re-color that whole stamp again. So I swirled on some C.C. ink all over the image and c/s. I'm not sure why but some of the colors blended out with the C.C. ink too. I had even waited a while to do this. The M.M. blurred into the center and edges as well as the P.P and R.R around the stamped floral elements. I was not  happy at all, but the more I looked at it, I decided it looked like a really old element and that it went well with the card, so I decided to just go with it. Here's a close-up of the center element-


I think it looks almost like a label or something from an old card. I actually really like it. :) I adhered the C.C. mat to it with Tombow and then adhered that with Dimensionals. The other two layers are also adhered with Dimensionals.

Here's the inside-

Oooops! *EpicFail!* As I went to pull up a shot of the inside, I realized that I must not have taken one. *Headdesk* Oh well, as far as my usual insides go it was pretty boring. Definitely "masculine" with out frills or glimmer. I stamped "Love You" from the Bitty Banners Stamp set in M.M.onto a piece of V.V. c/s.  I inked it with my Stampin Write Markers so I was able to get just the words and not the frame around it. Oh and I sponged the edges too.

So what do you think? I think it fits the challenge requirements and is pretty cool too, even if it is all vintagey. Lol!

Now for today's technique. I know this is a very basic technique, but it's one that I use a lot. You can really change the look of a stamped image by doing this and create endless looks at the same time.

Here's what you'll need- Stamp set of your choice (This works best with line images or stamps with lots of detail), Markers of your choice (Of course I used S.U. because they're amazing and I never have to worry about them coordinating with my c/s or embellishments), Cardstock of your choice to stamp on and last but not least a Blender Pen.

Here's what you do, it's so crazy simple. Really it is, and speaking of this how cool is it that we can now color our stamps different colors in MDS? I know random thought. Sorry. :)
1- Choose the color you want for each different portion of your stamp and color directly on the stamp with that marker.
2- Continue to do this until your entire stamp is inked up. If you're using lighter colors just tilt your stamp around under the lights to see the color and make sure that everything is really inked up. It sure does stink if you forget this step and you have a beautiful image except for that one little spot. Ask me how I know!!! Your stamp  might not look the best at this point, but don't be a Scaredy Cat. Have a little Faith.


3- Once you've finished step 2, other sections of your stamp are probably dry, so you want to make sure you "huff" on your stamp to re-moisten everything. I usually huff a couple of times just to make sure I've got everything "huffed on". Then stamp your image onto your c/s. That's all there is to it. See I told you, Super Simple. I love the effects you can get doing this. What I really love is the look on the faces of my clients when they do this and see the beautiful images they get. This never fails to amaze!
4- Smile when you see your finished project and smile even more when you think about the smile it's going to bring to the face of it's recipient! I L.O.V.E. this part! : D

Oh did you think I forgot about my Blender Pen? Nope you get two Techniques today for the price of one. And since that price is FREE, What a Bargain!!! This second one was the "Main Idea" for today's technique, but since I figure there might be some "newbies" out there who happen to have stumbled upon my little blog somehow, I'd throw the first part in as well. Hey, there was a time when I had never heard of it either. :)

Here's how to turn an *@#%! into an YES! If you've ever tried this technique you have probably encountered one of those *@#%! moments where you coughed, sneezed, heck maybe you just blinked, or could be that the lines were really close together. For whatever reason, you colored out of, or off of your line.

This happened to me. I had colored in the entire center section and was outlining the outer rings when Mayhem struck. No, hes' not only in those insurance commercials (but don't you love him in those...so funny!) Any-whoo, I was almost done and BAM!!! (and not the Tasty, Emeril Lagasse kind of Bam!!! either). My hand slipped and I colored the tips of a few of my leaves Midnight Muse. Now on some of my colored images a little color sharing might be ok, but I was not having it for this one. Here's what I mean-

Sure wish I knew how to add in those handy little arrow pointers, right about now
Well let me just tell you- I was not in the mood to clean that entire stamp and start again. Now, I had heard that you could use your blender pens to "erase" these kinds of mistakes. Having never tried it for this (only on paper and it really doesn't work so well then, kinda like shutting the gate after the cows gone through it) I wasn't sure if it would work. Maybe it was one of those crazy Urban Legends. I figured it was worth a shot. What's the worst thing that could happen? It didn't work and I would have to start over again. I decided to take my chances and try-

Do you have any idea how hard it is to un-color your stamp
at the same time you are trying to photograph you un-coloring
your stamp with a B.B.?


Here's what you do-
1- Carefully swipe your Blender Pen over the misplaced ink until it's all removed. If your area is really big you may have to clean your blender pen at some point during your removal process. Mine was small so I didn't have to clean it till I was done.
2- Do a little *HappyDance* because you don't have to meticulously re-color your stamp.

Woo-Hoo!!! It worked. That Blender Pen just soaked up the color. It's just like touching the end on them on your ink-pads though (Not a good idea BTW! Ask me how I know.), you will really have to wipe it quite a bit to get it all out of your pen and on your scrap grid paper. But it will eventually come out and then you're stamp will look like this-

All clean and ready for the correct color to be applied. 
Well, that's all I have for you today. I hope you liked not only my card, but the techniques as well.  I really hope today's post inspires you to try something new today, whether it's a challenge or a technique or heck even something out of the crafting/designing realm. You know the motto here- Just try.

If you liked today's post or had questions about it, I'd love to hear from you. Feel free to leave me a comment. I read all of them and will be sure to get back to you. Your comments really do make my day! If you  would like to +1 or Pin today's card, I've put the buttons here on my blog for your convenience. Friends and Followers are always welcome too! :)

Thanks so much for taking time out of your busy day to stop by my little corner of the world. You are so appreciated! I hope to see you back here real soon for more fun projects or if you like...more excuses to smile and laugh at my mis-adventures. Till next time-

Remember- Life is often more about the storms than the peace they seek to overwhelm. It's not about Waiting for the storms to pass, but Learning to Dance in the rain.

Be Safe,
Shan


Pin It

Thursday, June 21, 2012

End of the Week Technique #37 Bargello / Thinking Thoughts of Hope for a Friend

Pin It
Hey y'all. Happy Thursday! Just one more day till the weekend. Holy cow and I still have 13 swaps to design and make before Saturday Morning, and no time tonight to work on them! AUGH!!!!! So excited though to have our team meeting Saturday and then begin taking a techniques class (hopefully learn some fun new stuff to post here). Gonna be a busy but fun day. Hope your weekend is shaping up too. :)

Sadly, I found out earlier this week that a team-mate has had a re-occurrence of her Breast Cancer. Even after over 23 years of being a nurse (Amazing for the simple fact that I'm only 29, lol!) the one thing that has always frustrated me was the utter Randomness of Disease and of Violence. I decided to make a card for her and this is what I came up with. I hope she likes it and I hope she gets a laugh when she figures out how much Tombow I used to get it together. My Tombow addiction reliance is a common laughing point in our team. I'm not sure if she follows this or not, but if she does, "Linda, this is coming your way. Try and act surprised when it arrives."

Here's today's card-

Bargello Technique "Pink Ribbon" Card
Ok, so two things about today's card-
1- All cardstock/DSP (except the two pieces of Whisper White), ink, and stamps are retired. I rarely do this but it's what I needed for the card. You can do the technique with whatever c/s, DSP you have on hand.
2- When I laid out my strip for this technique, I had the card in "landscape". The pattern is there you just have to turn your head 90 degrees to see it. I'm not sure when, or why, the orientation got changed. In fact, I didn't even notice it until I began writing this. *SMH!* Remember when I said earlier this week that I show everything I make even when it doesn't turn out "blog perfect"? I present yet another example. I'm still very happy with the card, I just am a little befuddled as to how I manage to do things sometimes. 
Note to self- I do many things well even when I'm tired. Obviously, cutting and pasting isn't one of them. LOL!!!!! Note to everyone- While this is a really neat technique, if you're a little on the OCD side, (your's truly) this may not be the ideal technique for you...just saying...ask me how I know!

For this card I used a base of Blushing Bride. My Bargello technique uses DSP from the 2010-2012 In-Color Collection. The ribbon is an a-la-carte stamp from last year's catalog. If you can find it, it's great to have because you  can make cards for so many causes with it. On the inside I used Sincere Salutations, and two stamps from last years special set benefiting Breast Cancer Awareness. I actually got that set to use for Domestic Violence Awareness, here's one of the cards I made with it, which, unfortunately is the same month as Breast Cancer Awareness. 

Here's a close-up of the ribbon-


I stamped it in Blushing Bride and used one of the new Apothecary Accents Framelets to cut it out. Next I sponged the edges and then let Tink have her way. I was worried at first that the color wouldn't be "pink" enough, but after a little Two-Way Glue and some Dazzling Diamonds, I love how the color turned out! This was popped up on Dimensionals.

Here's the inside-


Down at the bottom I used the flourish and the "H for Hope" stamp. Both were stamped in Blushing Bride. For the flourish, I stamped off once. The flourish is outlined as well with Two-Way Glue pen and Dazzling Diamonds.

Here's a closer look-


I sure do wish the sparkle translated in pictures. It's really pretty.

Now for today's technique, here's what you'll need- DSP 4-6 different designs (same color family), adhesive or adhesive sheets, paper cutter.
Basically here's what you are going to do, I'm including a video to show you.
1- Cut strips of your DSP the same width for the example 3/4", and 6-7" long.
2- Adhere them to a piece of cardstock, alternating the placement of the patterns until you get a pattern you like. In the video she uses a Zyron to make her c/s sticky. Since SU doesn't sell Zyron's I chose to just use Tombow liberally on the back of each piece of DSP. SU sells "Multi-purpose Adhesive Sheets" but I didn't have any. Tombow will work if you don't have any adhesive sheets lying around either.
3- Once everything is adhered you will cut "across" the strips so you get all of the DSP patterns on one strip of c/s.
4- Adhere these to strips to another piece of c/s alternating the patterns until you get one you like i.e. chevron, zig-zag etc. (Believe it or not if you look at my card you can see the "pink c/s with the white stripes and the white cardstock with the pink floral image are in a "zig-zag pattern" They're the easiest to see.
5- Trim off any excess c/s hanging off the edges of your c/s base.
6-Optional- I ran my c/s / DSP through my Big Shot with my Lattice EF.I did this for two reasons, 1- to help "embed" the DSP and ensure it was firmly attached to the c/s base and 2- because I thought it would make it look a little more like a quilt. Embossing is totally optional.
7- Mount your finished piece on your card. I used Tombow instead of Dimensionals because I had already planned to use them for my ribbon and for ease of mailing.
8-Admire your work and smile when you think of the joy receiving you card will bring to someone.

Here's the video. She does a really good job of explaining. Somehow though, it took me much longer to make my card then it did for her. :)

I think this is a really neat technique and I'm going to try it again with DSP that has more contrast and I'll be sure to post that and let you see how it turns out. This is a really good technique to use up your scraps of DSP. I hope you'll give it a try. As always, if you do, I'd love to see what you create.

Well, that's all I have for you today. I really Hope my firend likes it and I hope you liked it too. My hope is that it inspires you to try something new. It doesn't have to be this, just something. After all that's the goal of this blog... to "Just Try". I'd love to hear what you think. Your comments always make my day! Friends and Followers are always welcome too! :) If you have a moment to send up a little prayer for my stamping friend that would be great too!


Thanks so much for taking the time to stop by today. I hope you'll come back tomorrow, I have a Clean and Simple card for you. No, it's still not one layer, but it is pretty.


Till next time-


Remember- Life is often more about the storms than the peace they seek to overwhelm. It's not about Waiting for the storms to pass, but Learning to Dance in the rain.


Be Safe,
Shan

Pin It

Monday, June 11, 2012

Watercolored Motorcycle Card / Sweetshop Sketch Challenge #162

Pin It
Hey y'all. Happy Monday! I hope you had a great weekend. Mine was packed. No MDS Monday today however. I think I got a little behind on my hydration yesterday as I was power washing and painting my front porch railings, because I ended up with a wicked migraine. I will try and get to it today.

Today's card is a special one I made for a special guy in my life. He loves to ride, so I got this stamp set specifically to make a card for him. I know it's retired, hope you won't hold it against me. This card fits the Sweet Stop Sketch Challenge. If you haven't checked them out yet, go on by when you get a chance. They have lots of great sketches.

Here's today's card-

Watercolored & Embossed Masculine Card with SU Motorcycle Stamp
This card is a first for me. This is the first card I've designed where I used my Aqua Painter and Watercolor Paper to create a watercolored image. I really enjoyed doing this and will be doing more. Ok, I enjoyed watercoloring the sky and grass. It was the rest of the focal point that gave me such grief. This was attempt #7. Ok, Ok, Ok, so my OCD was partially to blame. It took me a couple of tries to figure out that I needed to Heat Emboss my stamped image. Then it took another 4 tries to get the color for the bike just right.

Here's a close-up of the focal image-

Watercolored and Embossed Image, SU Motorcycle Stamp


My friend's bike is a beautiful, Royal Blue color, but we don't really have anything that color so I ended up mixing colors, finally settling on Not Quite Navy and Concord Crush layered together. I thought I might be able to use Pacific Point, but believe it or not, Not Quite Navy and Pacific Point look very similar to each other in watercolor.  After I got the color just where I wanted it, I colored over these spots with my VersaMarker and then applied Clear Embossing Powder and Heat Embossed to give the blue areas I glossy finish. I also tried (unsuccessfully) on one of the early attempts to use my VersaMarker & Pewter Heat Embossing Powder, to make some of the metal stand out. :(  I used Wild Wasabi for the grass and a mixture of Bashful Blue and Marina Mist for the sky. (I have to say I'm really excited by how this turned out!) I then sponged the edges with Not Quite Navy and Wild Wasabi. This panel was then popped up with dimensionals on my two colored panels, which were run through the Big Shot in my Lattice Embossing Folder.They were then mounted with dimensionals as well.

For the metallic background I used a piece of cardboard that comes with our DSP, covered it with our Glue Stick then adhered regular Aluminum Foil over it and ran it through my Big Shot with the same Lattice Embossing Folder. If you look closely you can see that even though both elements used the embossing folder, they are very different in appearance. I used the debossed side for the background and the embossed side for the Not Quite Navy and Wild Wasabi panels. I also lightly sponged over them to show make the embossing stand out a little more. The background panel was adhered with Tombow to a base of Night of Navy.

No inside to show you today. It's hard for me to do with most of my masculine cards. After I had mounted everything to the base I felt like something was missing....maybe some brads or something. Not sure. I still kind of feel like it needs something, but I'm ok with it missing whatever it's missing. At the end of the day what really matters is that my friend liked it and he did. I told him I felt like something was missing and he told me he loved it just like it was because I had made it for him. :) Hard to argue with that.

That's all I have for you today. I hope you enjoyed it and I hope it inspires you to get out your Aqua Painters and try something new. I'd love to hear what you think. Your comments always make my day. If you'd like to +1 or Pin this, I've put the buttons on my sidebar for your convenience. Friends and Followers are always welcome too! :)

Thanks for stopping by. I hope you have a great day and that you're able to come back soon.

Till next time-

Remember- Life is often more about the storms, than the peace they seek to overwhelm. It's not about Waiting for the storm to pass, but Learning to Dance in the rain.

Be Safe,
Shan

Pin It

Thursday, May 10, 2012

End of the Week Technique #31 - Lattice Crosses

Pin It
Hey y'all. Happy Thursday! Just one more day to go 'till the weekend. Yea! I hope you're having an Amazing week so far.

Today's EWT is pretty easy, and nice to know. It uses the Lattice Die for the Big Shot. I've been wanting this die for a while, but finally decided to get it because I have a special event tomorrow that needed a Special card. My nephew Jacob has his Confirmation tomorrow and I couldn't be happier for him! I've seen lots of beautiful projects that were made with this die and I know I'm going to get a lot of use out of it, but having seen cards with this technique was the clincher. I'm so glad it arrived in time for me to make this card.

Here's today's card-

Lattice Cross Card made with Lattice Die and Big Shot
First off, let me apologize for the poor (worse than normal) picture quality. I moved my photo box to my stamping room in the basement a few days ago in an effort to try and corral all of my supplies down there. Unfortunately it's darker there than in the kitchen and even the Ott light doesn't seem to be helping. :(

I tried to keep this card pretty simple and as masculine as I could. I used Concord Crush for two reasons. 1- Purple is a "Royal" color and I thought it would suit this occasion and make a nice backdrop for my cross. I felt if I used all Whisper White the cross just wouldn't stand out the same. 2-Even though it's a "purplish color" it's a "strong, deep color" and in truth it often looks more Royal Blue than Purple. Hopefully Jake won't complain about it.

I ran the two pieces of Concord Crush through the Big Shot with my Lattice Embossing Folder. Not only does it give a nice background texture, this side looks like little crosses. All of the Whisper White pieces, including the inside of the card are a beautiful shimmery white. I used Frost White paint with some rubbing alcohol and made my own shimmer mist that I sprayed all the W.W. c/s with. I really wish you could see how beautifully it just seems to glow.

For this weeks EWT, here's what you need-
Big Shot, Lattice Die, Cardstock of your choosing, and Paper Snips

I wish I had the time last night to take pictures of each of the steps. Unfortunately it was getting late and they obviously wouldn't have turned out too nice anyways. There are plenty of You-Tube Video Tutorials for this, but I doubt you will need to watch them.

Here's what you do-
1- Cut out your c/s using your Lattice Die
2- If you turn your cut c/s so the edges point N-S-E-W you'll see the cross starting at the point.
3- Using your Paper Snips simply trim away the other pieces, leaving just your cross. Told you it was simple. :)
4- Mount your cross. I trimmed pieces of dimensionals from the left-overs in my pack and used them to raise my cross off my Concord Crush c/s. It would also be pretty to embed the cross into your c/s by using  an Embossing Folder.
5- Admire your technique and smile at both the beautiful project you made and the thought of the smile it will bring to it's recipient's face.

Here's a bonus *Tip* for you- Take your cut-out cross and lie it on a piece of c/s and then use your shimmer spray to spray all over your c/s.  I did this on a scrap of Concord Crush and it left a beautiful image. I will try and put it to use soon.

Here's the inside-


Thank Goodness the W.W. c/s is shimmery or I would be severely upset at the lack of extra prettiness on the inside of this card. I know it's for a young man, but still. :)

I'm so proud of Jake as he takes this next step in his faith and I hope he likes the card I made just for him. What a special young man. Of course I'm sure he'll like the gift card I put with it even more than the card.

Well, that's all I have for today. I hope you liked today's EWT and card. I really hope however it inspires you to try something new today, it doesn't matter if it's this technique or something else. Remember the goal of this blog is to encourage us all to Just Try.

If you liked today's card, I hope you'll take the time to leave me a comment. I love hearing from you. Also if you liked today's technique and would like to +1 or Pin it, I've put the buttons on my side-bar for your convenience. Friends and Followers are always welcome too. :)

I hope to see you back tomorrow, for another card.

Till next time-

Remember- Life is often more about the storms, than the peace they seek to overwhelm. It's not about Waiting for the storms to pass, but Learning to Dance in the rain.

Be Safe,
Shan


Pin It

Friday, March 16, 2012

Embedded/Embossed St Patrick's Day Card With A Blessing For You

Pin It
Hey y'all. Happy Friday! Are you ready for the weekend? I know I am. I'm also ready for 4pm cuz that's when I get to head down to Verizon to pick up my New I-Pad.

I'm so excited! *Happy-Dance* I have waited so long for one and now I'm getting the Big-Daddy of 'em. It's especially exciting since I seemed to have killed yet another computer. I do believe my Net-Book is D.E.A.D. I have had my I-Touch for years now & my I-Pod as well, hopefully this will bode well for me & Apple products. Sadly, Target didn't have the one I wanted so I couldn't use my Red Debit to save $40 (you have one of those and are saving money right?) so I have to go give Verizon more, but it is what it is.

This card however, makes me Very Happy and I hope it makes you happy too. It's the paper version of this weeks MDS card. I have to say it took me almost as long to punch out all those little hearts and cut the stems & position them just right as it did to create them on the computer.

Here's my card-


I started with a base of Garden Green. I then used a layer of Whisper White and sponged the edges with Garden Green. I used my Small Heart Punch to make the "leaves" of my Shamrocks and I simply free-hand cut the stems out of more Garden Green c/s. I laid them out in what I tried to make appear a random (I hate trying to do that!) pattern around my Lucky 4-Leaf Clover in the center. I wanted the effect to be as if they had been thrown up in the air and scattered around the center clover. Not quite sure I succeeded. To me, they still look to be almost in a straight line down the center. AUGH!

After lightly securing them I put them in my Square Lattice Embossing Folder and ran it through my Big Shot and you get this beautiful Embedded/Embossed Effect. I love it! I used Tombow to secure it to the card base. The sentiment is from Teeny Tiny Wishes and is stamped on Whisper White in Garden Green, Punched out with the Designer Label and then sponged lightly.I backed it with more Garden Green c/s and popped it up with dimensionals.

A sweet little rhinestone in the center of my 4-Leaf Clover finishes off the front of my card.

Here's the inside-


I used my MDS to print the sentiment and because I was afraid my colors wouldn't match just right to do the shamrock in the corner I simply punched one out and put it there myself. I miscalculated a little on the sizing so the border's not quite even, so I fudged it a little by sponging the edge. :)

Not sure if you can read the sentiment so I got a closer picture. It's one of my favorite blessings and I only just found out that it's attributed to St. Patrick. Pretty appropriate to add it to today's card.


This is my wish for all of you my friends who may read this. I hope you have not only a safe and happy St. Patrick's Day but this is my wish for you Always!

Well, that's all I have for you today. I hope you liked today's card and I hope you'll come back tomorrow. I know I don't normally post on Saturday's but I have one more St. Patrick's Day card for you, so I hope to see you then.

If you liked today's card, I would love it if you left me a comment. It's great when I get to hear from you! Also, if you liked today's card, please feel free to +1 or Pin it. I've added the buttons to my side-bar for your convenience. Friends and Followers are also welcome. :)

Till next time-

Remember- Life isn't about Waiting for the storm to pass, It's about learning to Dance in the rain.

Be Safe,
Shan Pin It

Wednesday, February 29, 2012

An Open Seas Birthday

Pin It
Hey y'all. Happy Hump Day! We're half-way through the week. Just two more days to go. :) It's rainy and cold here in the DMV and they're even talking about the white stuff for this weekend, YUCK! I hope it's nicer where you are.

Sunday was my Sweetheart's birthday. (Hey Step-Nanny are you paying attention, I'm talking about him? LOL!)  We're both from the South and love the ocean. One of the things we often talk about is just escaping and getting away from everything out on a sailboat. If I ever won the Lottery one of the first things I would get would be a really nice sailboat. One with a nice master suite that his 6'2 self could fit comfortably in without hitting his head. So, when it came time to create a birthday card for him I knew exactly which set I wanted to use.

I sat down Friday night and got busy and this card came together pretty quickly. Here it is-


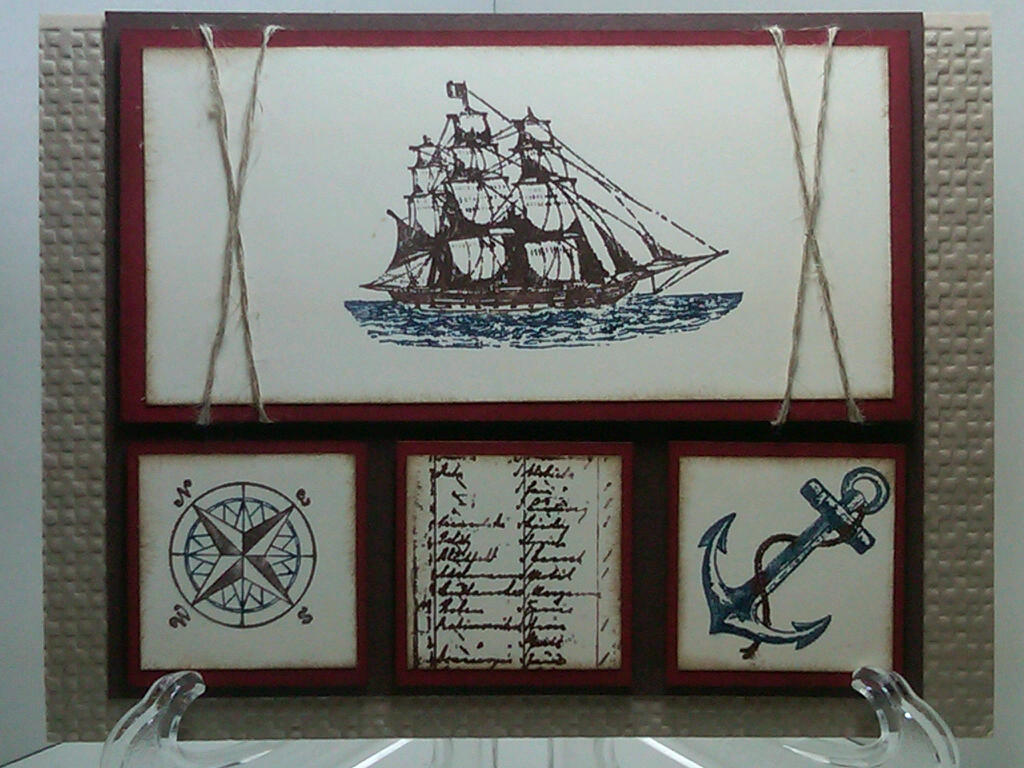
I used a base of Crumb Cake and ran it through my Big Shot with my Lattice Embossing Folder for some texture. I then sponged over that with some Crumb Cake Classic Ink to make the texture show up more. The DSP is retired Nautical Collection from last year, matted on Chocolate Chip and Tombowed to the base. The focal image is from the stamp set Open Seas. I inked it with Chocolate Chip and Not Quite Navy Stampin Write Markers and stamped it on Very Vanilla c/s. This was mounted on Cherry Cobbler and Chocolate Chip c/s and was then popped up on dimensionals. The compass was also inked in Chocolate Chip and Not Quite Navy Stampin Write Markers and stamped on Very Vanilla c/s. It was punched out using my 1 3/4 Circle Punch. I used my Mat Pack and Paper Piercer to pierce the hole for the Vintage Brad I put in the center. I think it goes perfectly there. All the cardstock and DSP on the front of the card were sponged around the edges in Crumb Cake to add dimension and depth. It should have been done on the inside too but alas I did the inside of this and the second card at a later time and forgot. SMH! :(

Here's the inside of the card-


The compass image is from the same set. It's stamped in Not Quite Navy and is stamped off 3 times prior to stamping on the card to give that lighter impression. The sentiment is from Elementary Elegance, our Sale-A-Bration set. You can get this set with a $50 purchase. I cut the stamp so I could get it to stamp in a line like that. But it will still line up and stamp underneath each other in the set like normal as well. Pretty nifty huh?

The good news is he liked his card! Yea Me! And, since I ended up making a second card (did you see it yesterday?) I still have another one for him at another time :)


That's all I have for you today. I hope you'll come back and see me tomorrow.

Don't forget Sale-A-Bration ends in a month. You can shop in my ONLINE STORE and get your FREE merchandise. Have Fun!

Today's Card Recipe-
Cardstock- Crumb Cake, Chocolate Chip, Cherry Cobbler, Very Vanilla
Ink- Crumb Cake Classic Ink, Chocolate Chip and Not Quite Navy Stampin Write Markers
Stamp Set- Open Seas Elementary Elegance
Big Shot, Lattice Embossing Folder
Accesories- Vintage Brads, Mat Pack, Paper Piercer, Dimensioinals, Tombow, Sponges

I hope you liked today's card as much as my sweetie did. If you did, I would love it if you left me a comment. It's great when I get to hear from you! Also, if you liked today's card, please feel free to +1 or Pin it. I've added the buttons to my side-bar for your convenience. Friends and Followers are also welcome. :)

Till next time-

Remember- Life isn't about Waiting for the storm to pass, it's about learning to Dance in the rain.

Be Safe,
Shan


Pin It

Tuesday, February 28, 2012

Open Seas and FMS #23 / My Challenge # 10

Pin It
Hey y'all. Happy Tuesday. I hope you're having a great day, and a great week so far. Just got back from the doctor and am officially on the mend. My oxygen saturation is up to a whopping 98%. Woo-Hoo! Never thought I'd be happy about 98%. Still short of breath on exertion but getting better.

Funny story- my first day of clinicals as a nursing student I had a patient with Dementia, very aggressive, verbally and physically. Not a very nice experience. As I was reading his chart I came across the notation "Pt SOB" I was offended. I told my instructor, "Mrs. Strickland, (who was a gem, by the way) This is horrible! It's not his fault he's not very nice. They shouldn't write something like this about him in his chart, it's an official record!" Hand to God, I said it! I was so serious. I was maybe 20. She looked at me at said all straight-faced... "SOB- Short-of-Breath" and then just smiled. I know she wanted to follow up with a big ole "DUH", but God Love Her she didn't.

Are you laughing yet? I hope so. :)

If not, I hope today's card will at least make you smile. I needed a card for my sweetheart's birthday last Sunday and made one.

But not this one.

And then I thought about how I could use the set for the challenge over at Freshly Made Sketches. I almost didn't submit it for their challenge though, because their guest designer had used the same stamp set and DSP I used in my original card. (I'm going to post it later this week) When I do a challenge, I try and sketch it out before I look at what the Design Team has done so I don't feel like I'm CASE'ing from them. Once I have my idea figured out, I look at what the team has done and what has already been submitted. If mine is different from anyone else's I submit it.

I know this is silly. Why can't more than one person have the same idea? I'm just afraid someone's going to think I copied them and then I'm definitely not going to win anyway. Would you believe one time, I sketched out a challenge, looked at the DT samples and I kid you not, same stamp set, same DSP, same placement everything! I know I should feel like "Great Minds" and all that but nope! So I re-worked my sketch idea, till the only things our cards had in common were that they used the same stamp set, and came up with today's card. I submitted it and I'm really glad I did. You know the Guest Designer I said had used the same set? She thought my card was "Awesome" and how even though we both used the same set how both cards were so "unique".

Here's today's card-


And here's the sketch-


As you can see I turned the sketch on it's side and pulled the squares to the bottom instead of the side, but all of the design elements are still there.

I started with a base of CrumbCake which I ran through my Big Shot in my  Lattice Embossing Folder for some texture. Next came layers of Chocolate Chip, Cherry Cobbler, and Very Vanilla. They were all sponged with Soft Suede. I used my Stampin Write Markers to ink up my stamps from my Open Seas stamp set. I used Not Quite Navy and Chocolate Chip to stamp on the Very Vanilla c/s. The Chocolate Chip layer was Tombowed to the base. Two pieces of Linen Thread were tied around the top section to fill in the extra space and to tie in with the "Nautical" theme. Then the Very Vanilla and Cherry Cobbler c/s pieces were Tombowed together and then applied to the Chocolate Chip piece using Dimensionals.

Here's the inside-


I used the compass image from the front and stamped off 3 times to get the lighter image. However, I realized too late that I forgot to sponge the edges of my Very Vanilla c/s on both cards. SMH... :( I didn't add a sentiment because I'm not sure what I'm going to use this card for.

To be honest I ended up liking this card so much, it was a hard decision as to which card to give my darling. He may still end up getting it for some occasion. :)

Well, I hope you liked today's card and I hope you'll be back soon to see what I have in store for you. If you need supplies to make cards of your own you can shop in my ONLINE STORE 24/7. Remember Sale-A-Bration is only here for another month. Don't wait too long.

Today's Card Recipe-
Cardstock- CrumbCake, Chocolate Chip, Cherry Cobbler, Very Vanilla
Ink- Soft Suede Classic Ink- Chocolate Chip, Not Quite Navy Stampin Write Markers
Stamp Set- Open Seas
Big Shot- Lattice Embossing Folder
Accesories- Linen Thread, Tombow, Dimensionals, Sponges, Clear Blocks

If you liked today's card, I would love it if you left me a comment. It's great when I get to hear from you! Also, if you liked today's card, please feel free to +1 or Pin it. I've added the buttons to my side-bar for your convenience. Friends and Followers are also welcome. :)
Till next time-

Remember- Life isn't about Waiting for the storm to pass, it's about learning to Dance in the rain.

Be Safe,
Shan Pin It

Wednesday, February 8, 2012

End of the Week Technique #19 - Pocket Cards

Pin It
*Edit* Here's how sick I've been- I didn't even realize this didn't post yesterday. It was sitting in Blogger as a draft. *SMH* Darn Pneumonia!

Hey y'all. Happy Humpday! I hope you're having a great day and that you feeling good about making it through half of the work week. We are preparing for the white stuff here *shudder*, luckily our area shouldn't get too much, but still.... ):

I'm posting this week's EWT a little early because I'm still sick as a dawg! I think it's probably back to the doctor for me tonight after work. Going on 2+ weeks now and still wheezing & coughing even with the antibiotics and oral and inhaled steroids, Boo-Hiss! I can't even sleep without narcotic cough syrup, No-Bueno! Heck, even the studio assistants don't want to cuddle because of all the coughing.

At any-rate, I was able to finish this last night but not able to get any other cards done yesterday, so you guys get the EWT a little early. Hopefully, I will be able to get in a little stamping tonight and have something else to show you tomorrow.

My goal for my weekly EWT's is to do new techniques or one's that I either haven't done in a while or don't feel all that comfortable with. This is the first time I have ever made a pocket card on my own, so I'm very excited to show it today. Do you do pocket cards often? They really don't have any more layers than most cards we normally make, and some (depending on whether or not you cover the pocket) may even have less.

Here's today's card-


I used a base of Poppy Parade (Love this color, so sad it's retiring soon). I cut a 8.5 x 11 piece of cardstock lengthwise at 4 1/4. I scored it at 5 1/2 for the bottom. Sorry, I can't remember the top score, you can adjust it to suit your needs. I love this card but looking back now, would probably have scored it another 1/4 inch down so the  score line hit the point of my Framelet.

I used my Corner Rounder Punch to round all the edges. I took a piece of DSP from our Everyday Enchantment DSP pack, that you can get for FREE with a $50.00 purchase, and ran it through my Big Shot with my Lattice Embossing Folder to give it some texture. I just love the look it gives this particular paper. I adhered it to my card base with Tombow. I scored and folded over the top edge, trimming off the excess with my paper trimmer and then secured the flap to my DSP with Tombow. I used a sponge and sponged all my edges with Poppy Parade.

I used Sticky Strip on the inside edges as close as possible to the outside edges to secure the pocket, so it would stay closed. Sticky Strip is really your best bet here. Tombow or SNAIL will not guarantee your pocket will stay securely closed.

For my Hinged Cover I used my Label Framelets. I think this is the first time I've used my Label Framelets on a card here. I've used them for projects but not cards. That somehow makes me sad! The Poppy Parade Framelet uses the next to the largest Framelet and the Very Vanilla one is the next smallest.

I have to admit I initially tried to stamp my heart image without my Stamp-A-Ma-Jig, but had two issues.
1- Of course it wasn't centered perfectly enough.
2- My pad wasn't juicy enough for me to be able to emboss directly from the pad without using the VersaMark so I had to use the old stand-by and "flip the paper over"

This ended up making me much happier anyway. :)  I inked up my heart image from P.S. I Love You in  Poppy Parade centered it with my Stamp-A-Ma-Jig and stamped away. Do you have this set yet? It is a MUST Have! It's great for not only Valentines, but just giving little love notes throughout the year. I then stamped over it with Versamark, applied my Heat and Stick Powder and then my Clear Embossing Powder. I then outlined this entire image with my Two-Way Pen and added Dazzling Diamonds . It really makes the image PoP! I then sponged all the edges with Poppy Parade, and once again rimmed the edge with my Two-Way Pen and added Dazzling Diamonds. I applied dimensionals to the Very Vanilla layer before attaching it to the Poppy Parade layer.


I used my Mat-Pack and Piercing Tool to get the hole for Vintage Brad. I also wanted to make sure that when the framelet was swung over the card it didn't catch so I wanted to elevate it some. I stuck two dimensionals together and left the tabs on the outside edges that would be against my cardstock. I pierced a hole through the center of these as well and put my brad through my Framelets, through the dimensionals, through the base-cardstock to the back of the card-base. It lets my Framelet cover swing up out of the way easily without catching on my note-card below.


See, It swings up and you get a sneak peak of the sweet card inside, just waiting for you to write your love note on.

I used a piece of Very Vanilla cardstock for the note-card. I sponged both sides of the note-card in Poppy Parade, so it would be pretty just in case there was writing on both sides of the card.


Both the sentiment and the cupid image are from the P.S. I Love You set. I told you, Fabulous! I used Poppy Parade for both and for the cupid image I stamped off twice before stamping the image on my cardstock. I used my Crop-A-Dile to punch my hole at the top of my card and used Calypso Coral Bakers Twine for the  loop. Even though it's not the same color, it still coordinates beautifully!

Now, you know I couldn't leave that brad just hanging out on the back of my card, right? Oh, heck no!
Here's what I did-


I stamped this image from the same set in Poppy Parade and punched it out using my 1 1/4 Circle Punch, sponged the edges and applied Tombow to just the outer edges.This allowed me to cover up the brad "legs" but still allows the brad to rotate under the cover. :)

So what do you think? This was so quick and easy and I can't believe I haven't made them before. The Big Shot and our new Framelets really made it extra easy too. You could also make this without the framelet and add embellishments to the fold over flap and have an absolutely beautiful, fabulous card that's ready to give and more than happy to be received.

Today's card recipe-
Cardstock- Poppy parade, Very Vanilla, Everyday Enchantment DSP
Ink-Poppy Parade, VersaMark
Stamps- P.S. I Love You
Big Shot- Labels Framelet, Lattice Embossing Folder
Punches- Corner Rounder Punch, 1 1/4 Circle Punch
Accessories- Calypso Coral Bakers Twine, Vintage Brads, Clear Block C, Heat Tool, Powder Trays, Heat and Stick Powder, Clear Embossing Powder, Dazzling Diamonds, Stamp-A-Ma-Jig, Two-Way Glue Pen, Tombow, Sponges

If you need supplies to recreate today's card or to make cards of your own, you can shop in my ONLINE STORE 24/7.

Well, that's all I have for you today. I hope I have inspired you to try something new, if not Pocket Cards then something else. I know you'll be seeing more of these from me in the future. As always, if you decide to try your hand at these I would love to see what you make.

If you liked today's card, I would love it if you left me a comment. It's great when I get to hear from you! Also, if you liked today's card, please feel free to +1 or Pin it. I've added the buttons to my side-bar for your convenience. Friends and Followers are also welcome. :)
Till next time-

Remember- Life is not about Waiting for the storm to pass, It's about learning to Dance in the Rain.

Be Safe,
Shan Pin It

Thursday, November 17, 2011

Merry Christmas Stampin 411 SSC 229 Part 2

Pin It
Hey Y'all! I hope today finds you warm and dry! That is surely NOT the case here in the DMV! Had I not seen the weather and known this mess was coming I would have been afraid I brought this mess upon us by mentioning those two bad Horrible 4-Letter words the other day.... you know the c word and the s word. UGH! It was so cooooold and windy and then the rain started at the slug line this morning...The good news though is that at least it made me feel like it was winter, so I could feel good about posting a Christmas card! Bright side of things, right?

So, for those of you that are new here, I am somewhat (A Lot) technologically challenged. In fact, that I have managed to get to this point in my blog without any major problems is a minor miracle in it's own right. I'm sure there is probably a way to have linked yesterday's post and today's but I sure don't know it. SMH.... Thanks for hanging with me as I figure this stuff out! :-) Yesterday's post is linked to the Stampin 411 page, I'm posting today for anyone who doesn't see that page. Hope that makes sense.

I'm a Scaredy Cat. Did you read the name of my blog? But I'm trying to not be such a big one at least and I entered a challenge a few weeks ago. This week though, I think I lost my ever-luvin-mind! (What? It's a real southern word) I found and entered two of them.

Yes, I said two. On the same day. Like I said... Lost my ever-luvin-mind! The good news is when I saw the sketches I had a plan in mind, right away. Unfortunately, they both had the same central element. So a little tweaking had to occur, but I got to go home and stamp & play all evening! SCORE! I have to say I was really pleased with how they both turned out.

This whole challenge thing though is like being back in High School or like being Single and Dating again. It's soooo intimidating and stressful! (Especially for us Scaredy Cats! Right?!?) It's not just me is it? I mean you're putting yourself out there, exposing yourself to everyone. Is it good enough? Will they like it? Will they get it? Augh! Is it in line with what others are doing or totally off base? Oh, but maybe if I try enough, it won't be as hard, right?

Well, Stampin 411 has been a challenge that I have followed for some time. I really like it because they give you a suggestion for the sizes of the different layers. I don't know about you, but this is one of the hardest parts for me, trying to figure out the measurements for different layouts, so this really helps simplify things for me. You can even go to the site and print out the challenges. I find it a great resource for card layouts.

Here's this weeks sketch-


I saw this and thought of the Poinsettias from the WOW Christmas Card Class from my upline Robin Merriman. Now that it's so C--D outside and making me feel Christmassy it seems like the perfect card too!
However, it was 70 on Tuesday when I was making it. *TEAR* I want summer back!

Here's my card-


I stuck right to their sketch and suggested dimensions except for the Wild Wasabi strip which I cut long and trimmed down.

I started with a base of Real Red cardstock. My next layer was Holy Berry DSP  that I had run through the Big Shot in my Lattice Embossing Folder. I love the texture it gives it.This is absolutely one of my favorite folders! I then used a strip of Wild Wasabi I embossed with the Snow Burst Folder. I had to do this piece twice. You definitely have to cut your material big and trim down when you use this folder if you want precise sizing. I adhered both of those layers down with Tombow so they would stay put.

The next layer of Real Red and Very Vanilla is Tombowed together and I heat embossed the Merry Christmas from Four for the Holidays in Gold Embossing Powder and then popped it all up with dimensionals.

The beautiful poinsettia was from Robin's class. Have you been to her blog? Check her out.... She has such Amazing stuff!....But, wait till after you're finished here. I was so excited I was able to turn it so it fit on the card, and in the envelope. It looks like it extends past the edge at the top, but it doesn't really.

Here's the inside-


I stamped the greeting in gold and was done.  For those of you that know me, Yes, I forgot to stamp something else on the inside. Truth be told, at this point I was tired. I had to remember to stamp the greeting, since it wasn't part of the challenge. LOL.

And Tink has been on Vacation. I think there was enough shimmer on the front of the card, though. I'm sure she will be back in full force soon.

I hope you liked today's card. It's starting to feel like Christmas around here so there will be more coming. If you liked it, I would love it if you left me a comment. It's great when I get to hear from you! Also, if you liked today's card, please feel free to +1 or Pin it. I've added the buttons to my side-bar for your convenience. Friends and Followers are also welcome. :) 

If you need supplies to make today's card or cards like it you can shop in my online store 24/7.

Card recipe:
Cardstock- Real Red, Very Vanilla, Wild Wasabi, Holly Berry DSP, Red Glimmer Paper
Ink- Versamark
Big Shot- Lattice Embossing Folder, Snow Burst Embossing Folder
Punch- Blossom Petals Builder Punch, 1 1/4 inch Circle Punch
Misc- Vintage Brad, Mat Pack, Piercing Tool, Tombow Adhesive, Stampin Dimensionals, Gold Embossing Powder, Heat Embossing Tool

Well, that's it for today.  If we don't see each other tomorrow I hope you have a great weekend and get to spend it with friends and family and of course Stamping. I'm going to spend tonight finishing up my swaps for this weekend's big meeting and Valentine's themed Swap, hard to believe that's what we're working on already...

Till next time,

Be Safe,
Shan


Pin It

Wednesday, November 16, 2011

Merry Christmas- Stampin 411 Challenge SSC 229

Pin It
Hey y'all - No, I'm not posting twice in one day. (I wish) I'm just putting this picture up so I can link to it today. The challenge ends tomorrow morning at 8am and with class tonight, well, if I don't submit it now I might miss it... and I think it's too pretty to miss. Hope you think so too. ****Note**** I came back and edited this to include the blog entry. See below the picture and initial sign off. Thanks! Shan****

Here's my card-


Here's the Stampin 411 Sketch-


I'll be back tomorrow with the blog to go with it....

Till then-

Be Safe,
Shan


Hey Y'all! Here's the continuation from the above post.
I hope today finds you warm and dry! That is surely NOT the case here in the DMV! Had I not seen the weather and known this mess was coming I would have been afraid I brought this mess upon us by mentioning those two bad Horrible 4-Letter words the other day.... you know the c word and the s word. UGH! It was so cooooold and windy and then the rain started at the slug line this morning...The good news though is that at least it made me feel like it was winter, so I could feel good about posting a Christmas card! Bright side of things, right?

So, for those of you that are new here, I am somewhat (A Lot) technologically challenged. In fact, that I have managed to get to this point in my blog without any major problems is a minor miracle in it's own right. I'm sure there is probably a way to have linked yesterday's post and today's but I sure don't know it. SMH.... Thanks for hanging with me as I figure this stuff out! :-) Yesterday's post is linked to the Stampin 411 page, I'm posting today for anyone who doesn't see that page. Hope that makes sense.

I'm a Scaredy Cat. Did you read the name of my blog? But I'm trying to not be such a big one at least and I entered a challenge a few weeks ago. This week though, I think I lost my ever-luvin-mind! (What? It's a real southern word) I found and entered two of them.

Yes, I said two. On the same day. Like I said... Lost my ever-luvin-mind! The good news is when I saw the sketches I had a plan in mind, right away. Unfortunately, they both had the same central element. So a little tweaking had to occur, but I got to go home and stamp & play all evening! SCORE! I have to say I was really pleased with how they both turned out.

This whole challenge thing though is like being back in High School or like being Single and Dating again. It's soooo intimidating and stressful! (Especially for us Scaredy Cats! Right?!?) It's not just me is it? I mean you're putting yourself out there, exposing yourself to everyone. Is it good enough? Will they like it? Will they get it? Augh! Is it in line with what others are doing or totally off base? Oh, but maybe if I try enough, it won't be as hard, right?

Well, Stampin 411 has been a challenge that I have followed for some time. I really like it because they give you a suggestion for the sizes of the different layers. I don't know about you, but this is one of the hardest parts for me, trying to figure out the measurements for different layouts, so this really helps simplify things for me. You can even go to the site and print out the challenges. I find it a great resource for card layouts.

Here's this weeks sketch-


I saw this and thought of the Poinsettias from the WOW Christmas Card Class from my upline Robin Merriman. Now that it's so C--D outside and making me feel Christmassy it seems like the perfect card too!
However, it was 70 on Tuesday when I was making it. *TEAR* I want summer back!

Here's my card-


I stuck right to their sketch and suggested dimensions except for the Wild Wasabi strip which I cut long and trimmed down.

I started with a base of Real Red cardstock. My next layer was Holy Berry DSP  that I had run through the Big Shot in my Lattice Embossing Folder. I love the texture it gives it.This is absolutely one of my favorite folders! I then used a strip of Wild Wasabi I embossed with the Snow Burst Folder. I had to do this piece twice. You definitely have to cut your material big and trim down when you use this folder if you want precise sizing. I adhered both of those layers down with Tombow so they would stay put.

The next layer of Real Red and Very Vanilla is Tombowed together and I heat embossed the Merry Christmas from Four for the Holidays in Gold Embossing Powder and then popped it all up with dimensionals.

The beautiful poinsettia was from Robin's class. Have you been to her blog? Check her out.... She has such Amazing stuff!....But, wait till after you're finished here. I was so excited I was able to turn it so it fit on the card, and in the envelope. It looks like it extends past the edge at the top, but it doesn't really.

Here's the inside-


I stamped the greeting in gold and was done.  For those of you that know me, Yes, I forgot to stamp something else on the inside. Truth be told, at this point I was tired. I had to remember to stamp the greeting, since it wasn't part of the challenge. LOL.

And Tink has been on Vacation. I think there was enough shimmer on the front of the card, though. I'm sure she will be back in full force soon.

I hope you liked today's card. It's starting to feel like Christmas around here so there will be more coming. If you liked it, I would love it if you left me a comment. It's great when I get to hear from you! Also, if you liked today's card, please feel free to +1 or Pin it. I've added the buttons to my side-bar for your convenience. Friends and Followers are also welcome. :)

If you need supplies to make today's card or cards like it you can shop in my online store 24/7.

Card recipe:
Cardstock- Real Red, Very Vanilla, Wild Wasabi, Holly Berry DSP, Red Glimmer Paper
Ink- Versamark
Big Shot- Lattice Embossing Folder, Snow Burst Embossing Folder
Punch- Blossom Petals Builder Punch, 1 1/4 inch Circle Punch
Misc- Vintage Brad, Mat Pack, Piercing Tool, Tombow Adhesive, Stampin Dimensionals, Gold Embossing Powder, Heat Embossing Tool

Well, that's it for today.  If we don't see each other tomorrow I hope you have a great weekend and get to spend it with friends and family and of course Stamping. I'm going to spend tonight finishing up my swaps for this weekend's big meeting and Valentine's themed Swap, hard to believe that's what we're working on already...

Till next time,

Be Safe,
Shan


Pin It

End of the Week Technique (EWT) #8 Versamark Marker - Embossed Gently Falling Card

Pin It
Hey y'all! I hope this post finds you well and if not sunny and warm, at least dry. Here in the DMV we have rain with 100% chance of more rain throughout the day. Seriously?!? You couldn't even give us 1% chance of sunshine. SMH... Oh well at least it's not my 2 least favorite 4-Letter words Cold and SNOW!

On the upside as I walked in to work this morning, the sidewalks were strewn with beautiful multicolored leaves. I do have to say that's one thing we never got much of back home. There's even this big tree across the street from my office and every once in a while when the wind is just right, you'll see a little swirling and fluttering of the golden leaves as they fall. So pretty!

It seemed kind of appropriate for today's card since it uses the Gently Falling stamp set. I'm a little early this week with the EWT but I put this card in as a challenge entry and wanted to be able to link it up here so, I'll try and do an extra post tomorrow or Friday with the other challenge I entered.

Have you been to Try Stampin on Tuesday? Not sure how I stumbled upon CherylAnn's regular site, but I'm so glad I did! Check her sites out....but after you finish here. :-)

Here's the sketch from Try Stampin on Tuesday-


Pretty simple, not a lot of fuss. I had an idea for the sketch as soon as I saw it. Too bad it had the same centerpiece as the idea I had for the Stampin 411 challenge. What to do....What to do? You know my inner Pooh-Bear came out- Think, think, think, think....come-on you know you just said it with me in your inner Pooh-Bear voice as you read that. :-)

Well, I have to say my upline Robin Merriman is such a creative inspiration for me. I missed her Firehouse camp last week, but saw the cards and wish I hadn't because they were SOOOOO Amazing! She posted one yesterday, here, that became the inspiration for my challenge card.

Here's my card-

As you can see, I only deviated from the sketch by changing the circle to a square. I have to say though, I only did that because I didn't have anything to make a large circle with, however I really like how it turned out. I hope the Try Stampin on Tuesday people aren't super sticklers for not deviating from the sketch.  I used a cardbase of Soft Suede and layered that with Very Vanilla. The next layers have DSP from the Spice Cake collection. So pretty! The more I use this collection, the more I like it. The final layer has Pool Party added for a pop of color and a bit of the unexpected. I sponged all the layers gently around the edges with Soft Suede and used Tombow to adhere them all.

For the Spice Cake sections, I ran them through my Big Shot with my Lattice Embossing Folder and then lightly sponged the top with Soft Suede to help define the embossing just a little.

Tip- When you use an Embossing Folder that has a lot of impressions or makes really deep or intricate impressions, Cut your cardstock larger than you need to (you can always cut it down to size). It will shrink up! Ask me how I know. In fact for this card I embossed a 5 1/4 x 4 piece of DSP and didn't have much waste at all.

For my center piece I used my Gently Falling stamp set and this single leaf fit like it was made for my card. Thank-you very much Stampin' Up! I was soooo excited to finally get to use this set as a 2-step set. I used Pool Party, More Mustard, and Old Olive. I don't have the In-Color markers yet so I inked up my stamp with my Pool Party Classic Ink Pad and then using a q-tip randomly (UGH, Random-U know it stressed me out, too!) swabbed off some of the ink. I then used my Stampin Write Markers to color in the bare areas. I stamped onto a scrap piece of Very Vanilla and then inked up the outline stamp in Soft Suede (it's becoming a favorite color of mine) and stamped.

For those of you that know me, or have been here before, you know how OCD I am about stamp placement. I know that one of the nice things about the 2-step sets are they don't have to be perfect, but can I just say I still had fits when I saw the placement wasn't perfect. I took a breath though and decided the Very Vanilla showing through was a nice color addition and left it like it was. Boy, it was hard though to not flip that scrap over and stamp again!

So, are you wondering about today's EWT yet? Well, I think the leaf would have been pretty enough as it was, but I wanted to make it a little more special. (As if a Blue leaf isn't special enough, Shan?)

Well, I recently got a Versamark Marker and have been dying to try it out. I wanted to edge my pretty leaf in Gold and I knew just how I was going to do it! (Or at least I hoped I knew just how I was going to do it)

I grabbed my Versamark pen which, by the way, is dual ended (so nice) and used the Brush-Tip to outline my leaf. (It's just like using the brush end of your Stampin' Write Markers). I went just outside of both images, whether it was the solid line or the colored image. I then coated it with my Stampin' Up Gold Embossing Powder and fired up my Heat tool and watched as my leaf went from pretty to OOOOHHHHH! (And Yes, I did my Happy Girl Dance, yes I did).

But, as pretty as it was, this Scaredy Cat wanted MORE! I wanted the whole leaf to be Extra Pretty and Shiny, so throwing caution to the wind (who knew how this was going to work out...was I going to have to scrap everything and start over with a fresh stamp....oh stress, oh worry...) I took my Versamark Marker back out and ....wait for it.... Colored in my Whole Leaf! I was so excited the colors didn't blur or anything. So I held my breath (figuratively not literally, because that would have been really hard *tee-hee*) and using my Clear Embossing Powder and Heat tool waited for the magic to happen. I was not disappointed! I watched it go from OOOOHHHH! to WOW! (And Yes, I did my Happy Girl Dance a second time!)You can't really see it in the first picture so here's another one-


Ooooohhhhh..... Aaaahhhhhhh! Right! So Shiny and Pretty! Not bad for my first try, huh? This is definitely a technique I will be trying again! How about you? It's so quick and easy and gives almost Instant Gratification (always nice!) and such amazing results.

I cut it out with my Paper Snips as close to the embossing as possible and the positioned it with 4 Stampin Dimensionals, one at the N, E, and W points of the leaf and one a little low middle and then used some of the side Dimensional to put behind the stem.

I did do the inside of the card, but it was getting late and I forgot to snap a picture of it. Sorry. It uses the sentiment "Magnificent!- The perfect word for you" in Soft Suede on Very Vanilla. The sentiment is from our Hostess Collection "Perfect Words"

Well, that's it for today. I hope you like my card for the sketch challenge and today's EWT. I hope you try it! I think you'll be very happy with the results. If you liked today's card, I would love it if you left me a comment. It's great when I get to hear from you! Also, if you liked today's card, please feel free to +1 or Pin it. I've added the buttons to my side-bar for your convenience. Friends and Followers are also welcome. :)

Card Recipe-
Cardstock- Soft Suede, Very Vanilla, Pool Party, Spice Cake DSP
Ink-Soft Suede and Pool Party Classic Ink Pads and More Mustard and Old Olive Stampin' Write Markers
Stamps- Perfect Words
Embossing Powders- Gold and Clear
Big Shot- Lattice Embossing Folder
Others- Versamark Pen, Heat tool and Powder Trays, Tombow, Stampin' Dimensionals

If you need supplies to make this card or others you can shop in my Online Store, 24/7.

Come back soon and see what else I have for you. I have a Stampin 411 Challenge to post probably tomorrow.

Till then,

Be Safe,
Shan Pin It