Showing posts with label Petal-A-Plenty Embossing Folder. Show all posts

Tuesday, September 17, 2013

A Wishy-Washi Thank-You :) / NAC #55

Pin It
Hey y'all. Happy Tuesday! I hope you're having a good week! I have a bright a sunny card for you today.

I don't know where you are, but not only has it been a little overcast here in the DMV, but yesterday we had a very sad day with the mass shooting at the Navy Yard. So even though this card was made a few weeks back for a different occasion, it really fits for today's post. By the way, if you get a moment and you believe in the power of prayer or at least the power of goodwill, if you get a chance to send some good thoughts and positive energy to the families of those that lost love ones up here and those who will be struggling to go to work now due to this tragedy, I'm sure it would be much appreciated by all.

Do you ever find it funny how you get inspiration for your cards or projects? This week at Nacho Average Challenges  we have a sketch challenge, and as soon as I saw this week's sketch I knew what I wanted to use right off the bat. YEA!!! I just didn't know how I was going to get there? *Facepalm* But I persevered and I'm so excited with the end result. Here's what I came up with-

Can I just tell you that I did a little happy dance when I finished with this card? Yep! *HappyDance* 

Ok- that was after I conceded that I wasn't going to be able to easily add the gift card under the embossed framelet piece. But really, it didn't take me long to give that little bit up, then I danced around. I originally wanted to lift the flap up and have the gift card underneath, but in the end it wouldn't have laid nice enough so I'm happier with it like this. Many of you know I'm trying to sell my house. Well, I have some really good neighbors that built their house at the same time that I did 11 years ago. While I've been a single mom, the husband has often helped to shovel my sidewalk in the winter or mow my yard in the summer. I would go out to do it and just find it already done. So I got them a Gift card so they can go out to a nice dinner. They have a sweet little girl that I've watched grow up, and there's enough on the card for her to go too, but I'll offer to watch her so they can have a date night.

Here's the sketch we were using-

Sorry about the blurry photo, somehow I think I missed the newest upload. :(

When I first saw this sketch I knew I wanted to use Washi tape. Isn't funny how that works? Not DSP, not ribbons or embellishments, Washi right off the bat. Then I just had to figure out the rest of it. I have to say it actually came together pretty quick especially since my stamp room is in the closet.  I used my Gingham Garden Washi and DSP in addition to my Perfect PolkaDots and Plenty of Petals Embossing Folders. I created the whole card sitting on the floor of one of my spare bedrooms in about 30 minutes. LOVE when that happens. Normally I have a pretty inside to show you but I forgot to get pictures. More pretty washi inside though.  

Well that's all I have for you today. I hope you enjoyed it and I hope it brings a little sunshine and cheer into your day. What I really hope though is that it makes you want to pull out your supplies and play along with us Nachos. We can't wait to see what you come up with! If you have questions about today's card, or just want to give me a little digital love, feel free to leave me a message below and I'll be sure to get back to you. Your comments make my day!

Thanks so much for taking time out of your busy day to stop by my little corner of the world. you are very appreciated! Till next time-

Remember- Life is often more about the storms than the peace they seek to overwhelm. It's not about Waiting for the storms to pass, but Learning to Dance in the Rain.

Be Safe-
Shan


Pin It

Friday, August 31, 2012

Double Embossed Evergreen Center Step Card (Wow, That's A Mouthfull) / NAC#9

Pin It
Hey y'all. Happy Friday! I hope you're getting ready to enjoy the long Holiday weekend. I plan on kicking back and relaxing as much as possible and hopefully my stooopid arches will continue to heal and I'll be able to run again or at least walk reasonably well. I am going to Jimmy Buffet Saturday night, but other than that my weekends wide open. Wanna come stamp and play!?!

I've been trying to figure out for the last few days what I wanted to do with the sketch over at Nacho Average Challenge's site this week. I've done all of their challenges so I wanted to make sure to get this one done too. It seemed like a pretty C&S sketch, but you know how I am with C&S! HAHAHA!!! Well I kept batting around ideas and had finally decided on the set I thought I wanted to use, I just had to figure out the rest of it.

Well, then inspiration struck! I won't tell you where I was and what I was doing when it struck, but it struck and I was so excited to get to the studio and get started. I got downstairs and discovered it was going to work. Woo-Hoo! *Happy Dance* Then all I had to do was figure out just  how I was going to do it. It's almost never just Clean & Simple or even Easy with me, but then you most likely already knew that. :)

Here's today's card- Sorry for the Ginormous Picture, I had to get it this big so you could see all the details.


Merry Christmas Center Step Card featuring
Evergreen Stamp set 

AUGH!!! I really wish you could see this in person. It's definitely one of those that when you finish it you say, "Wow! I made that!!!" You can't see the Gold Embossed lettering in that picture so here's another view (a little smaller) but this time you can't see the dry embossing. UGH!

Merry Christmas Center Step Card featuring
Evergreen Stamp set 

Here's the sketch I was using from NAC


I was thinking about a card I wanted to make for my baby brothers with the monster set and how I had been thinking of a step card and it hit me that a "center step card" would leave a middle section that was set apart from the sides and it reminded me of the sketch.

Oooohhhh, I was ready to get cracking. Just one problem, I had never made a center-step card. Yep, over a year of blogging, 246 posts and not one center step card. Well off to You-Tube for a little tutorial help. I got the measurements, went to the studio and got started. Luckily, I've learned to practice on old colored cardstock that I won't miss. I got it right on the first try. However, it wasn't going to fit in a regular envelope. Now I don't mind making envelopes, in theory, but I want a card I can mail or that someone else can mail with out any hassles. Time to try again. Now, I've told you guys this before. There's two kinds of math I can do easily. Tip Math and Medic/Nurse Math. I can't even keep my checkbook balanced without the app. *SMH* Let me just reassure you, this was not one either one of those kinds of math. I persevered though and after 2 more attempts had a center step card that would fit in a standard envelope. *Yea!*

Could I just be happy and leave it at that? Of course not! I didn't want to add DSP to the side panels because I really wanted my center panel to be the star. I couldn't however just leave the sides blank. I decided to try and Dry Emboss them. Now I'm sure someone, somewhere has done this before. I'm sure I can't be the first one to do it (although that would be really Super Cool!) but I've never seen it done before. It took me two more sample cards and multiple attempts on the first  three pieces too before I was able to get it right. I even took pictures, but of course I didn't remember to take them until after I had perfected it, but still you'll get the idea.

First off , the measurements for this card so it will fit a standard envelope and the Embossing Folders- I will make a Center Step Card a EWT and take step by step pictures next time.

1- Cut your c/s (I used Night of Navy) - 4 1/4" x 11"
2- Measure in 1" from both long sides and cut from 1" (up from the bottom ) to 6 1/2". This will give you the cuts that will become your center panel.
3- Score your outer scores. On the long sides score (from the outside edge to your cut lines) at 1", 2" and 6 1/2" (I used my Simply Scored for this)
4- Score your inner score. On the long edge score the center  at 5 1/2" from one cut line to the next.
5- The easiest way to fold is this. Lift your center panel up slightly and "Mountain Fold" on your 5 1/2" score line. "Mountain Fold" at both of your 6 1/2" score lines. "Valley Fold" at both 2" score lines and finish off with "Mountain Folds" on both of your 1" lines.

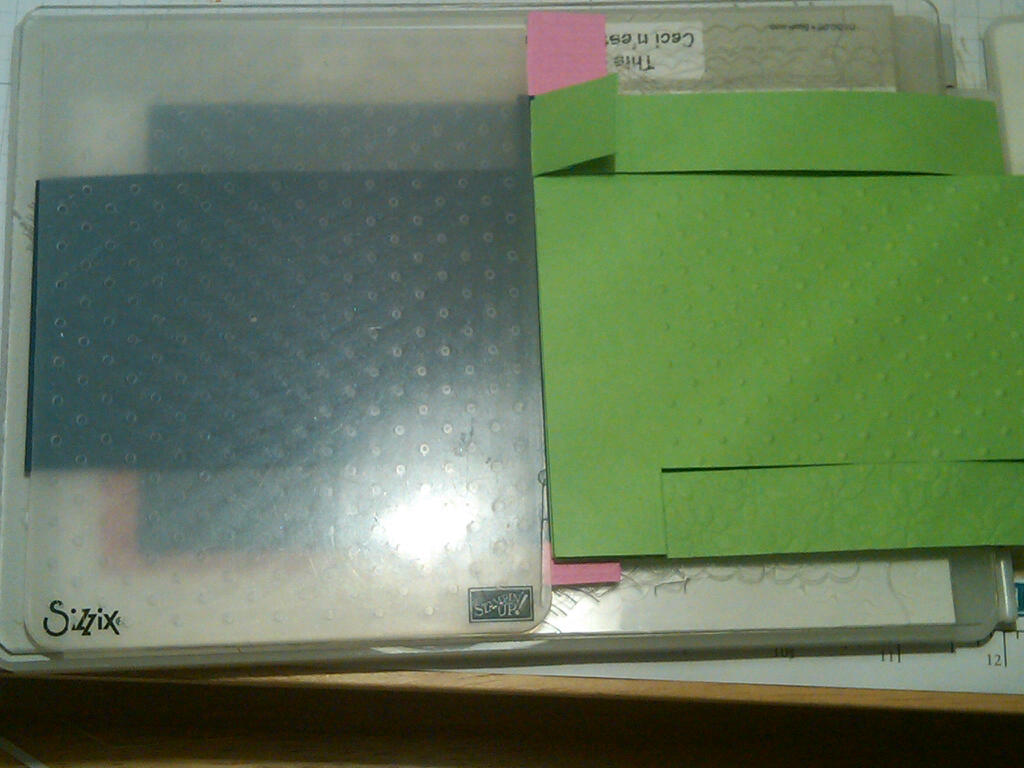
Now your card is folded. Take your first Embossing Folder, I used Petals-a-Plenty and place it so it's under your center panel and sandwiched over your two side pieces. Make your regular "sandwich" and run it through your Big Shot. I had mine with no tabs just the platform. Here's what it will look like-

Disregard the Embossed Center Panel. Like I said I went back and took pictures
 after I knew it had worked, but didn't want to run another piece of c/s through at that point.
You will have beautifully embossed side panels. I guess you could leave it with just the side panels done, but I wanted just a little something more. I know what you're thinking, "Shan trying to do something "More"? No way!?!" Yes-WAY!!!

Take your second Embossing Folder, I used Perfect Polka Dots, and place your center panel inside of it extending it fully across both side panels. Yes, this will flattened the embossing on your side panels a little but trust me when I say it makes for a very nice "subtle" embossed pattern and it also allows for your center panel to really be your focal point. You're going to need to add some shims to the bottom portion of your card. Ok, technically you don't but I found if when I didn't, and the card was "standing open" you could see the embossing was "bolder" in the very bottom of the side panels. It was just enough to bother me. If it doesn't bother you,  no worries, if it does this is how I fixed it.

See my samples. I told you old c/s. One is Pixie Pink and I'm not sure what the other is  Gable Green maybe.
I took the bottom one inch off a previous sample and slid it in from the bottom of the card behind the front bottom panel. I then took the green sample card (I forgot to stop cutting at 1" and cut all the way to the end of the c/s. This is another reason why you practice on old c/s.) and used it as a shim. When the card is "closed you will have 4 layers of c/s. Place this over the top of your bottom 1" section of c/s. As you can see that brings it up to the same height as the Embossing Folder. Build your sandwich as you normally would (for me No tabs, cutting plate under and over c/s and embossing folder) and run it through your Big Shot. This will allow you to emboss your center panel and get that inner lower portion of the side panels pretty close to the appearance on the top. If it's still a little too embossed for your tastes, you can also take your bone folder and carefully burnish just a little.


Look at the pretty Polka Dot Embossing on the center panel and the soft lightly embossed appearance on the side panel.

For my focal point I used my Crumb Cake Classic Ink Pad. I inked up my stamp and stamped off once before stamping the image onto my Naturals White Cardstock. I then inked up the words with my VersaMark pad and using my SAMJ (of course) stamped my second image. Gold Embossing Powder was added and set with my Heat Tool. The N.W. panel was adhered to an Always Artichoke panel with Dimensionals and then this whole panel was adhered to the center panel with more Dimensionals. Here are the Measurements for the center panel. Always Artichoke 3 3/8" x 3 7/8". Naturals White 3 3/4 x 3 1/4.

I had to move the "banner" portion of the sketch down so you could read all the words but otherwise I think I captured the sketch in a fun, unique way. I embossed the greeting Merry Christmas,  from Greeting of the Season, and adhered it in the same manner to the bottom front panel. The measurements for that piece are A.A. 7/8" x 1 3/8 and N.W. 3/4" x 3 1/5". Oh I also sponged the edges of the A.A. and N.W. pieces of c/s. I used Crumb Cake on the N.W. and it almost has a golden hue to it like the heat embossed areas. :)

I didn't even think of putting anything inside to write on. Hope you'll forgive me for that. After two hours of working on this card I honestly thought it was through. I think though that I will probably just add a piece of c/s to the back for a holiday note. I really wish you could see this card in person. It's just Wow!

Well, that's all I have for you today, but I guess since it was packed full with pictures and info, maybe you won't mind that I forgot something. I hope you liked it and I hope it inspires you to try something new, maybe a new card style or a challenge or better yet, do both! There's still time to play along with this challenge. If you have questions or comments about today's card, I  hope you'll take a moment to leave me a message. I love hearing from you, read them all and they really do make my day. Friends and Followers are always welcome too! :)

Thanks so much for taking time out of your busy day to stop by my little corner of the world. You are very appreciated! I hope you have a safe and happy holiday weekend, filled with lots of time for Family, Friends and of course Creativity. Hope to see you back here soon. Till next time-


Remember- Life is often more about the storms than the peace they seek to overwhelm. It's not about Waiting for the storms to pass, but Learning to Dance in the rain.

Be Safe,
Shan
Pin It

Wednesday, July 18, 2012

Christmas in July #2 - A Holiday Mini Preview

Pin It
Hey y'all. Happy humpday! Just two more days to go until the weekend. Woo-Hoo! I've been working on some holiday cards for upcoming classes and have another one for you today. Since I'm planning on at least one Christmas Card class a month until Christmas, you can probably expect 1 card/project a week that's holiday themed.

Here's today's card-


This card is a little bit outside of my normal style. It feels a little "vintagy" to me, which is totally not me, but I'm happy with how it turned out and I showed it to a friend yesterday who really liked it as well. It features a sneak-peek of 4 new products that will be available August 1st. As a demonstrator, I'm lucky enough to get access to new products a month before they become available to the public. The embossing folder is new as well as the sentiment and the DSP. My Top-Note is cut from a piece of Baja Breeze cardstock and run through my Big-Shot with the new embossing folder. Isn't it pretty? The sentiment is stamped in Early Espresso and yes, I will admit to using my Stamp-A-Ma-Jig to make sure my sentiment was centered "just right" in the center of my embossed area. I sponged the top of the embossing and the edges lightly with Soft Suede. It really makes the embossed areas "pop". I used Dimensionals to elevate this layer. Below it is a piece of DSP from our new Festive DSP pack. Lots of really pretty DSP at a great price. Wait till you see them all, 4 pages of each design. :) This was topped off with a 1/2" strip of Crumb Cake that I ran through my Big Shot with the Petals-A-Plenty E.F. I thought it echoed the pattern in the DSP as well as reminding me of poinsettias. All of this is on an Early Espresso base.


Here's the inside-


Isn't this sentiment pretty? It reminds me of the lovely Hand Penned Sentiment set from last year's catalog. It's from the same sentiment set as the one from the front. See that pretty little ornament? It's also in the new catalog. Not only is there a beautiful stamp set with lots of fabulous ornaments in it, there's also a matching set of Framelets. You can even bundle them together and save a little money. You know what that means right? More money to spend on other new product. : D


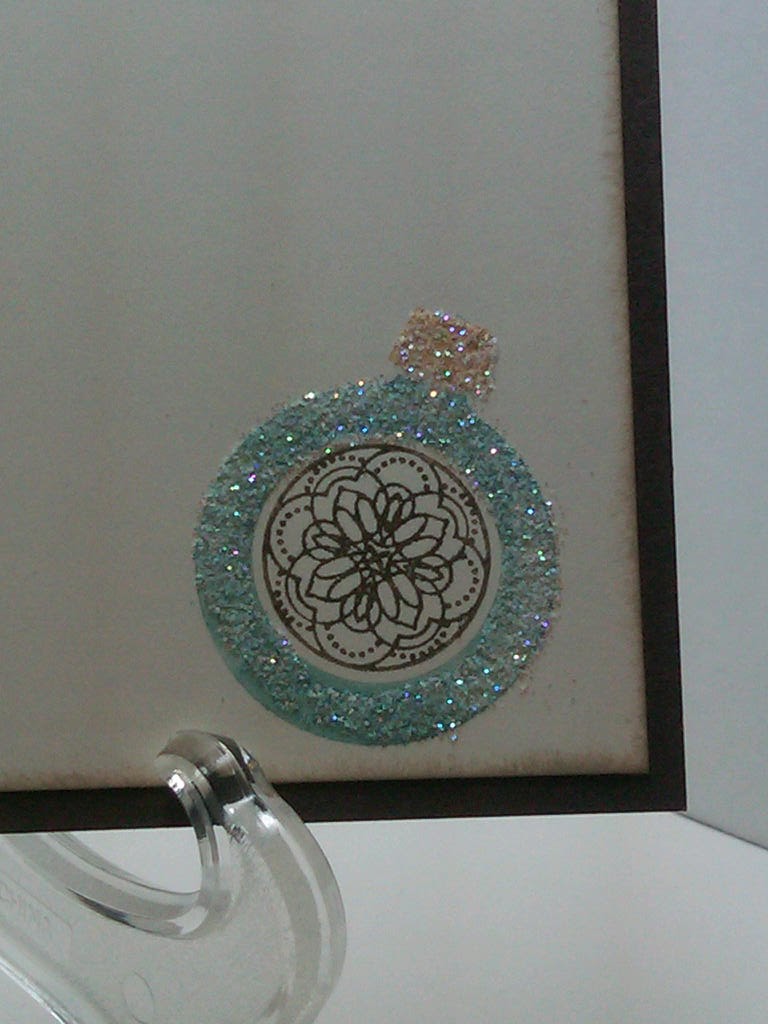
Here's a closer look-


Ooooohhhh, Aaaaahhhhh. Come on, you know you're thinking it. I inked up my stamp with my Stampin Write Markers in Baja Breeze, Early Espresso and More Mustard and then let Tink have a little fun. It reminds of those hand-blown European glass ornaments. I'm even excited that it actually showed up all glittery in the picture. Yea! *Happy Dance*


Well, that's all I have for you today. I hope you liked today's card and that it gets you just a little excited for the new Holiday Mini in just 13 days. If you liked it and would like to +1 or Pin it, I've put the buttons here on my blog for your convenience. I love hearing from you and read all of my comments. SO if you liked today's card and have a moment to drop me a line, it would make my day. Friends and Followers are always welcome too! :)


Thanks so much for taking time out of your busy day to stop by my little corner of the world. You are so appreciated! I hope you'll come back soon. I still have this weeks End of the Week Technique for you and a MDS project.  Actually they're together, so it will be a two parter. :)


Till next time-


Remember- Life is often more about the storms than the peace they seek to overwhelm. It's not about Waiting for the storms to pass, but Learning to Dance in the rain.


Be Safe,
Shan Pin It

Wednesday, March 14, 2012

End of the Week Technique # 24- A Paisley Petal Make & Take "De-Construct"

Pin It
Hey y'all. Happy Humpday! I missed you guys yesterday! But I was non-stop literally from 8:30am until 10:30pm.

I have a new card for you today and a question.

Do you ever look at other designers cards (or sites) and think "I wonder how long it took them to make that card" or "I wonder how many attempts it took to get that just right?"

Maybe I'm alone in thinking I'm the only one who doesn't make a card "Blog Perfect" on the first try, but I doubt it. I'm sure I'm not the only Scaredy Cat who has failed to produce the "Perfect" card on the first go round. In fact I have 2 cards at home that took multiple tries to turn out "right". In working and re-working the first one, I came up with the initial design for this card which then evolved into the final design.

I will show the other cards evolution on another post. I will also start keeping track of these "evolutions" so I can show them in future posts. Sometimes people say "I got my inspiration from X" but it's hard to know how they got form X to Y to Z. I'll show you how I got there. Then you can let me know if you think it's helpful, or interesting or not.

Here's today's finished card-

Paisley Petal, Mixed Bunch Punch Make and Take
I did this card recently, as a Make & Take, for a team meeting. I have to admit I was a little nervous because it was the first Make & Take I had done for my team, but it was well received. I really love that Paisley Petal DSP and I couldn't believe when I went to use it that I hadn't even opened the pack yet. I'm one of those people that Loves their DSP but just doesn't use it enough. SMH! And this card uses my ALL-Time Favorite Color Island Indigo! Love it!

So- By now (if you've read any of my posts at all) you know I've got a little OCD problem when it comes to stamping. And also, I hate to throw out usable scraps of cardstock or DSP. After all, You just never know when you might be able to use them for punches or making those cards where you use strips of cardstock to make patterns you know.... I just can't. So I keep the scraps in a folder with the packet of c/s so they're all together and there you go. But if it weren't for keeping scraps, well we wouldn't have this pretty little card.

In the process of making my swap card, which underwent multiple changes, I ended up using an Edgelet in the final design here-


This made this weeks EWT So Very Easy! 

You see that big open cut-away space formed by using the Edgelet? It gives you a nice piece with beautiful decorative edges....

Of course, I couldn't just throw away that "Huge" scrap of c/s. Oh No! And as I looked at it and turned it, I began to think that the decorative edges might look good on a card, framing some DSP... and so it turns out they did.


I cut a piece of Paisley Petals DSP (I think it's 7 x 2 1/2 it was a month ago), Tombowed it down and then Tombowed the two Island Indigo pieces down on top of it. I then simply flipped it over and trimmed the DSP over-hang with my paper-snips. It needed more. So, back to the drawing board or in this case the Big Shot-


I repeated the process this time running my scraps through the Big Shot with the Adorning Accents folder that coordinated with the Edgelet. Now we were cooking with Crisco! Love that combo!

***For the EWT-After a little playing around I discovered you could, depending on how much DSP you wanted to show, change the size of your borders. For the size I have, I cut squares that I believe were 6x4 to go with my DSP of 7 x 2 1/2. Use a piece of grid paper and lay it out on an old card front to check your sizes. You can make it any size you'd like. It's your card, Personalize it to make it uniquely yours!***


Then, I punched two flowers with the Mixed Bunch Punch, one with Island Indigo and one from a coordinating DSP. I sponged the edges of both with Island Indigo and then ran them through the Big Shot with the Petals-a-Plenty Embossing Folder. I used my Bone Folder to curl the edges up to give the edges some dimension and staggered the petals when I layered them so you could see both layers. I used Mini-Glue Dots to adhere them to each other and to the Island Indigo layer.

I stamped the sentiment from Petite Pairs, what a great set, in Island Indigo on Whisper White and used the Modern Label Punch to Punch it out. I then sponged it with Island Indigo, gave it a little dimension by curving it with the edge of my paper snips and tucked the edge under the flower and secured it with a Mini-Glue Dot and the Front was done.

Here's the inside-


Very simple- Whisper White edged with Island Indigo. The sentiment is the rest of the one from the front. The flower is from Fabulous Florets. I thought it coordinated well with the flowers on the front.

So that's how my card evolved... from a Swap Card Scrap, to a card that had potential that is now in the "it's got to be fixed-up pile" (cause you know I couldn't just throw it away, right?) to the finished product that went with me to the team meeting for people to see as they made their cards.

What do you think? About the card? About the idea for this as a blog topic? Yea, Nea, Maybea? :) LOLOL

At any rate, I hope I have inspired you to try something new today, maybe with some old scraps.

If you liked today's card, I would love it if you left me a comment. It's great when I get to hear from you! Also, if you liked today's card, please feel free to +1 or Pin it. I've added the buttons to my side-bar for your convenience. Friends and Followers are also welcome. :)

If you need supplies to make your own cards, you can shop in my ONLINE STORE 24/7.
Today's Card Recipe-
Cardstock- Island Indigo, Whisper White, Paisley Petals DSP
Ink-Island Indigo Classic Ink
Stamps- Petite Pairs, Fabulous Florets
Big Shot-Edgelet, Adorning Accent Embossing Folder, Petals-a-Plenty Embossing Folder
Punches- Mixed Bunch, Modern Label
Accessories- Mini-Glue Dots, Sponges, Tombow

Well, that's all I have for you today. I hope you have a great day. I hope to see you back tomorrow.

Till next time-

Remember- Life isn't about Waiting for the storm to pass, it's about learning to Dance in the rain

Be Safe,
Shan
Pin It

Saturday, December 24, 2011

Very Last Minute Gifts - Wine Tags

Pin It
Merry Christmas Y'all!

I had intended to do this post on Monday but when I went down to the storage room to get the plastic ornaments for the Dasher Ornament I was going to show you, guess what I found? That's right no ornaments. Now I'm sure they are down there somewhere but definitely not where I expected them to be. :-( As I am however already about 12 hours later than I had planned on posting I decided to just go ahead and post this instead. So I sit here writing this blog as I watch A Christmas Story. It just never gets old!

I did a wine tag and post for Thanksgiving and it was so well received and so easy to do that I decided I would make extras and keep them on hand. They dress up even a bottle of Sparkling Grape Juice and are so much nicer than a bag. I have 3 to show you today. These will make great last minute gifts that you can whip up in no time as you are getting ready to head out today or for any of your other special occasions.

Here's a picture of them grouped together-


The possibilities are really just endless with this design. Just take a 7 x 3 piece of c/s, score it at 2 punch out the opening for your bottle neck with a 1 1/4" circle punch and then decorate to your hearts content. The backer piece starts at 3 1/8 x 5 1/8 and then you adjust the length, adding to it depending on how much border you want to show at the bottom. See, I told you, Super Duper Easy!

Here's the one I'm taking to my sister's house for Dinner tomorrow-


I used the Petals-A-Plenty Embossing Folder, the Scalloped Ribbon Border Punch and added a few of our large rhinestones for a little extra shine.
Here's one for any winter occasion-


I did an extra layer on this one with Whisper White c/s that I spritzed with Frost White paint and alcohol to make it Shimmer after I ran it through the Big Shot in my Northern Flurries Embossing Folder. I used some Silver Glimmer Paper on this one. Want to know a secret? I punched multiple different punches from the center of the glimmer paper (it's so pretty I didn't want to waste any!) and then simply put another piece of Old Navy c/s behind it to cover up the holes.  Bonus, no waste! I used a whole string of rhinestones at the top and it's so nice because they were already attached to each other. All I had to do was lay them down in place. I just had to add two extras to finish off the line. How easy is that?

With New Year's coming up I thought about all the Celebrations that would be happening and decided to use one of my new SAB stamp sets. Here's a little Sneak Peek for you.


I started with a base of Pool Party and then got to play with some of my SAB goodies. I used a backer piece of Everyday Elegance DSP, which you can see peeking out at the bottom. I then got out my Outlined Occasions stamp set, also a SAB exclusive and stamped it 3 times on Very Vanilla c/s. I used my Blender Pens and Classic ink pads to color in the images. Because the Everyday Elegance paper is antiqued around the edges I got out my Crumb Cake ink pad and lightly sponged over the whole  piece of c/s, making it a little more concentrated around the edges.

If you liked today's project, I would love it if you left me a comment. It's great when I get to hear from you! Also, if you liked today's card, please feel free to +1 or Pin it. I've added the buttons to my side-bar for your convenience. Friends and Followers are also welcome. :)

That's all I have for you, well almost all.

Here's a video of one of my All-Time Favorite Christmas Songs. I couldn't find a video from the artists but I did find this one with Harry and Hermione. Yeah, I'm a Harry Potter fan. This is a funny song, and it always makes me smile, but I think it also gets the message out about how we often forget the true meaning of Christmas in our desire to get just the right gift.
If you don't like Harry and Hermione I hope you at least enjoy the song. It's the Twist of the Magi by She Daisy and Rascal Flatts.


I hope you have a safe, happy and Very Merry Christmas spent with family and loved ones.

I hope to see you back here soon.
As always, if today's project inspired you to make some of your own, I would love to see what you come up with.


Till next time-

Be Safe,
Shan Pin It