Pin It
Hey y'all. Happy Thursday! Just one more day to go till the weekend. I'm actually really excited about tomorrow, because I have an interview for a job I've been trying to get for over 2 years. Five candidates are being interviewed so, for those of you that believe in a little divine intervention, (via prayer), or just good energy, I'd appreciate it if you were able to send a little my way. :)
***Disclaimer*** If you're not new to my blog you know I always try to be honest with you. I've often said how easy it is to be frustrated by the seeming perfection of other stampers blogs. You know what I mean, how the cards always look just right and no-one ever seems to have any difficulties. Well, I can assure you if perfection is what you're looking for you've stopped at the wrong site. Don't get me wrong, I'm pretty happy with most of my creations. My gold standard is "would receiving this card put a smile on my face?" If the answer is yes, than I feel good about posting it. While I would definitely be happy to receive today's cards from someone else (because they had taken the time to create something just for me) my OCD is simply not allowing me to be overly happy with my results. I realize this is in all likelihood, a fault in my own reasoning and hope you will try your hand at this technique anyways. I am posting both cards today even though they are not my favorites because today's blog is about the technique and not my ability to be happy with the results produced by an inherently, non-consistent technique. At the end of the day though, my blog is about trying new things and stepping out of my comfort zone, both of which I did with today's technique.
On to today's End of the Week Technique. This is #32 for me, or about 8 months worth of techniques. I finally found one that I really didn't enjoy making. :( When I came to this realization last night it made me very sad. I wasn't sad because I had a least favorite (they can't all be favorites, right?) I was sad because I have loved so many cards done with this technique. However, I guess I shouldn't be too surprised, it's not new information that I'm a little OCD (have you seen the title of this blog?) and this technique does not lend itself to precision or predictable outcomes. I even did two samples and still ended up with the same sense of dissatisfaction. Hopefully though, when you try this technique you will enjoy yourself.
Here's today's card-
 |
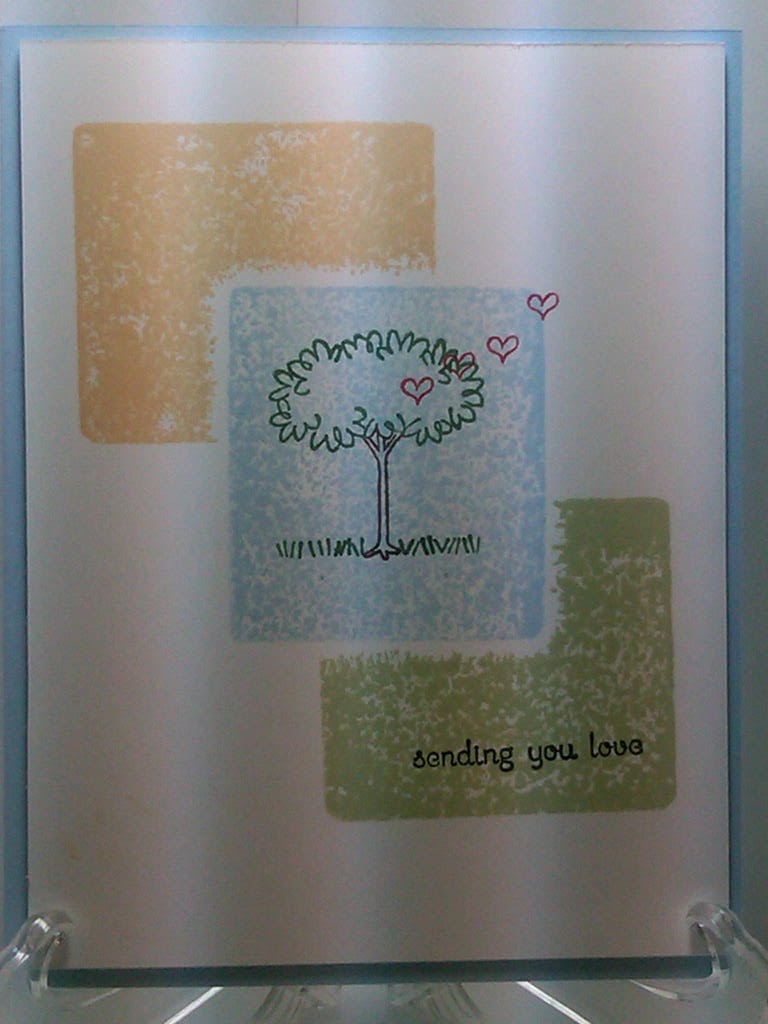
| Clear Block Background Stamping |
In addition to using this as my EWT, I am using this as my Clean & Simple card of the week. I was hoping to be able to get a one-layer WOW card with this technique, but it didn't quite happen that way, for me at least.
I really had high hopes for this when I stamped my center, Bashful Blue section. The coverage was so even and even looked a little textured. I was doing my little *happy dance* and then I stamped the Certainly Celery, and So Saffron blocks and I stumbled and felt like "Elaine" from Seinfeld doing her dance. *tear*
I had initially masked off my B.B. section and it seemed like even that little bit of elevation was throwing off the ability to get even coverage. I laid the block back down without the mask to try and get a little better coverage which is why you can see just a small line of C.C. below the leaves of the tree and S.S. in the middle of the leaves. I stamped my image from Easy Events by coloring my image with my Stampin Write Markers in Real Red, Garden Green and Chocolate Chip.
I decided to try again without the masking. Here's the second attempt-
 |
| Clear Block Background Stamping |
While I'm much happier with the fact that these are all more consistent in their appearance, I really liked the idea of the center section being just B.B. so that it, in my mind at least, looked like it was lifted above the others giving it a layered effect. Perhaps I just need to do a single block or a single color. I'm hoping some of you will chime in and let me know if I'm being totally off my rocker on this. The more I'm looking at the second one, it's starting to grow on me a little.
Here's what you'll need to for this technique-
Clear Blocks,Colored Classic Ink Pads (I think light colors would probably work best for this) and the stamp of your choice.
Here's how to do this technique-
1- Start with a clean block and tap it on your ink pad until you get it covered completely.
2- Stamp on your cardstock with your block, applying firm pressure and lift straight up.
3- Ink up your chosen image, either by inking it in all one color with a pad or by coloring it in with your Stampin Write markers (like I did) and stamp your image.
4- Do one of two things, a- admire your creation and think of the smiles it's going to bring or b- curse loudly at your inability to be content with what you consider to be non-symmetrical, un-even, not perfect results. Three guess as to which one I did and the first two don't count. :)
In my defense I don't even do things like "Tie-Dye" because of the unpredictability of the results and the irregularities inherent in the process. :(
I do however think I will try this at least once more but maybe on a smaller card where I only feel the need for one color.
I don't have an inside to show you today. :( I feel like such an "Epic Failure" with today's post. *SMH* In my despondency over what I felt to be my failure to create a beautiful card, I kinda lost my Mojo and couldn't think of anything for the inside. I stamped a sentiment from the now retired P.S. I love you (I had really hoped this would carry over, it had such nice "loving" sentiments) and just couldn't think of anything else to put inside. I think I'll go back later and maybe put a few punched hearts inside.
Can I just say this technique drove me to chocolate last night! AUGH!!!
Well, that's all I have for you today. I hope you, at least, liked today's card. I really hope my dissatisfaction with my inability to produce a card I was thrilled with doesn't keep you from trying your hand at this technique. As always, I would love to see what you're able to come up with. Like I said, I've loved others cards with this technique, just not my own.
Till next time-
Remember- Life is often more about the storms than the peace they seek to overwhelm. It's not about Waiting for the storm to pass, but Learning to Dance in the rain.
Be Safe,
Shan
Pin It