Thursday, November 29, 2012

End of the Week #57 - Scribbled-Spritzed Markers / NAC # 23 / My Challenge #49

Pin It
Hey y'all. I hope you're having a great week so far. It's been so cold here lately. I can't stand it! I miss the warmth, like crazy. I really miss the beach and all the beautiful sunsets.  This week over at Nacho Average Challenge they have a color challenge. Now normally color challenges are so not my favorites, but this one inspired me and I couldn't wait to get too it.

Here's today's card-

Card featuring Scribbled-Spritzed Marker Technique


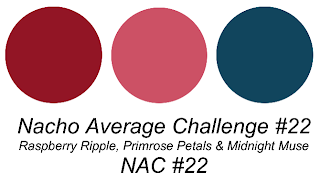
Here's the challenge-


I love this color combo! Yea! When I saw it, I was reminded of a recent sunset. It was so pretty I had to  take a picture-

You know I probably should have used "Like A Tree"
 but I didn't. I just went with another silhouette.
Here's a close-up-


I started with a base of Midnight Muse and added a layer of Raspberry Ripple. My focal point uses a base of Glossy White c/s. The image is stamped in Midnight Muse. It took me a few tries but I'm so happy with how it turned out.

Here's a look at the inside-


Both the image and sentiment are from the same set and are stamped in Midnight Muse.

What do you think? Didn't it turn out pretty? This was the first time I tried this technique, and I'm pretty sure I will try it again. I will say though it is not one for those of us with more than a little Stamping OCD. If you're not as OCD as I am, you may be able to let loose and just go with it. :) Oh and you have to wait for it to dry to get the full effect.

Here's what you'll need for this technique- Stampin Write Markers, an old plastic stamp case,  Glossy cardstock, coordinating colored c/s, the stamp set of your choice and a spray bottle filled with water. Although you could probably use just about any type of stamp, line or solid image I chose to use a solid silhouette.

Here's what you do- this is another easy technique, you won't believe how easy it is. I just tend to make things harder than they really are....darn OCD!!!
1- Choose your colors- take your colors and scribble them onto your plastic case. You want to make sure that you scribble enough to equal your card stock both height and width, then add a little extra.


***Tip*** - start with your lightest color and then add the darker ones. This way you won't get any dark colors in your light marker's tip.
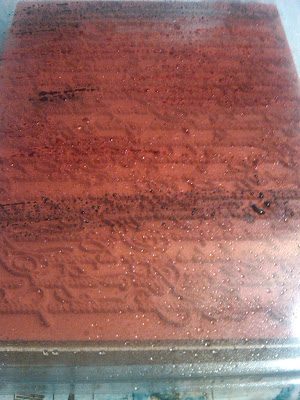
2- Lightly spritz the case with water. This is what it will look like. You can see the water droplets in my pic. :)


3- Take your Glossy c/s and lay it glossy side down onto the case, carefully. Take your Grid Paper and use it to rub the c/s onto the stamp so every surface is covered.
4- Lift it off the case carefully being sure to only touch the edge....unless of course you want a multicolored finger-print on your card.
5- Let this dry. You may have a line down one of your edges where the color poled as you lifted it off. If you just can't bear it, you can cut your paper down to avoid that. (That's what I did)
6- Once your paper is dry, stamp as you normally would. I used the floral image from "Just Believe" and stamped it twice.
7- Layer on your card or scrapbook page as desired.
8- Smile when you see your finished product. Smile even more when you think about the smile it will  bring to its recipients face. Boy, I love that part!

Here's another look-


See! I told you it was easy. Do you like it? I hope so and I hope the ladies over at NAC like it too. If you haven't joined them yet, why not hop on over as soon as you're done here. They are pretty darn fabulous...and their challenges are too! I hope this inspires you to try something new today, or whenever it is you're reading this. :D If you liked today's card or have questions about it, I hope you'll take a moment to leave me a message in the space below. I read all of my comments and they really do make my day!!!If you'd like to +1 or Pin today's card, I've put those buttons here on my blog for your convenience. Friends and Followers are always welcome too!

Thanks so much for taking time out of your busy day to stop by my little corner of the world. You are very appreciated! Till next time-

Remember- Life is often more about the storms than the peace they seek to overwhelm. It's not about waiting for the storms to pass, but Learning to dance in the resin.

Be Safe,
Shan
Pin It

Sunday, November 25, 2012

End of the Week Technique #56 - Mother of Pearl

Pin It
Hey y'all. Happy Sunday/Monday! I'm starting this at 11:30pm so some of you might actually get to read it on Sunday, but most likely you will get it Monday, so this way I've got all of you covered. :)

*Edited* I'm also entering this in Nacho Average Challenges Color Challenge for this week. It has a little Lucky Limeade in it as well, but the 3 main colors are from the challenge.

Elements of Style has been on my wishlist for some time. I finally got it a few weeks back and have been waiting for just the right card to use it on. I think I found it. I have to say I think it was pretty when I first stamped it and it was even prettier after I finished it off with a new technique, Ok, so it's just new to me, but it's still pretty cool. It's late and I'm pretty tired so I'm gonna try and make this quick, but there are lots of pictures. Hopefully, you'll think it's worth it. Here's what I came up with-


Card featuring Elements of Style and
Mother of Pearl Technique.
I wish you could see just how pretty this is in person. I just couldn't capture the shimmery beauty of it. Here's a closer look-


The card base is Midnight Muse. This is topped with a layer of Raspberry Ripple and the technique is done on Glossy White c/s. I inked my floral image with my Stampin Write Markers in Raspberry Ripple, Primrose Petals, Lucky Limeade and the little hummingbird in Midnight Muse. Here's what it looked like before I started the technique.


See what I mean? So pretty. I may have to make another card that looks like this. :)

Here's the inside-


The sentiment is from the same stamp set and is stamped in Raspberry Ripple onto a piece of Naturals White c/s. I'm really loving that paper lately. My floral image is inked the same way as the front. I stamped off once to lighten the image and then stamped it again. A little love from Tink added a little shine and shimmer to the inside too.


So what do you think? Isn't it pretty? Are you ready to make your own with this technique?
Here's what you'll need- Glossy White c/s, Shimmer Paint (I used Frost White), Cling Wrap (I used Saran, because that's what I had on hand, but you could use any kind), and a plastic stamp case.

Here's how you do it-
1- Stamp your image onto Glossy White c/s
2- Shake your paint until it's mixed thoroughly and then pour a small amount onto the closed top of your stamp case.

3- Wad up (That's a real technical term "Wad") your cling wrap then dab it into your paint. Dab this off (another technical term "Dab") onto your case so it doesn't just glob (Wow! So technical tonight) in one spot.

4- Dab the paint onto your c/s until it's covered. Let it dry and then mount on your c/s base or layer. Here's another look at the finished technique-

Two things of note-
1- This is the first time I've done this technique so I'm gonna have to check some other sites because I don't remember this being mentioned. As I started to dab with the paint some of the ink picked up from my stamped image and mixed with the frost paint. At first I was pretty upset that the colors were mixing and blending, but I kept on and it worked out ok. I grew up near the ocean and real Mother of Pearl has lots of variations in coloring and the colors mix and swirl throughout, pretty much like this. I'm glad I didn't stop when I first saw this happening. Stick with it.

2- The extra paint makes the Glossy c/s a little heavy so I recommend using Dimensionals to adhere it to your c/s. I used 3 down each side and 1 in the center. I wanted to make sure it wasn't going to pull away from the c/s layer.

Well, that's all I have for you today. I hope you like it and I hope it inspires you to try something new, this technique or even something else. Remember the goal of this blog is to encourage you to "Just Try". If you liked today's project or have questions about it, I hope you'll take a moment to leave me a comment in the space below. I love hearing from you and read all of your comments. They really do make my day. If you'd like to +1 or Pin it, I've put the buttons on my blog for your convenience. Friends and Followers are always welcome too! :)

Thanks so much for time out of your busy day to stop by my little corner of the world. You are very appreciated! Till Next Time-

Remember- Life is often more about the storms than the peace they seek to overwhelm. It's not about Waiting for the storms to pass, but Learning to Dance in the rain.

Be Safe,
Shan
Pin It

Saturday, November 24, 2012

Amazing Birthday/ NAC #21 My Challenge #48

Pin It
Hey y'all. Happy Saturday. I hope you are having a great weekend and that your week was Amazing!

First let me say, I'm a BAD Blogger! For 2 reasons. 1- I got this Amazing set from my friend Terry over at Going Over the Edge. (I won it during her "The Great Pumpkin" blog hop) and haven't sent her a Thank-You card with it yet. Hey Terry, I have a special card for you! Check her site out, it's Fabulous!!!! 2- I've been busy all week and went to 4 different houses on Thanksgiving and didn't get a chance to tell you all Happy Thanksgiving. I'm very Thankful for all of you. Thanks so much for all of your support and friendship.

One of my dear friends, Adrienne, had a birthday on Thanksgiving. It was another reason to be thankful. So, of course I had to make her a card. We were headed to her house for our 1st stop so I was able to take it with me, along with my Pumpkin Gooey Butter Cake, Chocolate Chip Pecan Pie and Homemade Fudge. :) (I stirred them all backwards to take out the Fat and Calories. You do use that technique right?) I used this week's sketch over at Nacho Average Challenge as my inspiration. Here's what I came up with-


Birthday Card featuring
World Spectacular DSP and You're Amazing Stamp Set

Here's the sketch from NAC-


It's another great one. Have you checked out their site yet. Great sketches and color challenges. I never miss their challenges. Make sure you stop by for a little weekly inspiration. I viewed the challenge on my phone so I didn't remember it was in landscape orientation when I made my card, but other than that I stuck to the layout. I even remembered to stamp a coordinating envelope. :)


This card came together really quickly. Love when that happens. I actually started with the World Spectacular DSP and got my color inspiration from that. The base is Island Indigo and the banner is Daffodil Delight. I ran the banner through my Big Shot with my Chevron Embossing Folder for a little added dimension. I curled the end of my banner to give it some motion and adhered the top of the banner to my DSP with Tombow. This allowed the end to curve outward. My sentiment was stamped in I.I. and then cut out with one of my Apothecary Accents Framelets. This was adhered with Dimensionals. I added a few Rhinestones for a little extra bling and he front of my card was done.

Here's the inside-


I used the Fabulous Phrases set for the sentiment and the image is from the You're Amazing set. I colored it with my Stampin' Write Markers in Basic Gray and Island Indigo and let Tink have a little fun and my card was done.

I hope you like today's card and the fabulous ladies over at NAC like it too. I'm happy to say my friend Adrienne really liked it and the thing she liked the most was that I took the time to make it just for her. If you liked today's card or have questions about it, I hope you'll take a moment to leave me a comment below. I love hearing from you and I read them all. They really do make my day! If you'd like to +1 or Pin it, I've put those buttons on my blog for your convenience. Friends and Followers are always welcome too! :)

Thanks so much for taking time out of your busy day to sot by my little corner of the world. You are so very appreciated! Till Next Time-

Remember- Life is often more about the storms than the peace they seek to overwhelm. It's not about Waiting for the storms to pass, but Learning to Dance in the rain.

Be Safe,
Shan Pin It

Monday, November 19, 2012

End of the Week Technique # 55 Quilting with Diagonal Score Plate

Pin It
Hey y'all. Happy Monday! I hope your week is starting off fabulously and that you had a great weekend! I had this planned for last night, but I finished up too late. I've already got at least 2 items planned for this week. :) I'm still trying to figure out my time-management in order to get back to my 5 days/week posting. I really appreciate all of you for hanging in with me during this transition! Hugs to you all!!!!

Here's last week's End of the Week Technique, I hope you like it-

Quilted Card
I love the effect I got with this technique, almost like those quilted purses that so many of us would love to have. I used one of my new favorite colors, Midnight Muse, as the base. It's a one -layer card that is anything but simple. :) Hey April, Lookie! One Layer!!! Lol!

After making the quilted design with my Simply Scored Diagonal Plate I added Midnight use ink using the Direct to Paper technique. Here's a closer view-

Quilted Card featuring Direct to Paper Technique
You can see the variations in color that were obtained by using this technique. I lightly rubbed the ink pad directly onto the c/s (hence the name). This was the first time I had tried this technique and I have to say it is definitely Technique Driven. It took me two cards and 5 sides of paper to get it to where I was halfway happy. The trick, I think, is to lightly touch the paper and to not have any noticeable "start & stop" areas

I'm not quite sure that either of the techniques used on today's cards are really good techniques for someone as OCD as I am, especially the D-to-P. But, at least I tried them. You can try them and see how they work for you.

After my ink had dried I used the smallest pearls in our pack and applied them one at a time to the overlapping areas. My daughter said "You're Nuts!" I'm not sure she was too off on that one. :)

Here's the inside-

Inside of Card featuring
Blooming with Kindness set

Both the sentiment and image are from the same set, Blooming with Kindness. The floral image is also now available as a single stamp. I love the font used for the sentiments. It's so elegant.

Here's a close-up of the flower-


I inked my stamp first with Baja Breeze. To get the two-toned effect I used the Rock-n-Roll technique and rolled the edges of the stamp in Midnight Muse. Next, I took my Midnight Muse Stampin Write Marker and tapped the color randomly onto the center of the stamp. I used my Blender Pen to remove the color from the stem and used my Wild Wasabi Marker to color it in. I think this technique gives such a pretty effect. What do you think?

So for today's technique it's pretty easy (mostly). Here's what you'll need- Cardstock in the color of your choice, Simply Scored with the Diagonal Plate and color to add if desired. Sorry no pictures for this one. It's pretty self explanatory.

Here's what you'll do- Using your Simply Scored Tool with the Diagonal Plate score at your desired interval. I chose every inch. Once you've covered your c/s turn it 1/4 turn and score again. That's all. Easy-Peasy. Just make sure to hold your c/s securely so it doesn't move and make sure to be firm with your stylus so it doesn't jump the track on you. That happened to me a couple of times. I have to say the card looked pretty good just with the embossing. However if you want to step it up a notch add some color either by D-to-P or by sponging the color on. It will really make the embossed lines stand out even more. If you want to be really over the top, go ahead and add some embellishments too. It's your card, why not? Make it fab!

That's all I have for you today. I hope you liked it and I hope to see you back here soon. I can't wait to show you what I've been working on. If you liked today's card or have questions I hope you'll take a moment to leave me message below. I love hearing from you and read all of your comments, and they really do make my day! If you'd like to +1 or Pin today's card, I've put those buttons on my boo for your convenience. Friends and Followers are always welcome too! :)

Thanks so much for taking time out of your busy day to stop by my little corner of the world. You are very appreciated! Till Next Time-

Remember- Life is often more about the storms than the peace they seek to overwhelm. It's not about Waiting for the storms to pass, but Learning to Dance in the rain.

Be Safe,
Shan


Pin It

Wednesday, November 14, 2012

Go Ahead & Cry / NAC #20 ? My Challenge #47

Pin It
Hey y'all. Happy Wednesday! Boy, here I was thinking I was doing good because it was only Tuesday and then I realized I'm a day behind because of the Holiday. Oh well, at least I'm getting to post. I hope you're having a great week so far. I'm almost situated in my new job, so hopefully things will be getting a little more back to normal. For those that have followed me for a while now, I'm finally out of my boot, hopefully for good and trying to get back to exercising. I started at a new gym tonight and managed a 30 minute walk run 15/15 and am still able to walk so I'm thinking that's a good thing. :) Thanks for all the thoughts, prayers and well wishes you sent my way!

I'm so excited about today's card! You know I love those fabulous ladies over at Nacho Average Challenge and I make sure to get their challenge in every week. (Some times earlier than later, lol) They've got a color challenge this week and you know how I feel about them, but I'm very happy with how my card turned out. I love when people give measurements for their cards especially ones with lots of layers so guess what?  I have them for you and will put them at the end of the post. Why? Because that's just the kind of friend I am. :) It took me 2 hours to make this card and the bulk of that was trying to figure out the layer measurements. :( Here's what I came up with-

Sympathy Card featuring Lean On Me Stamp Set
Here are the colors I had to work with-

 Nac20color


Summer Starfruit is still not one of my favorite colors, but I have to say it's growing on me. I think it works best with strong, really saturated colors and Midnight Muse is one of my favorites to pair it with! I started with a base of Midnight Muse. To that I added a layer of Summer Starfruit that I ran through my Big Shot in my new Argyle  Embossing Folder. Love all that fabulous texture! One of the nice things about that folder is how nice it really looks on either sid, embossed or de-bossed. Next came a layer of Baja Breeze that was embossed with the Perfect Polka Dots Folder. These three layers were all Tombowed together.

My next layer is Midnight Muse and I used one of my scalloped border punches to add detail to the one end. I stamped my image on Naturals White with Black Staz-On and used my Blender Pens and Classic Ink Pads to color it in. I love all the color variations you can get with that technique! Here's a close-up view-


 I wrapped my Midnight Muse Striped Ribbon around the Naturals White layer and secured it with SNAIL. I then secured this to the Midnight Muse layer with Tombow. This panel was adhered with Dimensionals and the front of my card was done. Yea! :)

Here's the inside-

Inside of Sympathy Card with Everything Eleanor and Teeny Tiny Wishes
I used Teeny Tiny Wishes for my sentiment and stamped it in Midnight Muse. Here's a close-up of my pretty little flower because you know I think the inside should be pretty too!


I stamped this in Midnight Muse as well and then colored it in with some Baja Breeze. A little love from Tink finished it off.

Before I forget, Here's the card measurements-
The base is a standard  base of 8 1/2 x 5 1/2 scored and folded at 4 1/4.
Summer Starfruit- 4 1/2 x 3 1/4
Baja Breeze- 4 1/2 x 2 1/4
Midnight Muse- 3 1/2 x 2 1/4 and then cut with punch
Naturals White- 3 x 2
Hope this helps! :)

Well, that's all I have for you today. I hope you liked it and I hope the fabulous ladies over at NAC like it too! If you liked today's card or have questions about it, I hope you'll take a moment to leave me a comment below. If you'd like to +1 or Pin today's card I've put those buttons here for you. Friends and Followers are always welcome too!

Thanks so much for taking time out of your busy day to visit my little corner of the world. You are very appreciated! I hope you make it by again soon. Till Next Time-

Remember- Life is often more about the storms than the peace they seek to overwhelm. It's not about Waiting for the storms to pass, but Learning to Dance in the rain.

Be Safe,
Shan
Pin It

Sunday, November 11, 2012

End of the Week Technique # 54 / Altering the Cannery Framelet

Pin It
Hey y'all. Happy Sunday! I hope you're having a great weekend and are looking forward to having a good day off tomorrow. FIrst off, I'd like to say a big Thanks!,  to all of our service Men and Women who risk their lives to keep our country safe. You are so appreciated! Today was our team holiday party and I needed to make a gift so, I made a gift and a matching card to go with it. Hope you like  it.

Here's today's card-


Holiday Card featuring Candlelight Suite DSP &
 Altered Cannery Framelet
Time got away from me today and before I knew it, I had to hurry up and make a card to go with my gift. You know I don't always work well under pressure & this card was no exception. I had a layout in mind, or at least I thought I did. I was trying to re-create a layout I had seen once on a challenge. It just wasn't coming together so I think I must have forgotten something. This is what I came up with instead.

I started with a standard base of Real Red c/s. Next came a layer of Very Vanilla with Early Espresso sponged around the edges. For my layers, here are the measurements. Two pieces of Early Espresso cut at 2 x 3. The two pieces of DSP are from the Candlelight Suite DSP and are cut at 1 3/4 x 2 3/4. Normally I would have layered the Lucky Limeade Ruffled Ribbon around the V.V. c/s but I had already Tombow'ed it down. I really thought my card was going a different way. *SMH* Since I had already adhered it I ended up wrapping it all the way around the card front and tied it in a bow so the ends would trail down and fill the open space. I wanted my card to coordinate with my gift in more ways than one so I added a little jar in the upper space and topped it with a piece of coordinating fabric from the same Candlelight Suite. Both the Jar and the fabric topper were adhered with Dimensionals.

Here's a close-up of this element-


Like I said, I was in a bit of a hurry, so after I had finished it and was leaving I remembered I wanted to make it glittery and shimmery. Oh well, I think it still looks nice. This jar was cut from Whisper White c/s and was cut out with the Cannery Framelet using the technique shown below. It was sponged with Pretty in Pink and then the edges were sponged with Early Espresso to define the edges. I used the Topper Framelet and Candlelight Suite Fabric to create a coordinating fabric topper.

*Tip* When using the Framelets to cut fabric, you will need to run it through your Big Shot multiple times. I think I ran it through, back and forth, about 5 times and still had to lightly snip a few spots. However, it really made a nice addition and was totally worth the effort.

Here's the inside-


I stamped the sentiment from Greetings of the Season in Early Espresso on Very Vanilla c/s. I feel really bad that I didn't stamp something pretty on the inside, but I just ran out of time. :(

Here's the gift I made-


It's a Sugar Scrub. I've actually seen this in a couple of place on Pinterest. I thought I had it Pinned but couldn't find it, so I went looking on the Internet, found one to try and guess what? It Worked!!!!! Woo-Hoo! This was so quick and easy you've got to try it. I'm gonna tell you how I did it and do you know what that means? You get a Two-fer. Two tutorials for the price of one. Even better once you realize that price is free! :D

Here's what you'll need-
1)A seal-able container to hold your scrub- I used a seal-able Mason jar that I got with a 40% off coupon from one of those big box stores. It wasn't expensive at all, I think it was $4.99 before the discount :) 2) Regular White Granulated Sugar 3) Dish Detergent- I used Dawn's Olay the pink one (it's says it's for softer hands). They have a Lavender one too that's a pretty light purple color. I'm a big Lavender fan but I actually liked this scent better.

Here's what you do-
1) Fill the jar about 3/4 of the way full with your sugar.
2) Add your Dish Detergent up to the neck of the jar.
3) Stir the detergent into the sugar until it's incorporated completely. You can then add more sugar as needed to get the consistency you would like. You don't want it to be too liquidy. I ended up adding an extra 1/2 cup or so.

Here's what it will look like-


*Tip* Make sure to get into the corners of your container. I thought I had everything mixed well and then noticed one of the corners was white with sugar. Glad I saw that before I gifted it! I then cut a square of fabric, frayed the edges just a little and then secured it to the jar with more of my Lucky Limeade Ruffled Ribbon.


I have to say it was well received and I have to say I got a giggle when it was given. I told my teammate to open the card because it matched and I was rewarded with a chorus of "Of course it does!" LOL!!!

For today's technique I altered my Cannery Framelet, the jar one, to make it smaller. I've seen cards where they've made the jar bigger into items like baby bottles, but I haven't seen any smaller so I decided to try. I wanted to try and make it look like the jar I used for my gift. I think I came pretty close.

Here's what you'll need for today's technique-
1) Cardstock in your choice of color- I chose Whisper White 2) Cannery Framelet 3) Big Shot

Here's what you do- It's so stinkin' simple, you're not going to believe it!-
1) Using your Cannery Framelet cut out a jar.
2) Take your Framelet and position it higher on your cut out piece until you get the size you want. Here's what it will look like-


3- Run this through your Big Shot again. Here's what you'll get-


 I love how this looks just like my jar. I then just lightly sponged this with Pretty in Pink Classic Ink to match my scrub. I sponged the edges with Early Espresso for some definition and have a totally different look from the same framelet. :) Here's another look at the finished product-


Well, that's all I have for you today. I hope you liked everything I had for you today. I hope it inspires you to try something new. Both were really simple but pack a WOW for such easy techniques. Love when that happens! If you liked today's card, project or technique or have questions about it, I hope you'll take a moment to leave me a message below. I love hearing from you and read all of your comments. They really do make my day! If you'd like to +1 or Pin today's card or project, I've put the buttons on my page for your convenience. Friends and Followers are always welcome too! :)

Thanks so much for taking time out of your busy day to stop by my little corner of the world. You are very appreciated! I hope you have a safe and enjoyable holiday tomorrow filled with plenty of time for Family, Friends and of course Creativity. If you get a chance, I hope the next time you see a Uniformed Service member, you'll tell them thanks for their time and effort. Till Next Time-

Remember- Life is often more about the storms than the peace they seek to overwhelm. It's not about Waiting for the storm to pass, but Learning to Dance in the rain.

Be Safe,
Shan Pin It

Thursday, November 8, 2012

Lovely As A Tree / NAC#19 / My Challenge #46

Pin It
Hey y'all. Happy Thursday! I hope you're having a great day and an Amazing week! Have you missed me? I have missed y'all, something awful! I've been so busy with my new job, I just haven't had time to do much of anything. I think I'm going to have start doing all but my NAC challenges on the weekend and then scheduling them to post. I just hate the thought of that though because then it doesn't feel as personal. I'm gonna figure something out though, I promise!

Did you order stamps during our one day Spectacular? I did and Mr. Ups brought them to my house on Monday. Love that guy! One of the sets I got was Lovely as a Tree? Do you have it? It's only the longest running set in Stampin' Up's catalog. Well, I finally got it. I think it's very pretty and great for masculine cards but I just kept putting it off. I sure hope they don't discontinue it in the next catalog!!!

Whenever I get new sets, I try to use them before I use any of my other sets. With the exception of that poor Make a Monster set, I'm pretty good about doing this. SMH. At any rate, I thought it would go great with this week's challenge over at Nacho Average Challenge. Have you been there yet? If not, you really should check them out. They have a great design team and great challenges every week. I haven't missed one yet. :) Here's what I came up with for this week's challenge-

Masculine Card featuring
Lovely as a Tree


Can I tell you how long it took me to do this card? I knew what I wanted to do, it was just the DSP selection and trying to figure out how to layer them. I bet I spent at least 45 minutes figuring this card front out. In the end though, I was really happy with how it turned out. :)

Here's the sketch I was working with-


 What do you think? I think it ended up being a pretty good take on the sketch. Here's a close-up of my focal point-


I used DSP from the color stack pack for the lower pieces. They were cut out with the 3rd smallest Window's Framelet. I sponged the edges with Soft Suede adhered them with Tombow to my base of Crumb Cake and then trimmed the edges. Next I cut a scrap of Soft Suede c/s with the same size framelet and then ran it through my Big Shot in my Stripes Embossing Folder. This was adhered with Tombow over the the other 2 pieces. I also sponged Soft Suede over the raised stripes to make the embossing stand out even more. It's hard to see in the picture but it really made a big difference. I love that something so simple can make such a big impact. My image was colored with Always Artichoke and Soft Suede. I stamped the Always Artichoke off once before adding the Soft Suede ink and then stamping it on Very Vanilla c/s. This was also then sponged to add a little depth. This piece was adhered with some Dimensionals.

Here's the inside-


The sentiment is from Teeny Tiny Wishes. I really don't know how I made it this long without that set! The acorn & leaf image is also from the Lovely as a Tree set. I colored it with my Old Olive SU marker and then "tap-danced" Cajun Craze and More Mustard over it. The base of the limb & top of the acorn was colored in with Soft Suede and the bottom of the acorn with Crumb Cake. I then huffed on it and stamped it on a piece of V.V. c/s. Here's a closer look-


The edges were then sponged with more Soft Suede and my card was done. I'm so glad I finally got this set! Yea!!!

I hope you liked today's card and I hope the DT over at Nacho liked it too. I'll be back soon with the EWT for this week. Please don't give up on me, I'm gonna get this new job figured out and we'll be back on track soon. If you liked today's card or have any questions, I hope you'll take a moment to leave me a comment below. I read them all and they really do make my day! If you'd like to +1 or Pin today's card, I've put those buttons on my blog for your convenience. Friends and Followers are always welcome too!

Thank you so much for taking time out of your busy day to stop by my little corner of the world. You are very appreciated! Till Next Time-

Remember- Life is often more about the storms than the peace they seek to overwhelm. It's not about Waiting for the storms to pass, but learning to Dance in the rain.

Be Safe,
Shan


Pin It

Friday, November 2, 2012

End of the Week Technique #53 - Altering the Square Die

Pin It
Hey y'all. Happy Friday! I hope you have had a Fabulous week and are looking forward to an exceptional weekend. I'm so excited there's no hurricane to worry about this weekend! I'm also so excited to be holding my first Holiday Open House. Did you see the flyer I created for it yesterday, with my new MDS2? Hopefully I'll have lots of friends come by for some spectacular holiday shopping.

Today I have a card for you that incorporates one of our dies, but in a different way. You know what that means? Once again, you get more bang for your buck. Love when that happens! Here's today's card-


4x4 card featuring Quintessential Flower and
Scalloped Square Bigz Die
You know I try to use all of my stamps as soon as possible after getting them. I feel like if I'm ordering them I should be using them. This Quintessential Flower stamp though has sat unused for a while. I got it because I really liked the last layering flower stamp we had, but once I got it I just wasn't sure what to do with it. I actually stamped & punched the flower out a few weeks back trying to get a little mojo going and then nothing.  Then I saw this weeks sketch over at Mojo Monday and decided to try and put something together. Here's the sketch I was working with-


I decided to go with the square card and then had to figure out how to make the scalloped layer. I wish I could take credit for the technique I'll describe below, but I can't. I saw it a few months back and decided to play with it for this card and it worked out very nicely, or at least I think it did.

Here's a close-up of my flower detail-


I used Lucky Limeade, Elegant Eggplant, Wisteria Wonder, & Perfectly Plum for my flower. The middle image, if I remember correctly is Perfectly Plum, stamped off once. After my images were stamped I used the corresponding punches to punch out the layers and Dimensionals in between each layer. The banner is from Itty Bitty Banners and was cut out with the Banners Framelet. I also stamped the flower image in Wisteria Wonder on Wisteria Wonder c/s for a tone on tone effect. My Wisteria Wonder layer was created with my Scalloped Square Bigz Die.

Here's a look at the inside-


 I wasn't sure what purpose I was going to use this card for, so I simply left it without a sentiment on the inside. I stamped my image in Elegant Eggplant for a bit of pretty on the inside and my card was finished. I think it will make a simple but pretty thank-you or thinking of you card. What do you think?

For today's technique, here's what you'll need- Cardstock in your desired color, the Scalloped Square Bigz Die and your Big Shot or other embossing/cutting tool.

Here's how you do it-
1-Make your standard "sandwich" with your Die and c/s and run it through your Big Shot. This is what you'll get-


 2- Remove that c/s from your Die and decide how much smaller you would like your square to be. I chose to make it two rows smaller. Once you've decided on your size, reposition your paper to match that size and run it through your Big Shot again. This is what it will look like-


3- If you were interested in a Scalloped Rectangle instead of a square you could use the piece as is-

4-If you choose to go with a square simply position your paper so that the same amount of rows will be cut and run it through your Big Shot again-

5-Now you've got a smaller Scalloped Square to use in your project. How cool is that!?!

I love finding new ways to use my product and I know this is one technique that will be getting utilized plenty. Here's another look at the card with the smaller Scalloped Square-


So what do you think about today's technique. This is so simple, I'm not sure why I didn't think of it before. Sometimes it's the simplest things that make big impacts. Well, I hope you liked today's card and technique and I hope it inspires you to try something new today. I love hearing from you so if you liked today's card or have questions about it, I hope you'll leave me a message below.  I read all of your comments and they really do make my day! If you'd like to +1 or Pin today's card, I've put those buttons on my blog for your convenience. Friends and Followers are always welcome too! :)

Thanks so much for taking time out of your busy day to stop by my little corner of the world. You are very appreciated! I hope you have a fabulous weekend with plenty of time for Family, Friends and of course Creativity! Till Next Time-

Remember- Life is often more about the storms than the peace they seek to overwhelm. It's not about Waiting for the storms to pass, but Learning to Dance in the rain.

Be Safe,
Shan
Pin It