Showing posts with label Spinner Cards. Show all posts

Friday, September 28, 2012

Spin-ny Gingie

Pin It
Hey y'all. Happy Friday! Just a quick post today as I'm actually a little busy. I hope you've had a great week and are looking forward to an Amazing weekend. I'm going to Annapolis tomorrow for lunch with a bunch of friends but other than that, not sure what the weekend holds yet.

I did today's card a few weeks back. It's one of my favorite types of cards and it just makes me happy. I hope it makes you happy too....

Holiday Spinner Card featuring
Scentsational Season & Snowflake Soiree Stamp Sets

Isn't he cute? This is one of the cards I showed my friend Brenda last week to show her the versatility of this set. She was tickled when she saw him spinning his way across the card. This was a very quick and easy card but it sure makes an impact. I started with a base of Very Vanilla c/s and added DSP  from the Be of Good Cheer collection. I cut two pieces, one for the front and another to layer underneath. A lot of times the mat or card base shows behind the slide and while there's nothing wrong with that look (I've used it before) I wanted it to look like my sweet little Gingie was just spinning his way across the DSP. For my border I used a scrap of Cherry Cobbler c/s that I punched with my Dotted Scalloped Ribbon Border Punch and cut in half. It was adhered to the bottom of the DSP with Tombow. This panel was adhered with Dimensionals so Gingie could spin.  The slide is cut using the Word Window Punch. I know you've heard me say it a million times before, o.k. maybe not a million but it's a lot, but this is a must have punch. In fact, if you're only getting one punch to start with, this is the one. Just so you know, the other two must haves would be the Decorative Label and Large Scalloped Circle. Just line up your punch on one side of the paper an punch your way across to the other. I actually punched too close to the sides. :( You know I tell it like it is. But there was no way I was going to cut another piece of DSP that size. I just needed to make it work. So, in order to keep the DSP from tearing when Gingie spun to fast towards the ends, I added Dimensional "stops" under the DSP to keep him from spinning to close to the edge.  

My sweet little cookie was inked with Soft Suede and then stamped off once to give a softer color. He was cut out with the coordinating Holiday Framelet. The bow-tie is punched from the Owl Builder Punch. A few little pearls for his buttons and he was finished.    :) The sentiment is from Snowflake Soiree an was stamped in Soft Suede onto a scrap of V.V. c/s and punched out with the Decorative Label Punch. It was sponged lightly around the edges with Cherry Cobbler Classic Ink and adhered with more Dimensionals and the front was done.

Here's the inside-


This sentiment is from Teeny Tiny Wishes. I really don't know what I did before I purchased this set. My tasty little friend is stamped again and then a little visit from Tink made him even yummier, hard to believe that's possible. :)

That's all I have for you today. What did you think? I wish you could see it in person. He's just so darn cute spinning head over heels across this card. In addition to the diagonal strip being unexpected, it also gives him more room to spin and therefore gives more opportunities for smiles. I hope he inspires you to make a fun card soon. As soon as I saw this little guy, I knew he would be perfect for this type of card and I was right. I hope you think so too! If you liked today's card or have questions about it I hope you'll take a moment to leave me a message below. I love hearing from you and read all of your comments. They really do make my day. If you'd like to +1 or Pin it, I've put those buttons on my blog for your convenience. Friends and Followers are always welcome too! :)

Thanks so much for taking time out of your busy day to stop by my little corner of the world. You are very appreciated! I hope you have an Amazing weekend filled with lots of time for Family, Friends, and of course Creativity. Till Next Time-

Remember- Life is often more about the storms than the peace they seek to overwhelm. It's not about Waiting for the storms to pass, but Learning to Dance in the rain.

Be Safe,

Shan
Pin It

Monday, April 9, 2012

Sweet Bunny Spinner

Pin It
Hey y'all. Happy Monday! I hope you all had a safe and enjoyable holiday weekend. I know I did. :) I spent Friday night with friends, Saturday with friends and babysitting the sweetest little Chunky-Money around, and Sunday cooking a fabulous dinner to eat with my baby girl. All in all pretty good!

I meant to post today's card yesterday, but never even got around to checking my e-mail on the computer. What in the world did we do before smartphones? So this is a day late for Easter but I think it's still a really cute card and if you aren't familiar with spinner cards, it might give you ideas for your own.

Here's today's card-

Spinner card with EveryBunny stamp set and Nursery Nest DSP

Don't you love it when you can use DSP from one specific set for a totally different type of card? I do! It's like getting another pack of DSP for free! For this card I started with a base of Perfect Plum. I'm not usually a Pastel-ly kind of person but I'm trying. Then I added this 4 x 4 piece of DSP from the Nursery Nest DSP Collection. Such soft pretty colors and I felt like the up and down pattern kind of mirrored the motion of my sweet little bunny as she spins her way across my card.

I used the sweet little bunny from the EveryBunny stamp set and water-colored her in with my Blender Pen and Classic Ink Pads. Doesn't she look like she's holding on to that egg and getting ready for her ride? It's hard to see but I used some Dazzling Details on the inside of her ear and all around the darker outside edge of her shell for a little shine. I inked up part of the sentiment with my Stampin Write Markers in Perfect Plum, and punched it out with my Word Window Punch. A little sponging around the edges and some Stampin Dimensionals and the front was done,

Here's the inside-

Inside of card with EveryBunny stamp set

I inked up the rest of the sentiment the same way and stamped it on a piece of Whisper White c/s. I stamped the sweet little "egg-flower" with Basic Black Classic Ink and then water-colored it with my Blender Pen and Classic Ink Pads as well. For some added sparkle I once again used my Dazzling Details to make the image and the inside of my card even prettier. I also outlined the image with some Bashful Blue for a little shadowing and to make the image "pop" just a little. A little sponging around the edges of my card for a final little detail and my card was done.

I wish you could see it in person. It's just so cute not to mention fun to watch my sweet little bunny spin her way back and forth across the card. :) You know it's the small things in life. LOL

Well, that's all I have for you today. I should be getting back to my regular schedule this week of designing and posting; Look for a challenge card later this week and an All-New End of the week technique too.

If you liked today's card, I would love it if you left me a comment. It's great when I get to hear from you! Also, if you liked it, please feel free to +1 or Pin it. I've added the buttons to my side-bar for your convenience. Friends and Followers are also welcome. :)

Till next time-

Remember- Life isn't about Waiting for the storm to pass, but learning to Dance in the rain.

Be Safe,
Shan
Pin It

Thursday, April 5, 2012

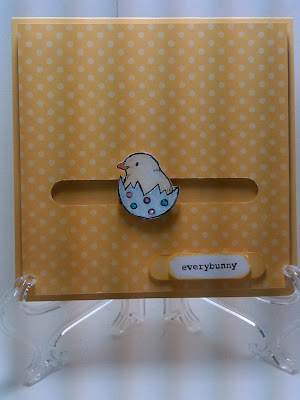
Sweet "Peep" Spinner

Pin It
Hey y'all. Happy Thursday to you. I hope your week is going great!

I don't know about you but one of my favorite types of cards is a spinner card. I love them because they're just so cute and they never fail to make me smile. :) In fact one of my first End of the Week Techniques was this spinner card.

For the last few Easters we had a really cute stamp set called A Good Egg. One of the stamps was of a little chick in a shell, and lots of people used him to make "Peeps" cards. He was just so precious! When they announced that set was retiring, I have to admit I was pretty bummed. However, this year's set Everybunny is so precious it was hard to be too upset. Especially since it also has a sweet little chicklet. For some reason though, I haven't seen any "Peeps" type cards featuring him. Well, I decided to change that...

Here's today's card-


Isn't he sweet? The best part, this card was so Easy to make. The hardest part was figuring out which colors I wanted to use to water-color with. LOL (Don't you just hate it though when you see something you missed, but you don't see it until it's on your post and you can't fix it? I just noticed I didn't put the ...'s after my "everybunny". Oh well, guess I know what I'll be doing when I get home.)

Any-hoo, back to my sweet little chicklet's card. I started with a base of Daffodil Delight folded to make a 4 1/4" square card. I added a 4' square of printed DSP and used my Word Window Punch to make the channel. You do have one of these punches right? It was the first punch I ever bought about 6 years ago and  is still one of my favorites. It's a must have! I stamped my sweet chickie on Whisper White c/s and used my blender pens and classic ink pads to color him in and then fussy-cut him out. It's hard to see but I went back just before bedtime last night and added a little of our dimensional glitter-glue (can't for the life of me remember what it's called right now. AUGH!) to his shell for a little added sparkle. I popped him up on some dimensionals and pennys, slid him in the channel and sat there and played with him for a few minutes. I then stamped part of the sentiment from the same set onto a scrap piece of Whisper White c/s in Chocolate Chip Classic Ink and punched it out too. I slid it back into the punch and punched again to get a smaller piece. A little sponging around the edge, some dimensionals and a Daffodil Delight Punch below it and the front of my card was done.

*Tip*- when making spinner cards it's helpful to double layer the dimensionals on your spinner layer, to make it easier for your spinner to spin. It's not absolutely necessary, but it does make it spin easier.

Here's the inside-


I stamped the rest of the sentiment from the front of the card in Chocolate Chip. I thought black would be too harsh. I then stamped the sweet little bunny and chick  to give the inside a little something pretty. Isn't he just too sweet?!? I used my blender pens and Classic Ink pads to color and finished it off with some dimensional glitter for just a little something extra. I used a little Bashful Blue to outline him for a little extra dimension and shading. This was the first time I had tried this and I think it really adds to the look. I've seen it on lots of blogs, but boy was I afraid to try. You know me, "Scaredy Cat" all the way...what if I used the wrong color, what if I messed up and had to start all over again and so forth. Whew! Not too bad though for a first attempt, and definitely something  I will do more of. A little sponging around the edge of the cardstock in Daffodil Delight and my card was done.

This card just makes me smile! How about you? I have to say, getting this card from someone would totally make my day. To me, that's the Gold Standard of crafting, to make something you would be happy to receive.

Well, that's all I have for today. I hope you liked it and I hope it inspires you to make something special for someone in your life. I hope you'll come back tomorrow for my End of the Week Technique.

If you liked today's card please feel free to leave me a comment or to +1 or pin it. Also Friends and Followers are always welcome, just click on the buttons in my sidebar.

Till next time-

Remember- Life isn't about Waiting for the storm to pass, but learning to Dance in the rain.

Be Safe,
Shan Pin It

Wednesday, January 25, 2012

End of the Week Technique #17 Floating Spinner - Special Birthday Card

Pin It
Hey y'all. Happy Humpday! I hope you're having a great Wednesday. I have a special card to show you today. It's my sister's birthday card. Shhhh- don't tell her about it- kay? I told her she couldn't visit here today, 'cuz I was gonna post it on here. (:

I know it's only Wednesday, but I figured we'd move our EWT up a day or two and use this for it this week, because let me tell you after all the work I put into this last night, I'm surely not coming up with any other "new techniques" this week. You hear? Good. (:

You ever have one of the concepts where you know just what you want and how it's gonna play out and everything you need and you sit down to make it happen and then 2 hours later look at the mess Catastrophe around you that has still failed to produce said end product and wonder "How the **** did this happen?" Yeah. That was me last night. I was inspired by a combination of a card I saw Sunday and a card I had seen online to do a Z-fold type of a card but have a floating spinner in the fold. Since it's my Sis' birthday I wanted a Spectacular Card! I decided to use cupcakes and I wanted to have a floating, spinning cupcake. Sounded so simple ... in my head. Not! I couldn't have the card situated the way I wanted,  couldn't punch through double cardstock, when you score and fold 2 pieces of punched and scalloped cardstock, multiple times, that are separated, the edges may not line up perfectly anymore. Do you see where I am going? Add to that new score measurements that I obviously didn't measure twice and score once for because I messed up a couple of pieces of paper. It's a good thing I made two of these, one for my sis and one for my techniques book that I am making because I tell you what, otherwise, who knows when I would have made another one.

However, since it's for my sister- I have to say the 4 hours, yes I said 4 hours from start to finish was worth it. At least I think so. Are you ready to see it?


Because of the odd (even for a z-fold shape) shape I had a hard time getting a picture of the front. This makes it look like there's a lot of open space, but it's really only to about the center. (Truth is I stamped the sentiment at almost midnight in the upper left hand corner and I didn't stamp it far enough over and you can see the last 2 letters or so if I took the picture full on frontal and I was too tired to finish the inside of the second card and take more pictures ):  )  I stamped the cupcakes down the right side for two reasons. 1- You know I like the inside to look as pretty as the outside and 2- I wanted there to be some motion there to mirror the motion of the cupcake spinning in the cutout window. I stamped off once before stamping each image except the cherry and then let Tink have her way. Don't they look pretty?

Here's a closer picture of the inside page-


I stamped the cupcakes with Crumb Cake and Blushing Bride, the cherry with Real Red and Garden Green and the sentiment in Chocolate Chip is from the Create a CupCake set.

Here's a picture of the card opened up-


I used a base of Blushing Bride c/s and for the inside panel used a piece of DSP from Beau Chateau that I sponged with Crumb Cake. All of the c/s edges on all surfaces were sponged with Crumb Cake.

Here's a closer picture of the cupcake panel-


As you can see the cupcake is suspended in the middle of a Large Scalloped Circle Punch. To make the punched area I simply marked my halfway point on the card and slid my Large Scalloped Circle Punch in there (at the mid point- you could use any punch you wanted) and went as deep as I could with the punch and punched. I also did this with my DSP, but as a back-up I also laid my DSP under my c/s and traced an outline of where the punch should be to make sure I was in the correct spot. I tried to get my punch points directly on the score lines and they just missed. I think I would have made this a little easier on myself if I had used a large circle punch, unfortunately I didn't have one, maybe I'll try it again when I get one.

Here's a close-up of the cupcake-


I used heat and stick powder and then our new Vanilla Embossing powder and my kitchen smelled sooo yummy! It was like baking custard without the guilt or the calories. However, I think that adding the glitter and setting it takes away some of the smell.

*Tip*- When doing double sided images like this when you are going to "sandwich" something remember you have to do opposite sides. I had initially heat embossed all the frosting on the same side and when I went to sandwich them together they didn't match up, so I had to turn it over and emboss it- does that make sense?

The hardest part of the cupcake was getting Tombow on the "candle and flame" and then lining up the thread in the center of them and then lining it up down the center of the cupcake. I secured it down the rest of the cupcake with dimensionals, and then secured it to my c/s with SNAIL. Clear fishing line or monofilament thread would have been the best for this, but I didn't have any, so I used a very fine flesh colored sewing thread that if you scroll back up to the first picture, you can barely see when the card is in it's regular position, and even open like this is not much of a distraction.

So, what do you think of today's EWT? It's a little harder than most of our previous EWT's. Are you going to give it a try? I would love to see your efforts? I would also love to hear what you think of my efforts. If you liked it, I would love it if you left me a comment. It's great when I get to hear from you! Also, if you liked today's card, please feel free to +1 or Pin it. I've added the buttons to my side-bar for your convenience. Friends and Followers are also welcome. :)

I really hope my sis likes her card!

I hope to see you back here soon. Don't forget Sale-A-Bration is going on. Now is a Great time to host a Workshop or Stampcamp or even place an order and get great FREE and Exclusive Stampin Up merchandise. You can go to my ONLINE STORE for more information.

Till next time-
Remember- it's not about waiting out the storm, it's about learning to dance in the rain.

Be Safe,
Shan


Pin It

Thursday, October 13, 2011

End of the Week Technique #3 A Sparkly Spinner for a Friend in Need

Pin It
Hey Y'all, Welcome back, or Welcome if it's your first time!

Today's card will seem particularly appropriate considering the weather outside here in the good ol' DMV is.... wait for it.... here it comes.... can you guess it.... yep.... 100%.... WET....with 100% chance of staying WET, with Thunderstorms likely! Where are we Forks? Seriously?!? :-) And, it's it's been below 72, for the last 2 days in a row, which we all know is TOTALLY unacceptable!

But, the sun'll come out tomorrow. Doug Kammerer the chief meteorologist said so, or did he say Saturday, at any rate he said the weekend was supposed to be Beautiful, Woo-Hoo! So, hopefully, you can look at today's card and it will make you smile and help get you through until the sun shines, and hopefully you'll make your own as well.

I don't know about you, but I got to relax on Columbus day by spending a few hours stamping and had a nice new card already made for today's segment. Then I got an e-mail that changed those plans, so we'll do that card next week. Turns out though this cards works with today though, funny how things work sometimes huh?

For those of you that don't know me, My beautiful daughter Jacquelline and my Upline Robin's daughter Emma used to skate Synchro together. That's how we met. J has graduated and moved on, and one of the girls on the team with Emma named Emily has had some recent medical problems and is in the hospital right now and is very ill. Robin sent out an e-mail saying that Emily loved Frogs and that Lime Green was her favorite color and it might be nice if we had the time to make a card to brighten her day. I immediately thought of this idea. I hope it makes her smile as much as it does me. I hope you like it as well. Maybe, if you get a chance to, you could remember Emily in your prayers too. Thanks!

 Do you like spinner cards? I LOVE Spinner Cards. They're interactive. They make me want to constantly pick them up and tilt them from side to side and watch them spin baaack and forth, baaaack and forth, baaack and forth and as I do I usually sit there with a Goofy grin on my face and think of the Special, Wonderful, person the took the time to make such a wonderful gift for me. (Unfortunately, it's usually me that took the time, but if you would like to be that Special, Wonderful, person, please feel free to share your creations as well!) One thing to make sure of though when making spinner cards, is to use quality cardstock. Now, I know I'm a Stampin' Up, distributor so you might say "She's going to say Stampin' Up's the best because that's what she sells." Nope, I'm going to tell you  I've used other card stock and other Designer Series Papers on the market and I've had to "Double them up" to get them to hold up and even then they would tear quickly under the strain of the spinning. So, I really do recommend Stampin' Up cardstock for this project because your card recipient is going to want to play with this card A LOT!

I started with a square base of Pear Pizazz and topped that with Lucky Limeade. Both are In-Colors. Sorry the colors aren't showing up well here. Better lighting is a little further down in the budget. :-( Next Pic is a little better. All stamps are from Turtle and Co. which is our Ronald McDonald House Stamp Set this year and a portion of all the sales go to this charity. How Stinkin cute is this little guy!?! Even before I blinged him out? I stamped him on Whisper White cardstock in Basic Black ink and then used my Stampin' Write Markers to color him in. I used Garden Green to outline him and Lucky Limeade for his body. I then cut him out and using my Two-Way Glue Pen covered his whole cute little body body with glue and then dunked him head first in my jar of Dazzling Diamonds Glitter. Yep, Just dove him right in! And, when I rescued him from the Dazzling Diamond Quicksand I had  forced him to endure, look how beautiful and happy he looked! Well, he couldn't then sit on just any plain ole lily pad so I made him a special one. I took some old Glorious Green that I had (although I'm sure Garden Green would work just as well) and using my new Lattice embossing folder, ran it through my Big Shot to give it some texture. I then used my Small Oval punch and cut out 3 ovals and using my Tombow Adhesive glued them together. Next I sponged the edges with some Garden Green to give it a little dimension and depth and then I used my Two-Way Glue Pen and you guessed it, a little more Dazzling Diamonds to add a little something-something for my cute little fellow.


Now, for the Spinner portion. There are plenty of video tutorials on You-Tube, but here's the Down and Dirty Print Version which I know you'll find hard to believe coming from me.
Ready? Here goes-
1-Take your handy dandy Word Window Punch (first punch I ever got, I swear It's the Best!) and slide it in as far as it will go. You can now punch and then continue to punch as far across as you want and it will be even. you can go across the card, or down the card in this manner. If you want, you can even make the lines zig-zag, you are only limited by your imagination and how far in you can reach your punch or tear the edge of your paper.
2- On the back side of the cardstock place a penny. Take a Stampin Dimensional and line it up in the Groove with a flat side to the top and bottom and remove the sticky strip and adhere to the penny.
3- I recommend mounting your cardtock layer on two Dimensionals because you want to make sure there is plenty of room for your slider to move freely and not get stuck. Place your dimensionals in each corner and then in the center of your card, above and below your punched slot. Just make sure to place them so the penny won't hit them when it spins. Do this next. As you do this have your penny/dimensional lined up with your slider slot as much as possible. This will really be very easy. Trust me on this. Some people advocate for wedging your paper apart and shoving your assembled slider mechanism in between the layers but I find this cumbersome and it risks tearing the slider window.
4- Center your Slider on a penny with a Dimensional (try to center it as much as possible for the best spinning).
5- Remove the top sticky from the penny under the cardstock, the one from #2. Now stick your Slider (#4) to this one.
6- Enjoy! Slide back and forth. Your slider may not slide smoothly the first few times, but the more you slide it the more smoothly it should slide and the more it should spin for you.


I tried to insert a video here but it was taking to long to upload at work so I'll try again from home :-(

After I played with the card a little, I decided the top greeting was a little plain, so I went back and Blinged it up a little. I stamped the greeting again on Whisper White cardstock and punched it out with my Word Window Punch. (told you it was Awesome!) Next I took My SNAIL Adhesive and swiped it over the punched out piece and then coated that with ... can you guess...Yep my fav... Dazzling Diamonds! and now I think the card front is Perfect! What do you think?


I then stamped a few more images on the inside and colored them in because, well they were just so cute and I just could help myself... Cute Overload I guess.
This picture actually shows the truest colors. But while I was typing this I got an e-mail from my upline about a light source for a really good price so maybe better pics are just around the corner. (fingers crossed, it is pay day tomorrow after all)

So, that's it for this edition of End of the Week Technique and for Emily's Get Well Card. What do you think?
Do you think she'll like it? I hope so! I hope you like it too, but more than that I hope it inspires you to try your own spinner card. You really are only limited by your own imagination. Give it a try! And, Please,  remember to be sure to show me how they turn it out. I can't wait to see.

If you liked today's card, I would love it if you left me a comment. It's great when I get to hear from you! Also, if you liked today's card, please feel free to +1 or Pin it. I've added the buttons to my side-bar for your convenience. Friends and Followers are also welcome. :)

As always, if you need supplies to recreate this card or your own cards, you can shop at my online store, HERE, 24/7.

See you back here soon.

Be Safe,
Shan Pin It