Wednesday, February 29, 2012

An Open Seas Birthday

Pin It
Hey y'all. Happy Hump Day! We're half-way through the week. Just two more days to go. :) It's rainy and cold here in the DMV and they're even talking about the white stuff for this weekend, YUCK! I hope it's nicer where you are.

Sunday was my Sweetheart's birthday. (Hey Step-Nanny are you paying attention, I'm talking about him? LOL!)  We're both from the South and love the ocean. One of the things we often talk about is just escaping and getting away from everything out on a sailboat. If I ever won the Lottery one of the first things I would get would be a really nice sailboat. One with a nice master suite that his 6'2 self could fit comfortably in without hitting his head. So, when it came time to create a birthday card for him I knew exactly which set I wanted to use.

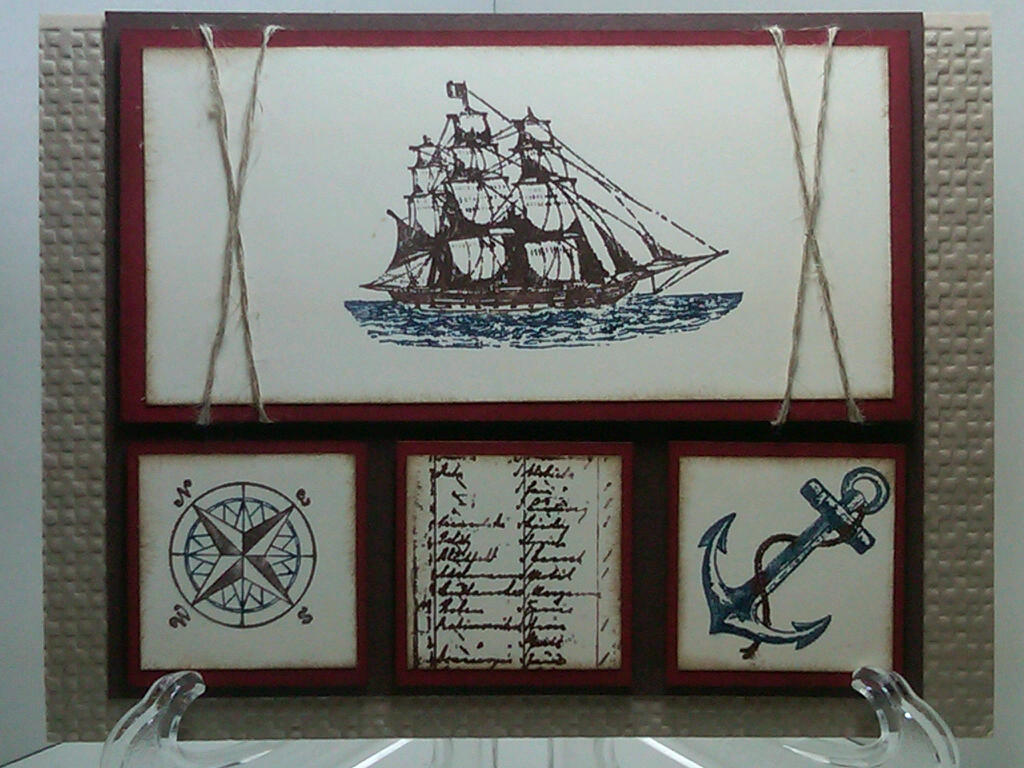
I sat down Friday night and got busy and this card came together pretty quickly. Here it is-


I used a base of Crumb Cake and ran it through my Big Shot with my Lattice Embossing Folder for some texture. I then sponged over that with some Crumb Cake Classic Ink to make the texture show up more. The DSP is retired Nautical Collection from last year, matted on Chocolate Chip and Tombowed to the base. The focal image is from the stamp set Open Seas. I inked it with Chocolate Chip and Not Quite Navy Stampin Write Markers and stamped it on Very Vanilla c/s. This was mounted on Cherry Cobbler and Chocolate Chip c/s and was then popped up on dimensionals. The compass was also inked in Chocolate Chip and Not Quite Navy Stampin Write Markers and stamped on Very Vanilla c/s. It was punched out using my 1 3/4 Circle Punch. I used my Mat Pack and Paper Piercer to pierce the hole for the Vintage Brad I put in the center. I think it goes perfectly there. All the cardstock and DSP on the front of the card were sponged around the edges in Crumb Cake to add dimension and depth. It should have been done on the inside too but alas I did the inside of this and the second card at a later time and forgot. SMH! :(

Here's the inside of the card-


The compass image is from the same set. It's stamped in Not Quite Navy and is stamped off 3 times prior to stamping on the card to give that lighter impression. The sentiment is from Elementary Elegance, our Sale-A-Bration set. You can get this set with a $50 purchase. I cut the stamp so I could get it to stamp in a line like that. But it will still line up and stamp underneath each other in the set like normal as well. Pretty nifty huh?

The good news is he liked his card! Yea Me! And, since I ended up making a second card (did you see it yesterday?) I still have another one for him at another time :)


That's all I have for you today. I hope you'll come back and see me tomorrow.

Don't forget Sale-A-Bration ends in a month. You can shop in my ONLINE STORE and get your FREE merchandise. Have Fun!

Today's Card Recipe-
Cardstock- Crumb Cake, Chocolate Chip, Cherry Cobbler, Very Vanilla
Ink- Crumb Cake Classic Ink, Chocolate Chip and Not Quite Navy Stampin Write Markers
Stamp Set- Open Seas Elementary Elegance
Big Shot, Lattice Embossing Folder
Accesories- Vintage Brads, Mat Pack, Paper Piercer, Dimensioinals, Tombow, Sponges

I hope you liked today's card as much as my sweetie did. If you did, I would love it if you left me a comment. It's great when I get to hear from you! Also, if you liked today's card, please feel free to +1 or Pin it. I've added the buttons to my side-bar for your convenience. Friends and Followers are also welcome. :)

Till next time-

Remember- Life isn't about Waiting for the storm to pass, it's about learning to Dance in the rain.

Be Safe,
Shan


Pin It

Tuesday, February 28, 2012

Open Seas and FMS #23 / My Challenge # 10

Pin It
Hey y'all. Happy Tuesday. I hope you're having a great day, and a great week so far. Just got back from the doctor and am officially on the mend. My oxygen saturation is up to a whopping 98%. Woo-Hoo! Never thought I'd be happy about 98%. Still short of breath on exertion but getting better.

Funny story- my first day of clinicals as a nursing student I had a patient with Dementia, very aggressive, verbally and physically. Not a very nice experience. As I was reading his chart I came across the notation "Pt SOB" I was offended. I told my instructor, "Mrs. Strickland, (who was a gem, by the way) This is horrible! It's not his fault he's not very nice. They shouldn't write something like this about him in his chart, it's an official record!" Hand to God, I said it! I was so serious. I was maybe 20. She looked at me at said all straight-faced... "SOB- Short-of-Breath" and then just smiled. I know she wanted to follow up with a big ole "DUH", but God Love Her she didn't.

Are you laughing yet? I hope so. :)

If not, I hope today's card will at least make you smile. I needed a card for my sweetheart's birthday last Sunday and made one.

But not this one.

And then I thought about how I could use the set for the challenge over at Freshly Made Sketches. I almost didn't submit it for their challenge though, because their guest designer had used the same stamp set and DSP I used in my original card. (I'm going to post it later this week) When I do a challenge, I try and sketch it out before I look at what the Design Team has done so I don't feel like I'm CASE'ing from them. Once I have my idea figured out, I look at what the team has done and what has already been submitted. If mine is different from anyone else's I submit it.

I know this is silly. Why can't more than one person have the same idea? I'm just afraid someone's going to think I copied them and then I'm definitely not going to win anyway. Would you believe one time, I sketched out a challenge, looked at the DT samples and I kid you not, same stamp set, same DSP, same placement everything! I know I should feel like "Great Minds" and all that but nope! So I re-worked my sketch idea, till the only things our cards had in common were that they used the same stamp set, and came up with today's card. I submitted it and I'm really glad I did. You know the Guest Designer I said had used the same set? She thought my card was "Awesome" and how even though we both used the same set how both cards were so "unique".

Here's today's card-


And here's the sketch-


As you can see I turned the sketch on it's side and pulled the squares to the bottom instead of the side, but all of the design elements are still there.

I started with a base of CrumbCake which I ran through my Big Shot in my  Lattice Embossing Folder for some texture. Next came layers of Chocolate Chip, Cherry Cobbler, and Very Vanilla. They were all sponged with Soft Suede. I used my Stampin Write Markers to ink up my stamps from my Open Seas stamp set. I used Not Quite Navy and Chocolate Chip to stamp on the Very Vanilla c/s. The Chocolate Chip layer was Tombowed to the base. Two pieces of Linen Thread were tied around the top section to fill in the extra space and to tie in with the "Nautical" theme. Then the Very Vanilla and Cherry Cobbler c/s pieces were Tombowed together and then applied to the Chocolate Chip piece using Dimensionals.

Here's the inside-


I used the compass image from the front and stamped off 3 times to get the lighter image. However, I realized too late that I forgot to sponge the edges of my Very Vanilla c/s on both cards. SMH... :( I didn't add a sentiment because I'm not sure what I'm going to use this card for.

To be honest I ended up liking this card so much, it was a hard decision as to which card to give my darling. He may still end up getting it for some occasion. :)

Well, I hope you liked today's card and I hope you'll be back soon to see what I have in store for you. If you need supplies to make cards of your own you can shop in my ONLINE STORE 24/7. Remember Sale-A-Bration is only here for another month. Don't wait too long.

Today's Card Recipe-
Cardstock- CrumbCake, Chocolate Chip, Cherry Cobbler, Very Vanilla
Ink- Soft Suede Classic Ink- Chocolate Chip, Not Quite Navy Stampin Write Markers
Stamp Set- Open Seas
Big Shot- Lattice Embossing Folder
Accesories- Linen Thread, Tombow, Dimensionals, Sponges, Clear Blocks

If you liked today's card, I would love it if you left me a comment. It's great when I get to hear from you! Also, if you liked today's card, please feel free to +1 or Pin it. I've added the buttons to my side-bar for your convenience. Friends and Followers are also welcome. :)
Till next time-

Remember- Life isn't about Waiting for the storm to pass, it's about learning to Dance in the rain.

Be Safe,
Shan Pin It

Monday, February 27, 2012

End of the Week Technique #21 - Emboss Resist

Pin It
Hey y'all. Happy Monday! You're probably thinking, Monday and End of the Week Technique? Well I totally flaked last Thursday night and forgot to take a picture of this card, so I wasn't able to do my EWT last week and then didn't get to post it over the weekend either so here we are with an EWT at the Beginning of the week instead. SMH :( I'm still going to try and get a new EWT posted for this week as well.

Today's technique is one I've seen done plenty of times and have just never done at home. It also uses a stamp set I've been wanting to get since it first came out almost a year ago. I was lucky enough to get to use it a couple of weeks back when my upline Robin Merriman offered an "Open Stamp" in her studio. Thanks Robin! In fact This is a popular technique with this stamp set. I've seen it done countless times before, by countless stampers and it still strikes me as sooo beautiful, I had to do it as well.

Here's today's card-


I am sooo having a moment right now, and can't even remember the name of this stamp set that I love so much. I blame it on all the steroids I've been taking for my pneumonia. They make my brain so muddled!

This is a really simple technique but gives such a WOW result. I used my All-Time Favorite color, Island Indigo as a base. First you stamp your image with VersaMark, I stamped mine on a Whisper White background. Next you apply your Embossing Powder, I used White Embossing Powder, to your VersaMarked image and heat set it with your Heat Tool. I absolutely love Heat Embossing! It's so magical to watch your image appear. After heat embossing the image, you simply sponge over it with the color or colors of your choice, I stuck with Island Indigo. You can use Sponges or Daubers, I used the daubers here, but have used sponges in stampcamps before. It just depends on the look you're after and your preference. Experiment and see which one you like the best. Once your done layering your color over your image, you simply take a napkin and rub over your embossed image. Any ink that may be on it will simply buff right off, leaving your image to stand out clearly from your colored background. See- I told you, really simple!

I sponged the edges of my cardstock with Island Indigo and then stamped one of the sentiments from the set in Island Indigo as well and the front of my card was done.

Here's the inside-


I kept it very simple here. Since I used the sentiment "Hello" on the outside I didn't put a sentiment here. I left it blank so there would be more room to write.

I stamped a small image from the Everyday Elegance stamp set in the bottom corner and added a little bling to it. It felt so good to do that! It's kind of one of my signature looks and for some reason lately, I haven't had a  lot of cards where I used it. I thought the little butterfly was a nice addition, since it tied in with the flower theme from the front of the card. It's also fun to use because I got it for FREE with a $50.00 purchase. It's one of our Exclusive Sale-A-Bration items. You can get your Free items by placing an order in my ONLINE STORE.


That's all I have for you today. Seriously- two posts is enough don't you think? :) I'll be back tomorrow with another new card. ( Pictures are already taken (:  )

I hope you liked today's card and that it inspires you to try something new today. If it does, I would love to see what you create!

If you liked today's card, I would love it if you left me a comment. It's great when I get to hear from you! Also, if you liked today's card, please feel free to +1 or Pin it. I've added the buttons to my side-bar for your convenience. Friends and Followers are also welcome. :)

Till next time-

Remember- Life isn't about Waiting for the storm to pass, it's about learning to Dance in the rain.

Be Safe,
Shan Pin It

MDS Monday-

Pin It
Hey y'all. Happy Monday! I hope everyone had a great weekend. I had Friday night off and made two cards I'll post here later this week, got to stamp with my best stamping buddy, April, on Saturday and just relaxed yesterday, caught up on my DVR and got ready for the Oscar's. But before the Oscar's started I made a quick MDS card for you. :)

I was inspired by my stamping with April. We did a project from our Stampin Success catalog, I'll post that soon too. Anyways we did some tone on tone stamping and it made me remember how simple but pretty that effect is. So I decided to try it on MDS. I ended up not using just the one color, but a palate of colors and I have to say it was fairly quick and easy and I'm not too disappointed with the results. Not sure it's my favorite MDS card, but I didn't feel the need to trash it either. Maybe you'll chime in and let me know if it's something I could send to someone via e-mail (which is what I often do with my e-cards) or not.

Here's today's card-


And here's the inside-


What do you think? I randomly stamped (I know...random....I hate doing that) the 3 different floral images from the stamp set I used (I think it's One of a Kind) in 3 different tones of purple and made a little layered flower using the Boho Blossoms Punch and just adjusted the sizes so they would layer nicely.

I used two different stamp sets for the sentiments. All of the items used are from my basic MDS download except the Boho Blossoms Punch which I got a while back to do another layout. Don't forget you can Download a FREE 1 month trial of our fabulous MDS program with absolutely No Risk! You can get it by visiting my ONLINE STORE.

Well, that's all I have for today's MDS Monday. Hope you liked it and I hope it inspires you to make something today, maybe with MDS or maybe a technique you haven't used in a while like Tone on Tone stamping. Remember the goal of this blog is to Just Try!

Till next time (it will probably be later today)-

Remember- Life isn't about Waiting for the storm to pass, but learning to Dance in the rain.

Be Safe,
Shan Pin It

Sunday, February 26, 2012

Preview Freshly Made Sketches Challenge #23

Pin It
Hey y'all. Just a quick preview post today so I can make sure I get this card into Freshly Made Sketches' challenge on time.

I had the idea for this card but when I saw that the guest designer had used the same stamp set and DSP I decided I wouldn't enter the challenge. :( But I was making a card for my boyfriend's birthday and after changing it around so the only thing that resembled the guest designer's card was the fact that it was the same stamp set and DSP, I decided to go ahead and enter it anyways. Normally I wouldn't, but I loved how it turned out and figured, why not? Great minds and all that, so here's the preview. I'll have the full post later this week.


Here's their sketch, I rotated it and changed the center layout just a little, but all the main features are still there-


Hope you have a great evening and are having a great weekend.

I'll be back tomorrow with an All-New Full sized post.

Till next time-

Remember- Life isn't about Waiting for the storm to pass, it's about learning to Dance in the rain.

Be Safe,
Shan Pin It

Thursday, February 23, 2012

A Fun, Quick and Easy Celebrate-ion Card - TST Challenge 54 /My Challenge #9

Pin It
Hey y'all. Happy Thursday. Just one more day till the weekend begins. :) I hope you're all having an Amazing week. I'm still sick but at least I feel like I'm slowly getting over this pneumonia. At least I have had the energy to design and stamp.

I've already done my "challenge" for the week, but I saw this sketch challenge over at Try Stamping on Tuesday, and knew I wanted to do it too. It was another one of those sketches that I just looked at and knew exactly what I wanted to do. Love when that happens, especially since it happens so rarely, for me at any rate.

Here's my take on the sketch-


And here's the TST sketch-


What do you think? I sketched it at work and went home and was able to recreate my plan so quickly and easily. Apparently though I sketched it too quickly, because I realized later that I missed the extra border under the lower strip and that the lower strip was supposed to go all the way across. Hopefully the design team over at TST won't mind too much.

I started with a base of Peach Parfait, the same as yesterday. Hard to believe I haven't used that color much and then made two very different cards with it, for two different challenges, in one day. Next I layered a Whisper White panel that I ran through my Big Shot with my Perfect Polka Dots Embossing Folder. Two strips of DSP from Just Add Cake (love that pack!), add some bright color to the front. 

For my flower I punched out pieces of Peach Parfait and So Saffron with my Large Scalloped Circle Punch. I tried something new with these pieces and, using my paper snips, made cuts in between each of the scallops and then raised every other one to make it look like individual petals. I layered the two colors on top of each other, so that you could see both colors and secured them with a brad from the Sale-A-Bration Ribbon and Brad pack. The flower was adhered with two dimensionals, for a little more elevation.

The sentiment is from Sprinkled Expressions, another Sale-A-Bration set and I used my Word Window Punch and Modern Label Punch  and some more dimensionals to make it stand out.

Here's the inside-


The sentiment is from the same Sprinkled Expressions set. I colored it in with my Stampin Write Markers in Peach Parfait, Baja Breeze, So Saffron, and Wild Wasabi. A strip of DSP carries on the design theme from the front. It's hard to tell from my picture (sorry about that) but the DSP is up from the bottom a little so that there is still some Whisper White c/s showing.

Like I said, Quick and Easy but I think it's so fun too! 

I hope you liked today's card and I hope it inspires you to create something today, maybe for a challenge, maybe a new technique... Remember the goal of this blog is to Just Try.

I hope to see yo back here tomorrow for my End of the Week Technique. It's one I've been wanting to try for a while now.

Till next time-

Remember- Life isn't about Waiting for the storm to pass, but learning to Dance in the rain.

Be Safe,
Shan
Pin It

Wednesday, February 22, 2012

An Enchanting Window (Challenge #8)/ Stamping 411- SSC-243 /My Challenge #8

Pin It
Hey y'all. Happy Humpday and Happy Ash Wednesday to those of you that celebrate today as well. I am prepared for the long season ahead.... I gave up my usuals (chocolate and cussing), thank goodness I still have my stamping to keep me happy and sane! (:

I have a new challenge card for you today. Yesterday, when I was looking through my feeds I actually found two sketches I liked and knew just where I wanted to go with them. So rare for me. Of course last time I did that, I scrolled down and found out someone on the design team had my same great idea and I then had to search for a new sketch. Yesterday though, I sketched out my ideas, looked at what the DT and others had posted and was good to go. I sat down at my table and made both cards. Start to finish, they came together quickly and just how I had planned them. I had to do a little happy dance. Don't you just love when that happens. So today you get card one and then tomorrow will be card two.

Here's today's card-


And here's the Stamping 411 Sketch-


What do you think? I kept pretty true to the sketch. This card is so different from my normal style and I'm so excited by how it turned out! I love the DSP from Everyday Enchantment, but I've had a hard time using this particular color/pattern combination. Not sure why. However, my upline Robin Merriman created a project this weekend for our team meeting using this combo and I guess it was still fresh in my mind.

When I first saw the sketch, the image in the background reminded me of this DSP, and I knew I wanted to use DSP, instead of just a background image. The DSP also has little butterflies on it, so in addition to the butterfly on the sketch, which I know can technically be any shape, I took my inspiration for my focal point from the DSP as well.

I used a base of Peach Parfait and made a tent style card, which is also something I don't normally do, but I think it works here. I love the color peach, but somehow I have not used this a lot. It will be gone soon though, so if it's one of your fav's stock up now. Next I layered my DSP with a piece of Pool Party that I used my Scalloped Border Punch on. I have to say my OCD kicked in just a little on this layer. This DSP has a vintage feel to it and all the 12 x 12 pages have darkened edges. Of course when you cut it though, if you cut from an edge, that can leave some edges antiqued and some not. Now you know good and well I can't have that unevenness on my card, right? Right! I knew you'd get it. So I got out my faithful CrumbCake Classic ink pad and sponge and evened the edges on my DSP so they all matched. Of course, once you sponge one elelment, you're pretty much committed to sponging them all, so my Pool Party addition got a little CrumbCake luv too. (:

I used my 1 3/4 inch Circle punch to punch out the window. Then on a scrap piece of Peach Parfait c/s I used my 1 3/4 Circle Punch and then centered it inside my Large Scalloped Circle Punch to punch out my Scalloped Frame. First time I've done that and I have to say I really like the effect. Now, you know I couldn't risk not having those circle line up, so I laid my DSP down on my card base and lightly traced the outline with a pencil and then used that as my guide to punch the window out of my base layer. This way I  knew everything would line up just right. I then took a small piece of Lace trim and laid it over the front of my DSP, and wrapped it through the edge of my punched window. Both ends were secured under the DSP with just a small amount of SNAIL adhesive. I then Tombowed my Scalloped Circle frame over the lace ribbon and the punched window to secure it. Add a little lace bow secured with a Mini-Glue Dot and the front of my card was completed.

Here's the inside-


I used two of the butterflies from my Beautiful Wings Embosslet for the inside of my card. I used Peach Parfait and Very Vanilla. I lightly sponged the edges to give them a little dimension and used Mini-Glue dots so secure them to each other and the Very Vanilla c/s I used inside of my card. I sponged the Very Vanilla all around the edges as well to carry that design theme from the front of the card. My bottom butterfly's wings are curved up just a little . Any more than this and they catch on the edges of the window. I was able to give the center butterfly a little more dimension and elevation without any impingement. I didn't add a sentiment, because I wanted to be able to have this on hand for any occasion, and I think it will be able to fit just about any need I might come up with.

What do you think? I'm so glad Stamping 411 gave us such an Amazing sketch to work with this week. I hope you like it and I hope it inspires you to try something new the next time you sit down to create, maybe a new sketch challenge, color combination or maybe even just using a punch in a different way. Remember the goal of this blog is to Just Try!

I hope to see you back here tomorrow. Don't forget I've got another challenge card ready and waiting to go. :)

If you like today's card, please feel free to leave  me a comment, I would love to hear what you think. Also, friends and followers are always welcome.

Till next time-

Remember- Life isn't about Waiting for the storm to pass- It's about learning to Dance in the rain.

Be Safe,
Shan Pin It

Tuesday, February 21, 2012

MDS Monday

Pin It
Hey y'all. Happy Tuesday! I hope you all had a fabulous, long, holiday weekend. Sorry I've missed a few days. This darn pneumonia just won't go away! I swear it's like the "Terminator" of pneumonias. After a 4th Doctors visit in a month, I got a new even stronger antibiotic, another round of steroids, and a new steroid inhaler. SMH... I am so ready to be over this and feel strong enough to get back to my regular routine! So I pretty much rested the whole weekend. I slept in, got some stamping done to show you this week and saw "The Vow" with my daughter who just moved back home from Nashville. I hope your weekend was equally as restful. :)

So, thanks to the holiday weekend, my MDS Monday is a day late but I do have it for you. I am really enjoying it. How about you? Have you tried it out yet? Don't forget we are offering a FREE 1 month trial, no strings attached and you can even purchase and download sets while you are in the trial period and use them after it's over, whether you purchase our program or not. Pretty Cool, huh?

Well, here's today's card-


I used the stamp set Cheap Talk. Isn't it cute? I have to say one of the things I love the most about SU's colors is how they all coordinate with each other. I used a strip of Sale-A-Bration DSP from Everyday Enchantment for a pop of color on my card. However, I didn't have the matching colors in cardstock. Kind of hard to tell though, isn't it? I mean, if you look real closely, you can tell the base c/s color and the mat color are not exact matches to that in the DSP, but you have to look really closely and it still coordinates so well.
The base c/s is Bashful Blue and the mat is Certainly Celery. I stamped my sweet little bird and sentiment in Night of Navy on a branch of Garden Green. So quick and easy!

Here's the inside-


Same colors carried through. I just think these little birds and the sentiments are sooo sweet! This is the first time I've used this stamp set and it may just be one I end up buying. :)

Well, that's all I have for you today. I hope you liked today's card and I hope it inspires you to try something new today, be it MDS or opening a stamp set you haven't used, or trying a new technique. Remember the goal of this blog is to Just Try!

As always, if today's card inspired you , I would love to see what you create.


If you liked today's card, I would love it if you left me a comment. It's great when I get to hear from you! Also, if you liked today's card, please feel free to +1 or Pin it. I've added the buttons to my side-bar for your convenience. Friends and Followers are also welcome. :)
Be sure to come back tomorrow for a new card.

Till next time-

Remember- Life is not about Waiting for the storm to pass, it's about learning to Dance in the rain.

Be Safe,
Shan Pin It

Thursday, February 16, 2012

Layers and Textures and A Challenge (#7) - Oh My! Cardabilities #49 /My Challenge #7

Pin It
Hey y'all. Happy Thursday. We're on the downswing towards the long holiday weekend and I couldn't be happier. I'm still amazed at how little energy I have just trying to get over this pneumonia! I've been on antibiotics for almost 3 weeks and was sick before that. At least I'm stamping again! I plan on sleeping in all 3 days! How about you?

Well, it's week 7 of the new year and I'm hanging in with my challenge/resolve to myself to do at least one challenge a week. I was catching up on my reader feeds and found one I liked over at Cardabilities. Have you seen their site? You should totally check it out, but after you're finished here. They do a new sketch every two weeks and at the end of the two weeks the  five most viewed links get posted at the top of their site with links to that person's blog. Pretty neat concept!

So, if you've been following me at all, you know I'm usually a pretty literal interpreter of sketches. I often find it hard to stray at all from the sketch. I've documented my frustrations with that aspect of myself here frequently. It's also rare that I just look at a sketch and know exactly what I want to do with it. That happened to me twice yesterday! I couldn't believe it. I usually try to figure out a sketch before I look at the design teams cards so I feel like the card is really mine and not just a CASE of them. The first sketch I saw I knew exactly what I wanted to do, down to the DSP and wouldn't you know after I had it all planned out, I scrolled down and the first card, I kid you not the very first one, was my idea even including some of the same DSP! They had even rotated the sketch, which is something I don't often do , because it strays from that whole literal interpretation thing I was talking about. Well, that sketch was out! I know I should be happy, great minds and all that, but I was not about to submit that card. *Boo-Hiss*

Then I came upon the sketch for Cardabilities #49 and I couldn't believe it. I knew exactly what I wanted to do...what were the chances? I sketched out my idea including colors and a slight interpretive change and scrolled down, surely no-one had done this...... Score! My idea was no-where to be found. Don't you just love it when you look around and no-one is near your idea? Yeah, me too.

I went home and got busy and here's what I came up with-


Here's their sketch-


What do you think? I just want to rub my hands all over it...all the texture. I added the Whisper White layer (It's my first time playing with this design team so I hope they don't mind), and I used my Perfect Polka Dots Embossing Folder to add the texture. The base is Concord Crush, love this color! It's only around for a little while longer so if it's one of your favorites too, better get it while you can. I also extended the strip of Concord Crush that I used with my Scalloped Border Punch so that it framed the Wisteria Wonder layer. I used my new Adorning Accents Embossing Folder to create the embossed hearts across that layer. I love that you get 3 different embossing folders  and they're just the right size for borders. So cool. Next I used my Fashionable Hearts Embosslet to create the little puzzle frame and the five different textured hearts that are in it. I used Pool Party, Island Indigo (my all-time fav color), Calypso Coral, Lucky Limeade and I think it's Pink Pirouette (it was in my combo pack, sorry about that). All the layers on the front are Tombowed except the little heart layer. The individual hearts are Tombowed in so they'll stay and then I popped that whole piece up on dimensionals to make that layer stand out just a little more. It's missing my normal shimmer and the only thing I'm not sure about is whether or not I should have let Tink have her way, maybe with the row of embossed hearts. What do you think?

Here's the inside-


 Ohhhh! Sorry about the blur. It didn't look like that last night on my BB. ): I didn't add a sentiment because I wasn't sure who it would be going to and I wanted to leave my options open. I did however feel the need to try and make the inside pretty too, and added one of the left-over embossed hearts.

Well, that's all I have for today and this weeks challenge. It's off to the accountant tonight to get my taxes done and then home to work on my team swap cards for this weekend. There's been multiple revisions on that one let me just tell you. I'll have it here for you next week. I hope I've inspired you to play along with me  for this week's challenge on this sketch or one of the many others out there. Step out of your comfort zone with me and Just Try.

As always, I would love to hear what you think about today's card. If you liked today's card, I would love it if you left me a comment. It's great when I get to hear from you! Also, if you liked today's card, please feel free to +1 or Pin it. I've added the buttons to my side-bar for your convenience. Friends and Followers are also welcome. :)

Today's Card Recipe-
Cardstock- Concord Crush, Wisteria Wonder, Whisper White, Island Indigo, Lucky Limeade, Calypso Coral, Pool Party
Big Shot- Perfect Polka Dots EF. Adorning Accents Hearts EF, Fashionable Hearts Embosslet
Scalloped Border Punch
Tombow

If you need supplies to help create your own card, you can shop in my Online Store 24/7. Don't forget Sale-A-Bration is still going. With every $50.00 in purchases you get one FREE item from our Sale-A-Bration catalog.

Till next time-

Remember- Life is not about Waiting for the storm to pass, It's about learning to Dance in the rain.

Be Safe,
Shan Pin It

Wednesday, February 15, 2012

End of the Week Technique # 20 - Memo Pads

Pin It
Hey y'all. Happy Humpday! I hope you're having a great week so far and are looking forward to a fabulous long weekend. My daughter's moving back home from Nashville, so my weekend is sure to be full of getting her settled in, plus we're going to take just a little time out to go see The Vow. How about you? Well, before you get too busy, here's a quick little project for you.

Are you a "List Maker"? I am so a list maker, in fact I like to think it's one of my charming habits that drives my daughter Batty. She's going to love this *snicker* (not!). As a nurse for nearly 23 years (kinda funny since I'm only 29, lol) these lists and notes, more often than not, would end up on my hands.

Funny story- when my daughter was not quite 3, and I worked nights in the ICU, my then husband would send her in to wake me in the evenings for dinner and family time. Often was the time when the notes had not been completely scrubbed off of my hands in that mornings pre-sleep shower. I would wake to my sweet baby shaking me and saying "Mommy we don't write on the walls, or the furniture or on our hands. We use the paper! Mommy!!!!!!" True story... she was soooo cute back then. I have no idea where she gets her sass from!

Now that I have a BlackBerry it keeps my hands clean...well most of the time at least. It currently has 12 ongoing lists that I keep updated. I told you, I'm a list maker. However, not everyone in my household has access to my BlackBerry or my hands as the case may be, so Memo-Pads are a great way to go. They're also  nice for "Honey-Do" lists. But they're not always the nicest looking things to have around. Why don't we make some that we don't mind looking at?

I'm helping my new friend Ashton from Something Swanky (Check her out. Great recipes and weekly link parties.) while she takes over her friends blog so she can enjoy her new baby. How nice is that? What a friend. Anyways, Ashton was looking for some crafty ideas and I thought this one would be Quick and Easy and something you can even involve the kids in.

Now, I don't normally believe in buying stuff just because it's on sale (seriously, who's got the money?) but over the holidays I got a bunch of those magnetic Memo-Pads at Target because they were in the $1 aisle and I knew I could use them for stampcamps or co-worker gifts that sort of thing or if for no other reason than I make a ton of lists and always need something to write on.

Here's my Memo-Pad-


No way Target's selling that for $1! Isn't it cute? It didn't start out that way.

Here's how it started out-


While certainly not bad for $1, not inspiring either. If you were to get a "Honey-Do" list which would you rather get it on? Me? I'm wanting the one with Love You at the bottom. Not to mention mine's definitely cuter.

Want to know what's even nicer? I used scraps of card-stock to give it it's little make-over. Scraps and about 15 minutes and I have something I don't mind putting on my refrigerator. One of things I always ask myself when I make a card or project is "Would I be happy if someone gave this to me?" I have to say if someone gave me the bottom one, not so much. If, however, someone gave me the completed top one I'd be tickled. Add a matching pen and you have a nice little set for a new office worker too.

Here's the Quick and Easy How-To. It's so easy, I didn't even take pictures for you.
1- Take a piece of scrap paper and fold it over the top of the memo-pad, from the front where the sheets tear off to the back where the magnet is (if yours has a magnet). Crease it at the top edges where the spine is (you want to make sure you give yourself enough paper to account for this).

2- Cut a piece of cardstock (construction paper- whatever you have on hand) the same width as your memo-pad and the length that you need to go cover your pad from front to back.

3- Score/crease your cardstock on the lines so you have crisp edges to border the spine of your memo-pad.  If you need to put holes in your new memo-pad cover for ribbon, now would be the time. I simply removed the ribbon and then used a pencil to push the holes through. If you have any old take-out chopsticks these would work great, plus they'll help you push the ribbon back through later.

4- Decorate your new memo-pad cover however you'd like. I actually chose to decorate mine after adhering it so, I could decorate around the ribbon, but it's your project, decorate it however you'd like. I used some embossed and cut out hearts from my Fashionable Hearts Embosslet, but mainly because I was still in a Valentine's kinda mood. I also used my Scalloped Ribbon Border Punch to make a little decorative edge.

5- Apply glue to the spine of your memo-pad and adhere this portion of your cardstock first holding it until it dries. It should only be  minute or so. I used Tombow Multi-Purpose Glue. It's great because you can use it as permanent or temporary glue depending on how you use it. Once that's secure, a little more glue to the underside of both the front and back flaps and you're pretty much set.

6- I took the Love You stamp from my P.S. I Love You set and stamped each page to give my notes a little something extra- also nice in case I forget to write it at the bottom of my memo. You could take any stamp you have and put a little sentiment or image on your pads as well to make them your own.

I hope you liked today's project ( I hope Ashton likes it too!) I hope it inspires you to try something new even if it's as simple as making over a $1 Memo-Pad. Remember the goal of this blog is to Just Try.
As always, if you're inspired to try something, I would love to see what you create.

If you liked today's card, I would love it if you left me a comment. It's great when I get to hear from you! Also, if you liked today's card, please feel free to +1 or Pin it. I've added the buttons to my side-bar for your convenience. Friends and Followers are also welcome. :)

If you need supplies to recreate today's project or to make your own special projects you can visit my Online Store 24-7

Today's Supplies-
Cardstock-Whisper White, Real Red, Pretty in Pink
Ink- Real Red Classic Ink
Stamps- P.S. I Love You
Big Shot, Fashionable Hearts Embosslet, Tombow

I hope to see you back here soon.

Till next time-

Remember- Life is not about Waiting for the storm to pass, It's about learning to Dance in the Rain

Be Safe,
Shan

Pin It

Tuesday, February 14, 2012

A Short Sweet Valentine

Pin It
Hey y'all. Happy Valentine's Day! I hope today finds you full of love and on the receiving end of much more.

Just a quick little post today. I know everyone is probably tired of seeing all the Valentine's Day themed cards and projects, but not me. I love, love. I love being in love, I love loving and being loved in return and I think it's a shame that we focus on it so much just on one day of the year. I hope I don't let myself forget to do "Love" themed cards often here, throughout the year. But, because I already had my "big" cards done for today, I thought I'd do another small "just because" love note for today. You really can't ever have enough of these hanging around. You never know when you might need or just want one.

I got the idea for this from a card I saw on a challenge a while back. I think it was from the Amazing Carrie Gaskins. It's Quick and Easy and re-purposes scraps, which if you know me is something I love to do.

Here's today's card-


It's another 3 x 3 card. I love the thought of just slipping one of these inside a jacket pocket or a lunch or laying them on a loved one's pillow. It starts with a base of Real Red, and a layer of Basic Black. I then used the frame from my Beautiful Hearts Embosslet as the base to fit my embosslets in. You know, when you use the Embosslet to get your 5 little hearts, the large frame is embossed as well. I simply cut that out and Tombowed it to my Basic Black c/s. I then used multiple hearts to fill in the empty spaces. I Tombowed them all in, so they would stay put. It's like doing a puzzle, except you get to make it look exactly like you want it too. An extra little heart to the side, well just because I could and the front was done.

Here's the inside-


I used the sentiment from P.S. I Love You and inked it in Real Red with my Stampin Write Marker. It's actually part of the sentiment that says Love You, Miss You, Kiss You. I love that it's easy to just use part of the sentiment by inking it with the markers. An extra little heart to the bottom and my card is done. So quick, so easy, but how much would this mean to you if someone you loved gave it to you?

*Tip*- I don't know about you but when I'm using my Embosslet and I'm making more than one heart, I just save all  the extras in an old brads container. I know I'll need hearts at some point and that way I have them all ready to go, kind of like having an assortment of buttons or brads at the ready.

Well, that's all I have for you today. I hope you liked my sweet little Valentine. I hope it inspired you to make a few little love notes to have on stand-by or, if you're running a little behind, a sweet little card for tonight. It's not too late.

If you liked today's card, I would love it if you left me a comment. It's great when I get to hear from you! Also, if you liked today's card, please feel free to +1 or Pin it. I've added the buttons to my side-bar for your convenience. Friends and Followers are also welcome. :)

I hope you'll join me back here soon for more ideas.

Till next time-

Remember- Life isn't about Waiting for the storm to pass, it's about learning to Dance in the rain.

Be Safe,
Shan Pin It

Monday, February 13, 2012

MDS Monday - Experimenting With Punched Layers

Pin It
Hey y'all. Happy Monday. I hope you had a great weekend! I don't know about you but I am ready for summer to be here! I woke up Saturday with energy for the first time in weeks and thought I was definitely on the mend only to wake up yesterday with more sinus issues. UGH!!!!! So I took the day off today today to rest in hopes that that listening to my body might make it happy, we'll see.

To that end, just a quick MDS Monday post for you today. I did this last night while I was waiting for the chinese take-out to arrive. I originally had planned on another scrap-book layout but my mojo wasn't there so I decided to do a card. I actually used a challenge sketch as the inspiration. I wanted to see if I could use my punches to make the DSP strips flagged in the middle like a piece of ribbon. This had been my original plan for a card when I saw the sketch, but since I've been so sick this past week I never got around to making it, and I wanted to see if I could make a go of it here instead. I think it turned out pretty nice.

Here's today's card-


I used a base of Riding Hood Red and a layer of Very Vanilla. For the center "Flagged"area, I used Everyday Enchantment DSP from Sale-A-Bration and Riding Hood Red and then used the Square Punch filled with Very Vanilla to take out the "cut" section. I think it turned out great!

I used the Curly Label Punch for the central focal point. I love that you can change the size of the different elements to suit your design needs. To me it almost looks likes one of our new "Label Framelts" here. I used the "mat" feature to help my Riding Hood Red one stand out from the background and then added another one in Very Vanilla to "stamp " my image on.  I used the Upsy Daisy Stamp in Riding Hood Red and lightened the color with the opacity feature. Love that! My sentiment is from the same set in Early Espresso.

Here's the challenge sketch-


Here's the inside-


The sentiment is from the set Enjoy the Moment. I put a few more daisies in the corner to add a bit of pretty and I think I've got a nice card to send someone. What do you think?

Well, I'm off to rest up while the laundry's going and I watch some t.v. and try and get an appointment scheduled to do my taxes later this week. I hope you have a great day and I hope to see you back here later this week.

If you liked today's card, I would love it if you left me a comment. It's great when I get to hear from you! Also, if you liked today's card, please feel free to +1 or Pin it. I've added the buttons to my side-bar for your convenience. Friends and Followers are also welcome. :)
Till next time-

Remember- Life is not about Waiting for the storm to pass, it's about learning to Dance in the rain.

Be Safe,
Shan


Pin It

Friday, February 10, 2012

Just a Little Love Note

Pin It
Hey y'all. Happy Friday. I hope you have had a great day.

I woke up today with energy for the first time in over 2 weeks. :) I think the new antibiotics are finally taking care of my pneumonia. Thanks to everyone who has sent love and prayers over the past few days. You are appreciated more than you know! Today's the first time I've had the energy to stamp or craft this week and I just wanted to share with you.

Just a quick post and a little love for you today.

Sometimes I think we, society as a whole, (and my fellow stampers as well as myself) forget about the really small things. I know myself, I rarely think about 3 x 3 cards. Look at most of the blogs out there and you rarely see 3 x 3's. When I do see them, they're usually in the form of a thank-you note we might send our customers.

But what about just a quick note to say how much we love or appreciate those that mean the most to us personally. Our lives are so hectic, we often forget to tell those we love just how much they mean to us. Worse, we forget to show them. Sometimes, we find the time to slip a quick handwritten note in our kids lunches, or send a quick text, but how about a quick card....Just Because.

I don't know about you, but when I sit down to think about a card it's rarely with the idea for a really Quick and Easy or Clean and Simple card. Look at most of the sketch challenges even, layer after layer and almost always full sized. This usually involves a commitment of 30 minutes to an hour or more unless I'm blessed with one of those moments of instant clarity when I see the sketch. What about just a quick card to tuck into a jacket pocket, a briefcase, or on the pillow?

This card has a few elements, but it came together in a flash and you could make quite a few in one sitting and have them ready for anytime. Here's a Little Love for you-


How nice would it be to find something like this on your pillow, or tucked in your wallet or commuter bag? Heck, your male significant others could be left alone with a few supplies for an hour or so, make some of these and feel like the Man of the Month!

It's a 6 x 3 piece of Basic Black scored at 3 to make a 3 x 3 card. A square of Whisper White at 2 3/4 x 2 3/4 holds a black heart that I cut out using my Heart Framelets. I used my Hearts Adorning Accents Edgelet Folder to emboss it. I then cut out a Real Red Heart with my Scalloped Heart Embosslet and layered it on top. A little Real Red heart, from the Beautiful Hearts Embosslet was added to the bottom.

The Sentiment is from the P.S. I Love You stamp set. I inked the p. s. with my Basic Black Stampin Write Marker.

Here's the inside-


I colored the rest of the sentiment from the front with my Basic Black and Real Red Stampin Write Markers and stamped it on a piece of Whisper White c/s. The little red heart was cut and embossed with the Beautiful Hearts Embosslet. I added a little Two-Way Glue Pen and Dazzling Diamonds to make it shine. I really wish it picked up better in the picture, it's so sweet! The nice thing about the embosslet is you get 5 different embossed and cut out hearts at one time. Extras for later, and you can use either the embossed or debossed area.

I also love that the "I" is dotted with a little heart. So Sweet!

Well, that's all I have for you today. It's just now 8 pm and I am getting ready to crawl back into bed. I can't wait to be over this whole pneumonia stuff. So Not A Fan!

I hope you liked today's card and I hope it reminds you as it reminded me, that sometimes it really is just the small things that can make a big difference. I hope it inspires you to try something small. It doesn't need to have a lot of elements, to be special. Remember the goal of this blog- Just Try!

I hope you have a great day and a great weekend filled with time to spend with family and friends and of course lots of creative time. I am looking forward to some creative time myself and hopefully the opportunity to guest blog and help out a hopefully new blogging friend. Will let you know how that turns out.

If you liked today's card, I would love it if you left me a comment. It's great when I get to hear from you! Also, if you liked today's card, please feel free to +1 or Pin it. I've added the buttons to my side-bar for your convenience. Friends and Followers are also welcome. :)
Till next time-

Remember- Life is not about Waiting for the storm to pass, It's about learning to Dance in the rain.

Be Safe,
Shan Pin It

Thursday, February 9, 2012

Still time to make a Special Valentine

Pin It
Hey y'all. Just poppin in real quick to say Hi. No new project today. ): Sorry about that.

I made my 3rd trip in 2 weeks to the doctor's last night and it looks like I have Pneumonia. I got some new Big-Gun, Heavy-Duty Antibiotics and a new inhaled steroid, took a shower and crawled into the bed. I have all these ideas running around in my head to do, but absolutely no energy to do them with. *Sigh* I am hopeful though that these new meds will kick in and the weekend will bring some blessed relief.

Have you got you Valentines yet for those "Special People" in your life? You still have time to make a beautiful card that will be treasured and even sick, I can help. If you live in the NoVa/Metro D.C area and have 30 minutes to spare, you can create a beautiful card. Come see me on the way to the grocery store, or on the way back home from the gym, or even on the way home from work.

I am available right up to Valentine's evening to help you out. Hopefully, I will be able to get a few more cute ideas on here this weekend, but for now I am just going to re-post the recent Valentine's Day Cards & Projects that you could make, with me, in 30 minutes or less. Think of how much your special someone would love a card made just for them, by you. Can you say "Bonus Points?"

Just contact me and let me know which card/cards you would like to make and when you would like to come by and we'll get things scheduled. Need to bring a friend with you, that's ok too.

#1-   

#2 

#3

#4  

#5

#6

#7 

#8 

#9 

#10 

So, if you would like to create any of these for those special people in your life, just contact me, and lets make next Tuesday a Great Day for you!

Till next time-

Remember- Life isn't about Waiting for the storm to pass, It's about learning to Dance in the rain.

Be Safe,
Shan Pin It