Where even Design Scaredy Cats can have fun creating and learning new design techniques. Come look around, leave a comment and let me know what you think. I'm an Independent Stampin' Up Demonstrator and I love what I do. If you like to have fun, create or want to learn new techniques, stop in and have a look or drop me a comment. I'd love to hear from you!
Pin It
Hey y'all. How are ya? I hope you're doing good. I'm soooo sorry I haven't been around! To be honest, I fully expected to get lots of stamping and crafting done while I was home recuperating after my recent surgery. As we have seen from my recent blog activity, or rather the lack-there-of that was not the case. In fact, I am finding the need for at least 1 nap a day and some days two. My surgeon tells me this may last for another month or so. :( Don't get me wrong, I love naps, I just love taking them when I want to and not needing to take them. I also don't like, not having any energy to do the things I really love. It will get better, eventually. I'll hang in here if you will. :)
So, while the seemingly simple act of cutting card stock, stamping it and adding embellishments doesn't sound too taxing it somehow ends up becoming so. MDS to the rescue again. This at least, I can do while I'm sitting on the couch watching t.v. I was recently talking with an old friend about a trip my daughter and I took to Mt. Vernon 8 years ago and it reminded me of the pretty pictures I took. When I saw this week's sketch over at MDSM I thought it would be a nice one to highlight a few of my pictures from that trip. I also used this week's challenge over at SMDS Challenges to use elements from only 1 digital kit on my page.
Here's this week's MDS page-
Here's the sketch I was working with-
I simply rotated the sketch and flipped the pictures. I used the Days to Remember Digital Kit. I don't normally use a lot of embellishments on my pages and I held true to that on this page as well. The sentiment and the numbers are embellishments and all of the DSP's are from the same kit. I didn't manage to use any stamps from the set, but I was still very happy with how this page turned out.
Want to know what I was even happier with? While I was trying to recolor the sentiment I accidentally changed the background color instead. You know what happened? Serendipity....A Happy Accident-
I think in a dark blue or grey frame this would be even more striking. I love how easy the align button made this page. :)
Well, that's all I have for you today. What do you think? I hope you like it and I hope the two design teams like it too. I hope it inspires you to try something new with your MDS, if not today, soon. If you liked today's project or have questions about it I hope you'll take a moment to leave me a comment in the space below. If you'd like to +1 it or Pin it, I've added those buttons to my blog for your convenience. Friends and Followers are always welcome too! :)
Thanks so much for taking time out of your busy day to stop by my little corner of the world. You are very appreciated! Till Next Time-
Remember- Life is often more about the storms than the peace they seek to overwhelm. It's not about Waiting for the storms to pass, but Learning to Dance in the rain.
Be Safe,
Shan
Pin It
Pin It
Hey y'all. Happy Thursday to you! I hope you're having a fabulous week. Just one more day to go until the weekend. Yea!!!
I've got lots of pictures for you today, so I'm just gonna jump on in. :) This card didn't start out with the intent to be a EWT. In fact, I was looking through my reader this weekend to get some challenge ideas and decided on The Paper Players Challenge. I went down to the studio to make my card and had a little "oopsie". Well, you know what they like to say about stamping..."There's no mistakes just creative design opportunities. That's what happened here. Gotta say I love when that happens and you end up loving your creation.
Here's today's card-
Masculine Card featuring
Forever With You
I know I talked yesterday about the only card as hard for me to do as Sympathy cards were Masculine cards. Luckily as I was reading through my feeds, I saw this challenge over at The Paper Players and thought I would give it a try. I usually like a little more structure to my challenges, which is one reason I don't often do Color Challenges.
I decided on the Masculine, Dry Embossing and Blue options. I really love this stamp set, but I think it's easy to make a beautiful, romantic card for a female with it and a little bit harder to make one that's masculine. You know...all those flowers. :)
I started with a base of Midnight Muse (Check, Blue). Next came a Crumb Cake layer that I embossed with my Stripes Embossing Folder and my Big Shot (Check, Dry Embossing). I gently sponged over this with some Crumb Cake Classic Ink to make the embossing stand out more. Oh, I used my new Windows Framelets to cut all of my layers out. I then decided to layer on a piece of DSP from the new Comfort Cafe Collection. Even though this piece has a floral element, I don't think it's frilly or feminine with this card so, I think it works. Oh I also ran it through my Big Shot with my Lattice E.F. and sponged over it with more C.C. (Check Blue and Dry Embossing). Hey this might not be so difficult after all. :) Or at least that's what I was thinking at the time.
For my focal point I decided to color in the stamp with my Stampin Write Markers. I guess I could have inked it up all in Midnight Muse for an even more "Masculine" look, but you know me, always adding a little something more. Coco Channel would be so disappointed. I used my Stampin Write Markers in Midnight Muse, Primrose Petals, Raspberry Ripple and Wild Wasabi to color in my image and stamped it on Whisper White c/s. You know this has really been a week where none of my cards have been created easily and without some little Oopsie happening. Well, I went to mount it to the C.C. mat (I cut a piece of C.C. c/s with the same framelet twice, and cut it so I could layer it behind my W.W. panel to give just a narrow mat instead of a wider one) and realized that I should have used Very Vanilla instead of W.W. AUGH!!!! It was def way to bright against that card. What to do, what to do? You know what to do here..... Think, Think, Think, say it in your best Pooh-Bear voice. Why, I know I'll just add some C.C. ink to it and make it look a little antiquey/vintagey. So definitely not my normal style, but I definitely didn't want to re-color that whole stamp again. So I swirled on some C.C. ink all over the image and c/s. I'm not sure why but some of the colors blended out with the C.C. ink too. I had even waited a while to do this. The M.M. blurred into the center and edges as well as the P.P and R.R around the stamped floral elements. I was not happy at all, but the more I looked at it, I decided it looked like a really old element and that it went well with the card, so I decided to just go with it. Here's a close-up of the center element-
I think it looks almost like a label or something from an old card. I actually really like it. :) I adhered the C.C. mat to it with Tombow and then adhered that with Dimensionals. The other two layers are also adhered with Dimensionals.
Here's the inside-
Oooops! *EpicFail!* As I went to pull up a shot of the inside, I realized that I must not have taken one. *Headdesk* Oh well, as far as my usual insides go it was pretty boring. Definitely "masculine" with out frills or glimmer. I stamped "Love You" from the Bitty Banners Stamp set in M.M.onto a piece of V.V. c/s. I inked it with my Stampin Write Markers so I was able to get just the words and not the frame around it. Oh and I sponged the edges too.
So what do you think? I think it fits the challenge requirements and is pretty cool too, even if it is all vintagey. Lol!
Now for today's technique. I know this is a very basic technique, but it's one that I use a lot. You can really change the look of a stamped image by doing this and create endless looks at the same time.
Here's what you'll need- Stamp set of your choice (This works best with line images or stamps with lots of detail), Markers of your choice (Of course I used S.U. because they're amazing and I never have to worry about them coordinating with my c/s or embellishments), Cardstock of your choice to stamp on and last but not least a Blender Pen.
Here's what you do, it's so crazy simple. Really it is, and speaking of this how cool is it that we can now color our stamps different colors in MDS? I know random thought. Sorry. :)
1- Choose the color you want for each different portion of your stamp and color directly on the stamp with that marker.
2- Continue to do this until your entire stamp is inked up. If you're using lighter colors just tilt your stamp around under the lights to see the color and make sure that everything is really inked up. It sure does stink if you forget this step and you have a beautiful image except for that one little spot. Ask me how I know!!! Your stamp might not look the best at this point, but don't be a Scaredy Cat. Have a little Faith.
3- Once you've finished step 2, other sections of your stamp are probably dry, so you want to make sure you "huff" on your stamp to re-moisten everything. I usually huff a couple of times just to make sure I've got everything "huffed on". Then stamp your image onto your c/s. That's all there is to it. See I told you, Super Simple. I love the effects you can get doing this. What I really love is the look on the faces of my clients when they do this and see the beautiful images they get. This never fails to amaze!
4- Smile when you see your finished project and smile even more when you think about the smile it's going to bring to the face of it's recipient! I L.O.V.E. this part! : D
Oh did you think I forgot about my Blender Pen? Nope you get two Techniques today for the price of one. And since that price is FREE, What a Bargain!!! This second one was the "Main Idea" for today's technique, but since I figure there might be some "newbies" out there who happen to have stumbled upon my little blog somehow, I'd throw the first part in as well. Hey, there was a time when I had never heard of it either. :)
Here's how to turn an *@#%! into an YES! If you've ever tried this technique you have probably encountered one of those *@#%! moments where you coughed, sneezed, heck maybe you just blinked, or could be that the lines were really close together. For whatever reason, you colored out of, or off of your line.
This happened to me. I had colored in the entire center section and was outlining the outer rings when Mayhem struck. No, hes' not only in those insurance commercials (but don't you love him in those...so funny!) Any-whoo, I was almost done and BAM!!! (and not the Tasty, Emeril Lagasse kind of Bam!!! either). My hand slipped and I colored the tips of a few of my leaves Midnight Muse. Now on some of my colored images a little color sharing might be ok, but I was not having it for this one. Here's what I mean-
Sure wish I knew how to add in those handy little arrow pointers, right about now
Well let me just tell you- I was not in the mood to clean that entire stamp and start again. Now, I had heard that you could use your blender pens to "erase" these kinds of mistakes. Having never tried it for this (only on paper and it really doesn't work so well then, kinda like shutting the gate after the cows gone through it) I wasn't sure if it would work. Maybe it was one of those crazy Urban Legends. I figured it was worth a shot. What's the worst thing that could happen? It didn't work and I would have to start over again. I decided to take my chances and try-
Do you have any idea how hard it is to un-color your stamp
at the same time you are trying to photograph you un-coloring
your stamp with a B.B.?
Here's what you do-
1- Carefully swipe your Blender Pen over the misplaced ink until it's all removed. If your area is really big you may have to clean your blender pen at some point during your removal process. Mine was small so I didn't have to clean it till I was done.
2- Do a little *HappyDance* because you don't have to meticulously re-color your stamp.
Woo-Hoo!!! It worked. That Blender Pen just soaked up the color. It's just like touching the end on them on your ink-pads though (Not a good idea BTW! Ask me how I know.), you will really have to wipe it quite a bit to get it all out of your pen and on your scrap grid paper. But it will eventually come out and then you're stamp will look like this-
All clean and ready for the correct color to be applied.
Well, that's all I have for you today. I hope you liked not only my card, but the techniques as well. I really hope today's post inspires you to try something new today, whether it's a challenge or a technique or heck even something out of the crafting/designing realm. You know the motto here- Just try.
If you liked today's post or had questions about it, I'd love to hear from you. Feel free to leave me a comment. I read all of them and will be sure to get back to you. Your comments really do make my day! If you would like to +1 or Pin today's card, I've put the buttons here on my blog for your convenience. Friends and Followers are always welcome too! :)
Thanks so much for taking time out of your busy day to stop by my little corner of the world. You are so appreciated! I hope to see you back here real soon for more fun projects or if you like...more excuses to smile and laugh at my mis-adventures. Till next time-
Remember- Life is often more about the storms than the peace they seek to overwhelm. It's not about Waiting for the storms to pass, but Learning to Dance in the rain.
Pin It
Hey y'all. Happy Humpday!I don't know about you, but the week is dragging for me. It totally seems like it should be Friday already. *SMH* Oh well, just two more days. :)
I have another challenge card for you today. This one's from the nice ladies over at Mojo Monday. If you haven't played along with them yet, check 'em out. (just after remember to finish up here too) They've got lots of great sketches and the DT cards are fabulous! Theirs is one my go-to sites for sketch inspirations.
Here's today's card-
Thank You Card with Summer Smooches DSP and Bright Blossoms Stamp Set
Can you believe it!?! I mixed DSP's again!!! *Happy Dance* I have to say I'm really happy with how this turned out, even if I didn't quite get the dimensions on the center panels just right. At least I didn't get out the ruler and mathematically calculate the correct dimensions. (if you haven't followed me for long...Yes, that is a real thing!) I used a base of Tangerine Tango, which I'm not sure I had ever used as a base before, and I used a button which I rarely do. I used my Big Shot and Perfect Polka Dots Embossing Folder for a little added dimension and detail. Love that folder! Don't you just love this DSP, I do. It's one of my all time favorite collections, so bright and cheery. Everything is adhered using Tombow except my flower layer which is popped up with two Dimensionals and the button which is adhered with a Mini-Glue Dot. This makes for a fairly flat card for mailing.
Here's the Mojo Monday Sketch-
Aside from the dimensions on the center panel, it's true to the sketch. Now if I can just figure out those dimensions I think this will be a good layout to keep in my rotation.
Here's the inside-
I wasn't sure what I wanted to do with the inside, so I kept it simple and put a matching strip of DSP for a bright accent. My sentiment is from the Kindness Matters set which I got for free during last year's Sale-A-Bration. Love Free! I also love the font. I inked it up in Tangerine Tango and my card was done.
So, what do you think? Hopefully it will brighten someone's day. I'd love to hear what you think. Your comments always make me smile, except this morning when I woke up to spam for the first time! *BOO-HISS!!!* If you like today's card and would like to +1 or Pin it, I've put the buttons on my sidebar for your convenience. Friends and Followers are always welcome too! :)
Thanks so much for stopping by today. I hope your day is as Fabulous as you are! Till next time-
Remember- Life is often more about the storms, than the peace they seek to overwhelm. It's not about Waiting for the storms to pass, but Learning to Dance in the rain.
Pin It
Hey y'all. Happy Humpday! Just 2 more days till the wekend. Woo-Hoo!! :)
I've had a lot of friends (stamping and non-stamping) asking for me to make more "Wine-Bottle" tags. Of course they can be used for any kind of bottle, not just wine. Today's tag is one I did for my "New Year's" Open House to celebrate the new SU catalog. These are becoming more popular everywhere and there's even one featured in the new SU catalog, pg 14, as a gift idea with what looks like a bottle of Olive Oil. It also fits along with Sketch Frenzy Friday's current challenge.
Here's today's project-
Wine / Any Bottle Tag Featuring With A Cherry on Top Hostess Stamp Set
Love these! This is a quick and easy project that would be great for classes/ stampcamps or workshops.
Wanna know a secret? I didn't even use my Stamp-A-Ma-Jig on this!!!! How many of you that know me either from here or IRL are jumping up and down over that little fact? LOL!!!!!
I started with a base of Pool Party and then layered on Daffodil Delight and Whisper White c/s. I stamped the Glass Dome with White Craft Ink, the base with Pool Party Classic Ink and inked the sentiment with my Pool Party, Real Red and Garden Green Stampin Write Markers. I used my Scalloped Border Punch along the bottom to mimic the one on the cake stand. I however intended to (and forgot) to use my Paper Piercer and Mat Pack to punch holes in the border to carry the theme on even more. :(
Do you see it? I simply rotated the sketch, my stamped image is the central portion and my scalloped borders are the far right portion of the sketch.
Although it's hard to see in the pictures, I used Heat and Set Powder to add some Dazzling Diamonds to the domed portion to help it "shine" like glass and stand out a little more.
Oh, and a little shimmer on the cherry with my Two-Way Glue Pen and some Dazzling Diamonds. The only thing I would suggest if doing a tag like this with a scalloped border is to cut your cardstock a little longer than usual to account for the loss with the punch. All layers were adhered with Tombow.
Well, that's all I have for you today. I hope you liked my most recent tag and I hope the girls over at SFF do too. This makes two entries for me, with them, this week. :) I'd love to hear from you if you liked today's project. It always makes my day! If you liked it and would like to +1 or Pin it, I've put the buttons on my sidebar for your convenience. Friends and Followers are always welcome too! :)
Thanks for stopping by. I hope you'll return soon. I still have this week's End of the Week Technique for you and a Clean & Simple card as well.
Till next time-
Remember- Life is often more about the storms than the peace they seek to overwhelm. It's not about Waiting for the storm to pass, but Learning to Dance in the rain.
Pin It
Hey y'all. Happy Thursday. Question-Why do 4 day weeks seem to fly by when 5 day weeks drag? Doesn't make sense.
Well, today is the last day of our current catalog and the new one goes live tomorrow at noon. Are you excited? Having seen the catalog, I can tell you I'm sooo stoked! I've already got a huge wishlist. There are a few things I'm sorry to see go, but the new catalog is so Amazing & I can hardly wait for you to see it. If you don't have a demonstrator and need one, I'd love to send you a catalog. :)
I got this new stamp set a few weeks ago and have just been so entranced by the ease of Betsy's Blossoms I didn't get to play with it much. I inked it up this weekend and I have to say I love it too! I thought I'd pair it up with a challenge and get my Clean and Simple card of the week thrown in at the same time. My stampin buddy April, laughed at me the other day and said "Shan, you just can't make a one layer card can you?" It would appear not. I wanted to do a one layer with this one but I think it would have been to stark, so I think I may have to simply resign myself to two layers. :)
As I said yesterday, I'm not always the brightest bulb in the pack and for the love of me I can't remember the name of this new set...something like Forever with You, kinda-sorta-maybe? Augh! I'll have to get back to you on that since I can't look it up in the catalog on line like I normally would. *SMH*
Thanks Robbie Rubala for a great sketch. (Which I obviously didn't look too closely at before finishing up since there are 4 lines in the corner instead of 3. Sorry!) I thought this would be a great time to get out my Simply Scored tool and I thought this stamped image would be perfect with this sketch.
I started with a base of Midnight Muse, my favorite of the new colors and quite possibly destined to be one of my new all time favorites. Such a rich, velvety color. I wasn't sure we needed another dark blue, but it's Fabulous! Over that is layered a single piece of Whisper White. I used my Simply Scored with the Diagonal Plate to make the score lines. It doesn't show up well on the picture, but in real life it's just a nice subtle accent. I inked up my stamp by coloring the image with my New In-Colors Markers in Midnight Muse, Gumball Green, Raspberry Ripple and Primrose Pink. This panel is popped up with dimensionals and I was done.
Here's a closer look at my stamped image-
I love this image, the sentiment, the font everything. I can't wait to play around with it even more!
So, normally I would have an inside to show you too, but not today. Initially I wasn't sure what I wanted to put on the inside and then I just ran out of time, but believe me when I say I'll make it as pretty as the outside. :)
Thanks for stopping by today. I hope you liked the card and I hope it inspires you to make something for that special person who makes everywhere seem like home. If you liked today's card, feel free to leave me a comment. I love hearing from you! If you liked it and would like to +1 or Pin it, I've put the buttons on my sidebar for your convenience. Friends and Followers are always welcome as well! :)
I hope you'll come back tomorrow for this week's End of the Week Technique. Till next time-
Remember- Life is often more about the storms than the peace they seek to overwhelm. It's not about Waiting for the storms to pass, but Learning to Dance in the rain.
Pin It
Hey y'all. Happy Thursday! Just one more day until the long weekend. Woo-Hoo! Do you have any fun plans? I'm having an Open House, Friday, Saturday and Sunday to celebrate our New Catalog. I'm also going to be featuring Scentsy Home Products and the delish New Velata Premium Chocolate Fondue. So if you're in the Metro DMV and want to come by and make a project with new product, smell some great scents and enjoy yummy snacks, hit me up..I'd love to see you!
I know the plan had been to do my EWT today....best laid plans and all that. I saw a sketch over at Freshly Made Sketches and just had to play along, (and wanted to go ahead and be able to post ) so this weeks EWT will come tomorrow.
Can you believe 3 challenges this week? It's been a while since I did that. :) However when I saw this sketch I knew exactly what I wanted to do. So rare for that to happen, so when it does it just doesn't make sense to not go with it! I'm using this for my Clean and Simple card of the week because even though it has a lot of embossing and sponging, the overall look is Clean and Simple. The C&S card I had planned for today will simply get moved to next week.(Whew now the stress is off for me to do another in the C&S style! Score!!!)
I hope you're not getting tired of Betsy's Blossoms because I am so loving it! Here's today's card-
C&S Betsy's Blossoms with Embossing, Freshly Made Sketches Challenge #36
Although I knew what I wanted to do with this sketch this is not the first color combo I planned on. I haven't decided how I feel about our New In-Color Summer Starfruit. I think it's the "Peach Parfait" of the 21012-2014 Collection. (You know what I mean, you know you do.) I had the card-base cut, scored and folded and just couldn't do it with this card. I think once I get some DSP that coordinates with it, maybe I'll have better luck. I am, however, loving this New Midnight Muse!
Here's the sketch I used-
My goal with this card was, even though it was such a great clean and simple sketch, to add a surprise to take it up a notch. I stayed true to the layout only flipping the orientation. I made the sky by sponging Bashful Blue over the edge of a scrap piece of c/s I punched out with my Large Scalloped Circle Punch. I did this multiple times and then went back and lightly rubbed the sponge all over the piece to give a "soft, airy" appearance and to ensure there were no harsh lines. I think this really helps to make my embossed images stand out.
Here's a close-up look-
Embossed Betsy's Blossoms
It was really hard to capture the embossing , but I think this few gives you a little glimpse. I used Midnight Muse, Primrose Petals, Marina Mist and Gumball Green and heat embossed them with Clear Embossing Powder. In person the embossing just "pops" out at you. It's really so striking and you just want to rub your hands over it to feel the texture, especially on the sweet little bird and middle blossom. I used my 1 1/4 square punch to punch out my elements after embossing and then sponged the edges with the matching color. The 3 squares are adhered with Tombow. The center panel is elevated with dimensionals.
Here's the inside-
I stamped the sentiment from Teeny Tiny Wishes in Midnight Muse. Next I masked the bottom of my card with post-it notes so I could be sure to get a straight line. I then stamped my two floral images from the Betsy's Blossoms stamp set in an alternating, random style, flowing pattern. I used Primrose Petals for the smaller flower and Raspberry Ripple for the larger one, stamping off once to get a softer look. A little visit from Tink gives it just a little sparkle and means the inside of my card has a pretty little surprise for it's recipient.
I'm so happy with how today's card turned out. I hope the fabulous ladies over at Freshly Made Sketches like it and that you do too! If you haven't checked them out yet,make sure you do. Their DT does Amazing work and the sketches are always fabuous!
If you liked today's card, feel free to leave me a comment. I love hearing from you and getting your input. If you liked it and would like to +1 or Pin it, I've put the buttons on my sidebar for your convenience. Friends and Followers are always welcome too. :)
I hope you'll come back tomorrow for my Surprise End of the Week Technique. Thanks for stopping by and sharing my creative journey with me!
Till next time-
Remember- Life is often more about the storms than the peace they seek to overwhelm. It's not about Waiting for the storm to pass, but Learning to Dance in the rain.
Pin It
Hey y'all. Happy Humpday! :) Just two more days to go until the long holiday weekend and the un-official start of the summer. Woo-Hoo! Hope you're having an amazing week.
I've got another challenge card for you today. I love the sketches over at Sketch Frenzy Friday! Those ladies have some fabulous sketches and cards to go with them. I saw this sketch last Friday and knew it was one I was going to want to play with. On Saturday I went over to my stamping buddy April's house for a little relaxation and stamp therapy. She showed me a card she had done that morning in her stampcamp and I loved it! I used it as my inspiration for this week's SFF card. Thanks April!
Here's today's card-
SFF Challenge Card, Domestic Goddess DSP, Butterfly Punch, Petite Pairs Stamp Set
Do you ever look at DSP in a catalog and not be overwhelmed by it and then see it in person and go "Awww, it's so cute! or I love it!"? I did that with this collection. I actually swapped some DSP I had for these and it's hard to believe now that I went the whole year without it! If you like it, don't wait too long it'll be gone in just a week. (I think it's going to be easier to get a feel for the look of our DSP in this years catalog though. They've done a great job showcasing them!) I've got two firsts on today's card. This is the first time I've used my sweet little butterfly punch. I'm so sad it's retiring. :( It's also the first time I've ever used Tangerine Tango. I love how our colors and DSP's coordinate so well. The actual color that coordinates with this paper is Calypso Coral, but the Tangerine Tango matches and even Poppy Parade matches too. I added a thin little rim of Dazzling Diamonds around the edges of my butterfly wings and some rhinestone jewels to bling them up a little, I also popped them up with a dimensional instead of Mini-Glue Dots for a little extra height. (Am I the only one that thinks height always looks mis-spelled?) I stamped the sentiment from Petite Pairs in Daffodil Delight, sponged the edges in Tangerine Tango and then matted it with a piece of Tangerine Tango c/s. Both were punched with the Modern Label punch.
Great sketch and one that I'm sure I will use again. If you haven't checked out their site, make sure you pay them a visit. Better yet, play along with us all....just finish here first. :) I didn't stick to it strictly, choosing instead to use it as a jumping-off point but you can still see the sketch in my card. For those of you that have been around my Scaredy Cat site you know how hard it would have been for me to say that last sentence as recently as the beginning of this year. :) HA! I also mixed DSP papers something that just gives me such anxiety. I can't wait for that session at convention. LOL
Here's my friend April's card that was my inspiration for this sketch and today's card. (She doesn't have a blog, I'm trying to talk her into starting one) If you like her card, leave her a little love here and I'll make sure she sees it.
My friend April's card- my inspiration for today's card :) She used Poppy Parade and Just Add Cake DSP
Here's the inside-
I kept it really simple. I used the rest of the sentiment from the front. (Love that font!) I cut a strip of matching DSP and added some Dazzling Diamonds to the little flower images in the DSP for my something pretty for the inside.
That's all I have for you today. I hope you liked my card (and April's too). If you did, I hope you'll take a minute to leave a comment. I love hearing from you and I'm sure it would make April smile too. If you liked it and would like to +1 or Pin it, I've put the buttons on my sidebar for your convenience. Friends and Followers are always welcome too! :)
Hope you'll come back and see me tomorrow. I've got this week's EWT...you might be surprised by it. I know I was.
Till next time-
Remember- Life is often more about the storms than the peace they seek to overwhelm. It's not about Waiting for the storm to pass, but Learning to Dance in the rain.
Pin It
Hey y'all. Happy Humpday. I hope you're having an Amazing week!
The sun is shining here in the DMV and the birds nested under my window are singing. Should reach low 80's today...Sweet! Although I hear my little friends all day, you know what I haven't seen yet? Butterflies. I love them, always have. I especially love when you are lucky enough to have one come and rest on your hand. How Incredible is that? We must seem like such huge, moving, giants and yet they trust enough to come and settle on us. WOW!!!
What's got me thinking butterfly's? Mr. UPS left me a package on my doorstep yesterday and I went in, sat down and promptly started going through all my new sneak peak goodies. One of my goodies was the new Patio Party DSP which I got as part of a recruitment bundle. SU takes such good care of us. I got two new stamp sets, DSP and new ribbon too!
I don't know about you, but whenever I get my DSP I look at each page and flip every other sheet around so when I go to look for a DSP to use I can see all of my selections without having to flip them over. Saves me time and frustration. When I was looking at and setting up my Patio Party DSP, I saw a sheet with nothing but pretty little butterflies. I knew I had to use it. I even had two different sketch challenges in mind to use it with. :) How often does that happen? For me not very. LOL
Do you ever know just how you want your card/project to turn out and have it seem so simple and then not have it look or feel right? That's what happened to me last night as I was putting this card together. I chose my sketch, a very simple and straightforward one, and yet I struggled. In the end, I was happy with my card, but what I thought was a short straight path turned out to be, at least mentally, twisty and bumpy. Let me know what you think.
Here's today's card-
Sneak Peek, Patio Party, 2012-2014 In Colors
Love, love, love the New DSP, ribbons and In-Colors. This card is chock-full of sneak peeks for you. I started with a base of Primrose Petals and layered on the Patio Party DSP. It makes me think of a summer night where someone has run through a meadow and surprised the butterflies and sent them soaring. I adhered a new strip of 1/4in stitched grosgrain ribbon to the edge of the DSP with SNAIL and tucked and secured the ends underneath the DSP. For the butterflies I used my Beautiful Wings Embosslet and the new Midnight Muse, Raspberry Ripple, and Summer Starfruit from the new In-Colors and a few Baja Breeze ones for accents. They were mounted with Mini-Glue Dots to punched circles of Baja Breeze and Whisper White c/s. The banner is from the new Itty Bitty Banners. There's a set of framelets that coordinates with these, but since I totally forgot these were part of my freebies, I didn't order them. Silly Shan!!! I inked the stamp with our my Midnight Muse Stampin Write Marker to get just the sentiment, stamped it and then handcut the banner. A few butterflies and 3 little pearls to echo the sketch and the front was done.
Here's the Sketch I used. It's from Sketch Frenzy Friday and if you haven't given them a try, I highly suggest it. They have great sketches each week and a fabulous group of ladies on their Design Team.
I stuck pretty close to the sketch. My only differences was to stagger the circles and to use pearls on the flag instead of off to the side. I hope they'll like my offering.
When it came to the inside, I was totally stumped! I actually considered leaving it till later and just not showing the inside. If you have seen any of my posts, you know this is just simply not done! I just couldn't think of a sentiment or decoration. As I went through my stamp sets for a sentiment I could use, I found one in one of my favorite sets Petite Pairs and I was off and running again. Here's the inside-
Truth be told as soon as I saw this sentiment, I thought of my sister Lisa. She is my Rock! We keep each other going whenever times get tough and luckily it's not too often that we have to "raise each other up". Being with her is so easy, like watching butterflies effortlessly floating skyward. I don't think she reads this everyday, but if you're reading today Lis... Love You! You're the Best!!!!!
I stamped the sentiment using our new ink-pads. LOVE THEM! OMGosh, they are soooo amazing! Getting a complete set is on my wishlist. If there are any stamping fairy god-mothers out there who listen out for heartfelt desires...Hear Me! :) I added more butterflies to the inside, alternating them so the embossed and de-bossed sides showed. I then added some sponging and a little Dazzling Diamonds for a sweet little glittery surprise and my card was done.
Well, that's all I have for you today. I hope you liked today's card and I hope it makes you think of someone special in your life and inspires you to create something new. If you liked today's card, I hope you'll leave me a comment. I love hearing from you! If you liked it and would like to +1 or Pin it I've added the buttons to my sidebar for your convenience. Friends and Followers are always welcome too! :)
I hope to see you back soon for this weeks End of the Week Technique.
Till next time-
Remember- Life is often more about the storms than the peace they seek to overwhelm. It's not about Waiting for the storms to pass, but Learning to Dance in the rain.
Pin It
Hey y'all. Happy Monday! I hope you had a great weekend. I know I did, filled with lots of friends and down-time and a little creative time thrown in. (Although there never seems to be enough of that!)
I was looking for my normal MDS challenge site to have a new challenge up but they hadn't posted one, so I used a regular sketch challenge from the same site. Normally I don't use my MDS projects for challenges, but because I felt like I really challenged myself on this card I decided to.
Do you use lots of different patterns of DSP when you create your cards or projects? I don't usually. I always struggle with which ones to put together. Normally my projects just have one pattern of DSP in them. I think it's the OCD in me that doesn't like the un-matched aspect. Even with this card, the only way I was able to combine these patterns was because the two outside were both kind of "florally" and had circles. Silly, I know but it's just so hard for me to do! I always love how others use DSP, but somehow trying to use multiples just causes me to "vapor-lock" creatively. There's a session at convention this year on creating with DSP...I am sooo in that session!
Oh well, I did try to mix it up with this project. You'll have to let me know what you think. The Scaredy Cat in me was stressing over this, but I tried anyways. Here's today's card-
I stuck right to the sketch for my card. The only extras were the little flowers and brad, that I added, that were part of the MDS Designer Kit I used. I know it say it a lot, but I really love the drop shadow feature. It adds such dimension to your projects it's hard to immediately recognize that it's not cardstock.
Here's the inside-
All the elements for the inside of this card were from the same kit. I think it's just so bright and cheery! Hopefully when I flake and miss someone's birthday and can't send a card by mail in time, they will be excited by receiving this in their in-box instead!
Well, that's all I have for you today. I hope you liked my attempt at combining DSP's. If you did, I hope you'll take a moment to let me know what you thought. I love hearing from you! Also, if you liked it and wanted to +1 or Pin it, I've put the buttons on my side-bar for your convenience. Friends and Followers are always welcome too. :)
I hope you'll come back soon to see what I've got for you!
Till next time-
Remember- Life is often more about the storms than the peace they seek to overwhelm. It's not about Waiting for the storm to pass, but Learning to Dance in the rain.
Pin It
Hey y'all. Happy Friday! The weekend countdown is on. :) I hope you've had a great week to this point and the weekend gets even better for you!
Where do you find inspiration for your projects? It surprises me sometimes where I get mine and how things often just fall into place. Last Friday I was able to get a ride home with a commuter-friend of mine. Actually she seems like such a nice person, I hope we get to be regular friends too. Hi Michelle! She's a creative person like me and on the 30+ minute ride home we got a chance to talk about stamping and scrapbooking and products we like, love, want to know more about.
Well, she asked me if I used Copics. I told her I didn't for a couple of reasons. 1-There's just so many and to be honest the 're a little intimidating. 2- I couldn't imagine the cost of getting all of them especially when I already have all the SU ones. 3- I had seen plenty of cards using SU markers to create the same effect. I had even tried my hand with ours and had been happy with the results. 4- This process takes so long it's definitely not one I would use everyday.
Wouldn't you know it, in just the few days since that conversation, I saw a tutorial for getting "Copic" results with our markers. Let me tell you I was on that in a Hot Second! Although I had tried my hand at this achieving these results before (by blending multiple colors) I had used it on regular cardstock and while I was happy, I felt like there could be even better results. I knew it was just my lack of experience. The video showed beautiful "Copic" type results, and I knew I wanted to try it! The difference between mine and theirs, watercolor paper. Amazing what a difference in results with just a piece of paper!
Then I saw a sketch challenge over at Operation Write Home and thought it might be just perfect to try the technique again, this time with the watercolor paper.
Here's my card- (Normally I wouldn't do the picture so large, but I wanted you to really be able to see the coloring)
"Copic-type" Watercoloring with Stampin Up Markers
I was so excited with how not only the card but the technique turned out. I'll do an End of the Week Technique on this soon. Because I was doing this for a challenge I wanted to go ahead and post it.
Want to know the best part of the watercoloring? Instead of using multiple markers in varying shades of the same color, I used one marker only for each of the three colors. I used Regal Rose for the main floral image, Island Indigo, for the smaller flowers and Lucky Limeade for the leaves. That's all! No 2 or 3 colors for each image, just one. Can I just say once more, how amazing our products are!?!
What do you think? For a first effort with this, after seeing the video, I think it looks pretty awesome and like it was done with Copics and the tutorial I saw had even better results! I'm sure mine will improve with time as well.
I stuck pretty close to it. I just extended the border some and flipped it on it's side. Truth be told the whole time I was making it I had it just like the sketch. It wasn't until I had the watercolored tiles applied that I decided to flip it on it's side and then I knew that was how it should be. Luckily I was able to remove my colored pieces from the dimensionals, without damaging them, and re-configure them.
I love the Bordering on Romance stamp set. If it's a favorite of yours too, you only have 3 more days to order it from the Occasions Mini before it retires. We have no idea if it will be carried over to the new annual catalog.
I used a base of Blushing Bride c/s, cut at 8 1/2 x 5 1/4. The Whisper White c/s was cut at 3 x 5, to leave the 3 x 3 center section. Next I used my Edglet to create the scalloped border, by running it through my Big Shot. I love the added ruffled edge the edgelet gives. Next I used my Adorning Accents Embossing Folder to create the embossed detail. I just love how they coordinate perfectly! I really hope all of these pieces are making a return to the annual catalog! I stamped the little row of flowers using a another stamp from the Bordering on Romance set. It was made to coordinate with the edgetlet and embossing folder. Love it! Of course it makes beautiful borders all on it's own as well. :)
For the focal point I stamped the image in Staz-On, so the colors wouldn't blend with the black ink, on a 2 x 2 piece of watercolor paper. After coloring the image with my 3 markers I cut the paper into quarters and mounted them on 1 1/8 squares of Blushing Bride c/s with Tombow and then adhered them to my WW base with dimensionals. I sponged the edges of all the cardstock except the watercolor paper for added dimension. The final accent was two strips of Blushing Bride Pleated Ribbon. All products used for this card with the exception of the inks, adhesives, and the WW and watercolor c/s could potentially be gone in just 3 days. Wow, that makes me sad!
Here's the video showing this technique-
Here's a look at the inside-
For the inside, I tried to do the same technique. While I think it looks nice, it doesn't have quite the same impact. This is due to the regular c/s used. You have to be careful with regular c/s as it can breakdown slightly if you apply the color repeatedly to a small area and then try to blend it. I didn't put a sentiment, because I'm not sure who this is going to or for what occasion just yet. It may be a Mother's day card for one of the special women in my life.
I looked up Copics to do a comparison and they have 214 colors in 16 different color families. Their markers are $6.99 each and feature a wide tip and a finer pointed "nib" type tip. Theirs are refillable and you can replace the tips. The cost for a full set of Copics, a whopping $1495.86. WOW! Stampin Up's markers by comparison have 38 regular colors separated into 4 color "families", which coordinate perfectly with all of their papers and accessories. They have both a wide, brush type tip and a fine tip that's perfect for smaller areas or journaling. SU's markers are $3.50 each and you can get the entire set in a carrying case for a total cost of only $109.95, that breaks down to just $2.89 each. Both sets of markers can be refilled. The main difference in the two marker styles was that the tips on the Copic markers were replaceable. However for $3.50 with SU you can just get another marker if needed. Now after seeing that I can get the same results with SU markers for 50% less per individual marker and 1/10th the cost for a complete set, the decision for which to get is pretty clear. Granted if I was doing graphic art or big time illustrating I might feel a little different, but for making beautiful cards, scrapbook layouts and gifts the answer seems pretty simple, at least in my mind and to my budget. *Note- This is just my opinion after doing a price and specifications comparison. You're opinion may vary.*
So what did you think about today's card? I hope you liked it! If you did, I'd love it if you left me a comment! If you liked it please feel free to +1 or Pin it. I've placed the buttons on my sidebar for your convenience. Friends and Followers are always welcome too!
If you need to buy supplies to make your own special projects, you can shop in my ONLINE STORE 24/7. Don't forget our Occasions Mini Catalog ends on April 30. Our Retired Lists are also out. The Accessories are While Supplies Last only and many are discounted up to 60 % off and they are flying off the shelves. Many items are already sold out. Our retiring stamps are only here until May 31. Make sure you don't miss your favorites!
Well, that's all I have for you today. I hope you have an Amazing Weekend filled with Family, Friends and of course lots of time for creativity!
Till next time-
Remember- Life isn't about Waiting for the storm to pass, but Learning to Dance in the rain.
Pin It
Hey y'all. Happy Thursday! Just one more day till the weekend.Woo-Hoo!
3 more days till my best friend arrives from Yuma for 2 weeks of class. I can't wait to see him! I have been a busy little bee in my stampin studio, getting lots of new cards and projects ready to go for you, because I don't imagine I'm going to have much time to stamp after Saturday.
Today's card is not the one I had originally planned to do for this weeks EWT. I was going to do my team swap card that I'm swapping tonight. However, I still needed to do a challenge card and when I saw this challenge over at Red Hot Stampers, I knew the technique I wanted to do.....Best Laid Plans and all that. So, next week you will get my swap card for the EWT. But, for today you get a Two-Fer. LOL! :)
Here's today's card-
This is way outside of my comfort zone, and it took quite a few tries to get a card I was happy with, But I have no doubt that was more me than technique driven.
Here's the sketch I was going by-
As you can see I stuck pretty close to the basic sketch. I simply moved the ribbon section over and added a stamped image. I think the concept with the sketch's "flags" was to use DSP and there would have been no need for an image, but as I used straight color instead, I felt I needed to put something else there.
I really struggle with Clean & Simple cards. No, wait, let's try that again...
I really Struggle with Clean & Simple cards!
In fact, I posted my first one layer card, just last week. This one has two layers, so I could wrap my Bakers Twine. I'm trying to do these a little more often especially since they are so hard for me.
*I'm not sure what this technique is really called, I'm calling it Color Wash, for obvious reasons. I saw it one day when I was trolling the blogs on my reader feed and thought "that's pretty cool!" I think it worked out well with this sketch. I don't remember who's blog I saw it on, but if it was yours or you know who's it is, please let me know so I can give credit.
I used Calypso Coral, Lucky Limeade, and Wisteria Wonder for my colors and sponged them onto my Whisper White c/s. I first masked off the edge with 2 sticky-notes using my grid paper to make sure it was straight. This gave me a crisp border. Then starting on the sticky-notes and sponging towards the other side, I sponged back and forth until I got the desired depth of color. I think this would probably be a little easier to control with daubers and you could control the lines a little bit easier too. I guess I could have used some sticky-notes to make clean edges in-between the 3 colors and make them all the same width, and maybe I will try that on another card, but I have to say that I actually kind of like the "raw" feel to this look. I wish I had bigger image to stamp so it fit more in all three colors...oh, well maybe next time.
I stamped the image from Bordering on Romance in Black Stayz-On because I wanted a crisper, cleaner image and I think that turned out to be a good move. I stamped the image a second time on one of my "Ooops" attempts to use as my little punched flower.
I "fussy-cut" it out, punched a hole with my Crop-A-Dile and then let Tink have at it. I secured it to my card with some Calypso Coral Bakers Twine that I wrapped a couple of times around my card and knotted off. I frayed the ends (something I never do) to give the look of more fullness to the ribbon layer, since I didn't add a bow.
Here's the inside-
I used the greeting from Everyday Elegance, one of our Sale-A-Bration sets. I love the font, so elegant! Don't forget to get your set while you can. SAB ends in just 9 days so don't delay!
The border of flowers along the bottom is also from Bordering on Romance. I used my Stampin Write Markers to color it, in the same colors I used on the front.
Well, that's my card for today. I hope you liked both the card and the technique, I know I sure enjoyed making it, once I got over my usual it has to be perfect and the oops I forgot the challenge "flags" weren't all the same length...DUUUUUHHHHH! *headdesk*
I hope I've inspired you to try something new today. As always if you do I would love to see what you create. If you liked today's card, I would love it if you left me a comment. It's great when I get to hear from you! Also, if you liked it, please feel free to +1 or Pin it. I've added the buttons to my side-bar for your convenience. Friends and Followers are also welcome. :)
Till next time-
Remember- Life isn't about Waiting for the storm to pass, it's about learning to Dance in the rain.
Pin It
Hey y'all. Happy Monday. I hope you all had a great weekend. I got a huge box from sweet Mr. Ups and had every intention of stamping the weekend away. And then life happened as it has a tendency to do, and I spent it, spending quality time with my daughter who just moved back home. We saw the Lorax (go see it, it's Amazing!), did some shopping, did some cleaning and organizing and then it came time to work on my MDS.
I think I have lamented plenty of times here that I am not the most computer savvy person. In fact me and technology, not a good mix in general, unless it's the medical kind or Lexus-Nexus, I did pretty good with the Law library. How I managed to get an A in my computer class was sheer determination, hard work and the fact that the professor gave us the majority of the answers on the first 2 tests. God Bless that man! I have in fact now killed 2 lap-tops, a net-book and 2 desk tops. At any rate, I had some issues with finding some of my downloaded material and updates (totally my issue) and spent the better part of about 4-5 hours over 2 evening dealing with this all in an effort to come up with today's post.
Toady's post is a very special post! It's my momma's 65th birthday.
Happy Birthday Momma! :)
I talked to her late last week and told her I was afraid I had waited to long and was trying to figure out how I was going to manage to get her card in her hand by today. I was thinking I was going to have to Priority Mail or Express Mail it to her. She said all she wanted was for me to make her a card and put it on my blog for everyone to see. She follows my blog and she thought that would be cool.
Well, I think she's the best, so I thought I'd surprise her and do her one better and give her two cards instead of one. So, I made two cards that I'm posting here, and then I'm e-mailing her the cards with a special message inside just for her.
Also, I told you guys last week I'm doing 2 challenges early since my best friend Jason will be here at the end of the month and I won't be stamping and won't be able to do my challenges those weeks. Both of these cards fit the Utah Diva's MDS Monday Challenge for last week of Anything Birthday or Use A Piece of Cake CD from Sale-A-Bration, so I submitted both of them to their site last night to qualify. Now my 2 challenges are caught up and I'm back to just my one challenge a week. :)Yea me!
Ok, so are you ready to see my momma's first card? Here it is-
I used Elements of Style and Messages for Mom. My Mom loves Humming Birds so I knew she would love this sweet little guy.
You know I have to have a pretty inside-
Another little Humming Bird this one getting a little sip from one of the flowers on the flower from the Element of Style flourish. The sentiment is from Messages for Mom.
Here's card #2-
The first card was more serious, so I wanted to give momma a fun card too. This one is from the Piece of Cake CD in the Sale-A-Bration Catalog. You can get it Free. Lots of Fun Stuff in it.
Here's the inside-
Those little pieces down the sides are "pieces of cake" how fun is that?
Well, what do you think? I hope she loves them as much as I loved designing them for her, but more importantly.... as much as I love her!
I hope I inspired you to try creating with MDS today. If you decide to try I would love to see what you make.
If you liked today's card, I would love it if you left me a comment. It's great when I get to hear from you! Also, if you liked today's card, please feel free to +1 or Pin it. I've added the buttons to my side-bar for your convenience. Friends and Followers are also welcome. :)
Thanks for stopping by!
Till next time-
Remember- Life is not about Waiting for the storm to pass, it's about learning to Dance in the rain.
These cards are actually for my mother's birthday which will be my Monday post. It will also be my MDS Monday post. I'm posting it early so I can get it in on the Utah Divah's MDS Monday Challenge for Birthday Cards or Cards using the Piece of Cake CD that you can get free during Sale-A-Bration.
My Mom lives out of state and I waited just a little too long to be able to get her card in her hands on her birthday and she said all she wanted was for me to make her a card and put it on my blog for everyone to see. I decided since I waited to long I would to her one better and make her two. I hope she likes them. Be sure to check my blog on Monday to see both full cards- the insides are done as well.
Entry #1
Entry #2
Hope you liked this quick little preview. :)
Till next time-
Remember- Life is not about Waiting for the storm to pass, it's about learning to Dance in the rain.
Pin It
Hey y'all. Happy Tuesday. I hope you're having a great day, and a great week so far. Just got back from the doctor and am officially on the mend. My oxygen saturation is up to a whopping 98%. Woo-Hoo! Never thought I'd be happy about 98%. Still short of breath on exertion but getting better.
Funny story- my first day of clinicals as a nursing student I had a patient with Dementia, very aggressive, verbally and physically. Not a very nice experience. As I was reading his chart I came across the notation "Pt SOB" I was offended. I told my instructor, "Mrs. Strickland, (who was a gem, by the way) This is horrible! It's not his fault he's not very nice. They shouldn't write something like this about him in his chart, it's an official record!" Hand to God, I said it! I was so serious. I was maybe 20. She looked at me at said all straight-faced... "SOB- Short-of-Breath" and then just smiled. I know she wanted to follow up with a big ole "DUH", but God Love Her she didn't.
Are you laughing yet? I hope so. :)
If not, I hope today's card will at least make you smile. I needed a card for my sweetheart's birthday last Sunday and made one.
But not this one.
And then I thought about how I could use the set for the challenge over at Freshly Made Sketches. I almost didn't submit it for their challenge though, because their guest designer had used the same stamp set and DSP I used in my original card. (I'm going to post it later this week) When I do a challenge, I try and sketch it out before I look at what the Design Team has done so I don't feel like I'm CASE'ing from them. Once I have my idea figured out, I look at what the team has done and what has already been submitted. If mine is different from anyone else's I submit it.
I know this is silly. Why can't more than one person have the same idea? I'm just afraid someone's going to think I copied them and then I'm definitely not going to win anyway. Would you believe one time, I sketched out a challenge, looked at the DT samples and I kid you not, same stamp set, same DSP, same placement everything! I know I should feel like "Great Minds" and all that but nope! So I re-worked my sketch idea, till the only things our cards had in common were that they used the same stamp set, and came up with today's card. I submitted it and I'm really glad I did. You know the Guest Designer I said had used the same set? She thought my card was "Awesome" and how even though we both used the same set how both cards were so "unique".
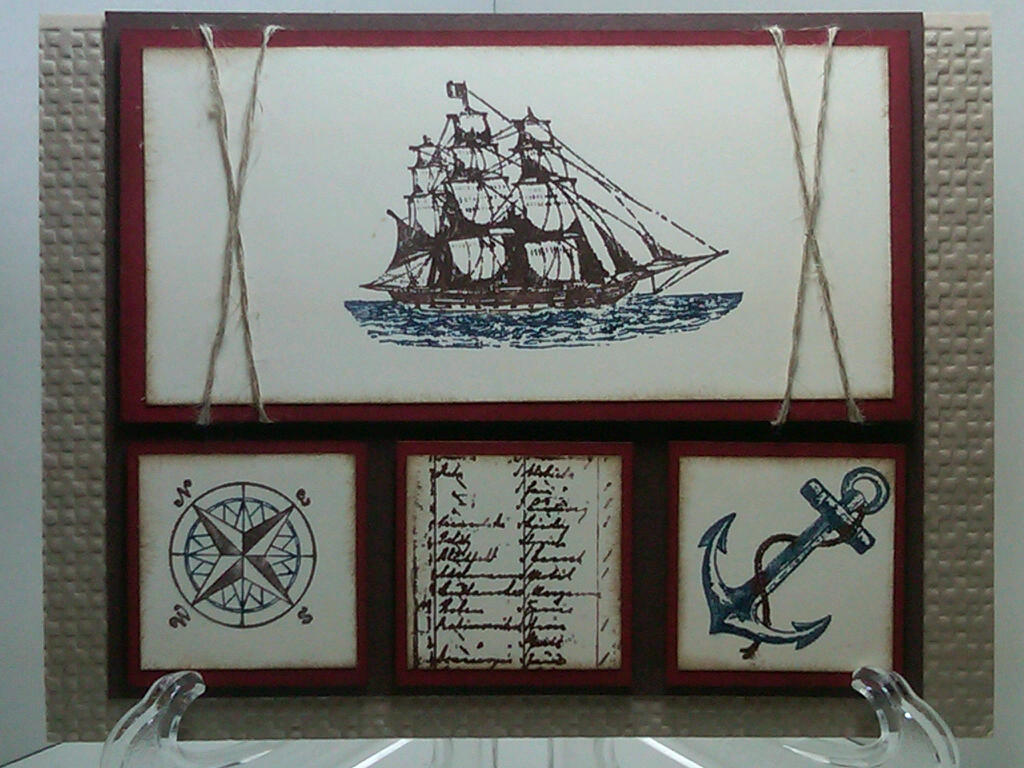
Here's today's card-
And here's the sketch-
As you can see I turned the sketch on it's side and pulled the squares to the bottom instead of the side, but all of the design elements are still there.
I started with a base of CrumbCake which I ran through my Big Shot in my Lattice Embossing Folder for some texture. Next came layers of Chocolate Chip, Cherry Cobbler, and Very Vanilla. They were all sponged with Soft Suede. I used my Stampin Write Markers to ink up my stamps from my Open Seas stamp set. I used Not Quite Navy and Chocolate Chip to stamp on the Very Vanilla c/s. The Chocolate Chip layer was Tombowed to the base. Two pieces of Linen Thread were tied around the top section to fill in the extra space and to tie in with the "Nautical" theme. Then the Very Vanilla and Cherry Cobbler c/s pieces were Tombowed together and then applied to the Chocolate Chip piece using Dimensionals.
Here's the inside-
I used the compass image from the front and stamped off 3 times to get the lighter image. However, I realized too late that I forgot to sponge the edges of my Very Vanilla c/s on both cards. SMH... :( I didn't add a sentiment because I'm not sure what I'm going to use this card for.
To be honest I ended up liking this card so much, it was a hard decision as to which card to give my darling. He may still end up getting it for some occasion. :)
Well, I hope you liked today's card and I hope you'll be back soon to see what I have in store for you. If you need supplies to make cards of your own you can shop in my ONLINE STORE 24/7. Remember Sale-A-Bration is only here for another month. Don't wait too long.
Today's Card Recipe-
Cardstock- CrumbCake, Chocolate Chip, Cherry Cobbler, Very Vanilla
Ink- Soft Suede Classic Ink- Chocolate Chip, Not Quite Navy Stampin Write Markers
Stamp Set- Open Seas
Big Shot- Lattice Embossing Folder
Accesories- Linen Thread, Tombow, Dimensionals, Sponges, Clear Blocks
If you liked today's card, I would love it if you left me a comment. It's great when I get to hear from you! Also, if you liked today's card, please feel free to +1 or Pin it. I've added the buttons to my side-bar for your convenience. Friends and Followers are also welcome. :)
Till next time-
Remember- Life isn't about Waiting for the storm to pass, it's about learning to Dance in the rain.