Pin It
Just a quick note as I'm heading out to Hershey for a quick mini-vacay. Just wanted to give a quick shout out to the ladies over at Stamping 411 for making my card an Operator's Pick this week. Check out their picks here. Congrats to the other ladies who were chosen as well. Simply Beautiful cards!
Thanks for stopping by. I'll see you back here real soon! Here's hoping you have a Fabulous weekend and lots of tie for Family, Friends and of course lots of creativity!
Till next time-
Remember- Life is often more about the storms than the peace they seek to overwhelm. It's not about Waiting for the storms to pass, but Learning to Dance in the rain.
Be Safe,
Shan
Pin It

Where even Design Scaredy Cats can have fun creating and learning new design techniques. Come look around, leave a comment and let me know what you think. I'm an Independent Stampin' Up Demonstrator and I love what I do. If you like to have fun, create or want to learn new techniques, stop in and have a look or drop me a comment. I'd love to hear from you!
Friday, June 29, 2012
Thursday, June 28, 2012
End of the Week Technique # 38 - Herringbone Technique
Pin It
Hey y'all. Happy Thursday! I hope you're having a Fabulous day and counting down to the weekend. :) Today is my Friday as I will be heading to Hershey to see DMB with my sis tomorrow. Yep, we're getting away for a whole day. :) I'll likely not be posting tomorrow so today seemed like a good time for this weeks EWT.
I'm doing another card that utilizes scraps of cardstock. I don't know about you, but at the end of the catalog year I always have lots of scraps and lots of paper from the previous year that I'm looking to use. Well, this year is no different. So, here's my first attempt at this kind of card. Although it's not any harder than last weeks technique I felt it might be a little cumbersome to try and write it out, so I'm giving you a video to help show you how it's done. The video is from Dawn Olchefsky, check her out when you get a chance. She has lots of great video tutorials on her You-Tube channel.
Here's today's card-
I just love these colors, so bright and cheery! I was trying to figure out what to put on the front, I actually had some flowers that I was going to put in the center, but I really wanted you to be able to see the pattern so I decided on a little tag instead. I was going to just put the sentiment straight in the middle and then as I was putting the punch into position it somehow got a little wonky and the sentiment ended up positioned at an angle like that & I was so glad it did. It's a little unexpected and it just-so-happens to mirror the DSP in that section of the card so it worked out great.
Sometimes it's the small things, right? Love how this turned out and that it actually showed up in the picture. Yea me!
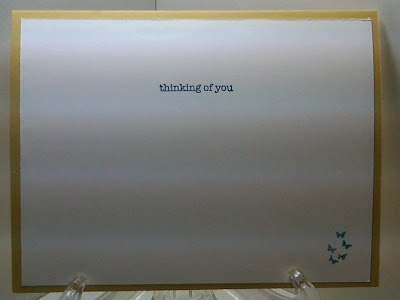
Here's the inside-

I kept it real simple here, well truth be told I did it cuz, I couldn't think of anything to put on the inside. :( I used another sentiment from Friendly Phrases. (Love how you can mix & match them!) Then I decided I could put a strip of coordinating DSP here for a little something-something. While that probably would have been enough, There was just not enough Tink-Time to this card so I added just a little more to make the inside sparkly and pretty too. How fun is that!?!
So, here's what you're going to need for this week's EWT- Coordinating DSP, adhesive ( I used Glue Stick for this, but Dawn uses an adhesive sheet in the video. I really need to get me some of that), paper cutter and then anything you might want to further decorate your card with.
So gather your supplies and get ready to try a new technique and make a beautiful card.
Here's the video-
Once your'e done don't forget my last step in my techniques instructions- Smile when you look at the great new card/project you've created and smile even bigger when you think about the smile it's going to bring to its recipient's face.
Well, I hope you liked today's card and that it inspires you to try something new. I love hearing from you, it always makes my day when I get your comments and I read every one of them. So, if you liked today's card I hope you'll take just a moment to drop me a quick line. Friends and Followers are always welcome too! :)
I hope you have a great weekend full of plenty of time for Family, Friends and of course for Creativity!
Thanks so much for taking time out of your day and stopping by. I hope you'll come back soon for more creative ideas, or just to smile as you follow me trying to work with my Scaredy Cat tendencies and my stamping OCD! LOL :)
Till next time-
Remember- Life is often more about the storms than the peace they seek to overwhelm. It's not about Waiting for the storms to pass, but Learning to Dance in the rain.
Be Safe,
Shan
Pin It
Hey y'all. Happy Thursday! I hope you're having a Fabulous day and counting down to the weekend. :) Today is my Friday as I will be heading to Hershey to see DMB with my sis tomorrow. Yep, we're getting away for a whole day. :) I'll likely not be posting tomorrow so today seemed like a good time for this weeks EWT.
I'm doing another card that utilizes scraps of cardstock. I don't know about you, but at the end of the catalog year I always have lots of scraps and lots of paper from the previous year that I'm looking to use. Well, this year is no different. So, here's my first attempt at this kind of card. Although it's not any harder than last weeks technique I felt it might be a little cumbersome to try and write it out, so I'm giving you a video to help show you how it's done. The video is from Dawn Olchefsky, check her out when you get a chance. She has lots of great video tutorials on her You-Tube channel.
Here's today's card-
 |
| Any-Occasion Card featuring Herringbone Technique, Friendly Phrase and Domestic Goddess DSP |
I just love these colors, so bright and cheery! I was trying to figure out what to put on the front, I actually had some flowers that I was going to put in the center, but I really wanted you to be able to see the pattern so I decided on a little tag instead. I was going to just put the sentiment straight in the middle and then as I was putting the punch into position it somehow got a little wonky and the sentiment ended up positioned at an angle like that & I was so glad it did. It's a little unexpected and it just-so-happens to mirror the DSP in that section of the card so it worked out great.
I did want to "step it up a little" though so I sponged the edges with a little Calypso Coral and then let Tink have her way with it before attaching it to the card with a little C.C. Bakers Twine. Here's a closer look-

Sometimes it's the small things, right? Love how this turned out and that it actually showed up in the picture. Yea me!
Here's the inside-

I kept it real simple here, well truth be told I did it cuz, I couldn't think of anything to put on the inside. :( I used another sentiment from Friendly Phrases. (Love how you can mix & match them!) Then I decided I could put a strip of coordinating DSP here for a little something-something. While that probably would have been enough, There was just not enough Tink-Time to this card so I added just a little more to make the inside sparkly and pretty too. How fun is that!?!
So, here's what you're going to need for this week's EWT- Coordinating DSP, adhesive ( I used Glue Stick for this, but Dawn uses an adhesive sheet in the video. I really need to get me some of that), paper cutter and then anything you might want to further decorate your card with.
So gather your supplies and get ready to try a new technique and make a beautiful card.
Here's the video-
Once your'e done don't forget my last step in my techniques instructions- Smile when you look at the great new card/project you've created and smile even bigger when you think about the smile it's going to bring to its recipient's face.
Well, I hope you liked today's card and that it inspires you to try something new. I love hearing from you, it always makes my day when I get your comments and I read every one of them. So, if you liked today's card I hope you'll take just a moment to drop me a quick line. Friends and Followers are always welcome too! :)
I hope you have a great weekend full of plenty of time for Family, Friends and of course for Creativity!
Thanks so much for taking time out of your day and stopping by. I hope you'll come back soon for more creative ideas, or just to smile as you follow me trying to work with my Scaredy Cat tendencies and my stamping OCD! LOL :)
Till next time-
Remember- Life is often more about the storms than the peace they seek to overwhelm. It's not about Waiting for the storms to pass, but Learning to Dance in the rain.
Be Safe,
Shan
Wednesday, June 27, 2012
Bargello Technique - Part Deux. Just Try, Try Again
Pin It
Hey y'all. Happy Humpday! Hope you're having a great week. I just have one more work-day then I'm off for a long weekend and a concert trip to Hershey! Woot!
Do you ever wish life had a replay button? Kinda like that movie with Adam Sandler, Remote I think it was called, but where life doesn't go crazy if you change one little thing? Boy, howdy! There are some days I think I would have to re-do multiple times just to get them right. Of course the good thing about having something go just not right enough that you wanted to do it over is, hopefully you learn something from it and don't make the same mistakes over and over and over again like Bill Murray in Ground Hog's Day. LOL!
Somehow with my cards that's happened now two weeks in a row. First with a sketch challenge I did and then last week with my End of the Week Technique. Now, don't get me wrong, I liked last week's technique card, I just felt like I could do something more. I don't know, it's hard to explain. I also think that even though I staggered my strips I did them evenly, square for square, instead of staggering them in the middle of the squares. I think this gave it more of a "Patchwork Quilt" look than a true "Bargello" look. So, you know me, I had to give it another try. Since I told you I'd try again and post it for you, I do my best to stay true to my word.
Here's what I came up with-
I think this card more accurately reflects the Bargello technique. As you can see I used a stair-step technique here instead of a zig-zag. I'm very happy with how this one turned out.
I stamped the sentiment from Teeny Tiny Wishes, and the butterflies from Make A Cake in Midnight Muse and I was done. Maybe 30 minutes max,start to finish and that's with cutting and attaching all the strips.
Well, that's all I have for you today. I hope you thought it was a worthwhile second attempt. Using the DSP with all the patterns really helped. This is definitely something I'll try again. Not only do I hope you liked it, I hope it inspires you to give yourself permission to have a "do-over", even if you just want to improve on the first go-round. I love hearing from you, it always makes my day. If you get a chance I'd love to hear what you think, and as always if you try this technique or just have a re-do, I'd love to see what you come up with. If you like today's card and would like to +1 or Pin it, I've put the buttons on my sidebar for your convenience. Friends and Followers are always welcome too! :)
On a non-stamping related note, I've started a new blog called A Better Shan. It's an honest look at my attempts to be a better me, in all aspects of my life starting with my journey to a healthier weight right down to weigh-ins. I'll have some recipes and links on there too for some healthy/ier noms. I just started it, but if you have a chance to stop by and join me on my journey, I'd love to have you along for the ride.
Thanks so much for stopping by today. I hope you have a Great day! Till next time-
Remember- Life is often more about the storms than the peace they seek to overwhelm. It's not about Waiting for the Storm to pass, but Learning to Dance in the rain.
Be Safe,
Shan
Pin It
Hey y'all. Happy Humpday! Hope you're having a great week. I just have one more work-day then I'm off for a long weekend and a concert trip to Hershey! Woot!
Do you ever wish life had a replay button? Kinda like that movie with Adam Sandler, Remote I think it was called, but where life doesn't go crazy if you change one little thing? Boy, howdy! There are some days I think I would have to re-do multiple times just to get them right. Of course the good thing about having something go just not right enough that you wanted to do it over is, hopefully you learn something from it and don't make the same mistakes over and over and over again like Bill Murray in Ground Hog's Day. LOL!
Somehow with my cards that's happened now two weeks in a row. First with a sketch challenge I did and then last week with my End of the Week Technique. Now, don't get me wrong, I liked last week's technique card, I just felt like I could do something more. I don't know, it's hard to explain. I also think that even though I staggered my strips I did them evenly, square for square, instead of staggering them in the middle of the squares. I think this gave it more of a "Patchwork Quilt" look than a true "Bargello" look. So, you know me, I had to give it another try. Since I told you I'd try again and post it for you, I do my best to stay true to my word.
Here's what I came up with-
 |
| Bargello Technique Featuring Patio Party DSP |
Here's two things I learned-
1- Our Glue-Stick works great for this! Shocker- No Tombow. No, this is not a sign of the impending apocalypse. I used Tombow on my last card since I didn't have the adhesive sheets and while it worked, it did leave a few areas that I had to go back and touch up. (Just keeping it Reals, folks!) With the Glue-Stick, I just swiped the whole base piece and laid my strips down. So Easy!
2- Using a DSP that already has "strips" of different patterns in it, means you don't have to cut out the initial strips and lay them side by side to cut them out. I don't know about you but anything that is going to save me time is fine with me. Additionally if your DSP Coordination Challenged, you know who you are... it's hard to mix and match your patterns, this is great! Heck SU not only picked patterns that would go together they even laid them out in a nice pattern for me. SWEET!!!! Thanks SU! :) I can not even begin to tell you how much stress this took away from me. No, Seriously! One shouldn't have to stress over something that is supposed to be "Stress Relief". Am I right!?!
I adhered the Bargello panel to my Summer Starfruit base with Dimensionals. I'm going to fall in love with that color if it takes me 2 years.
Please, Please, Please, Don't let it take 2 years!
Here's the inside-

I stamped the sentiment from Teeny Tiny Wishes, and the butterflies from Make A Cake in Midnight Muse and I was done. Maybe 30 minutes max,start to finish and that's with cutting and attaching all the strips.
Well, that's all I have for you today. I hope you thought it was a worthwhile second attempt. Using the DSP with all the patterns really helped. This is definitely something I'll try again. Not only do I hope you liked it, I hope it inspires you to give yourself permission to have a "do-over", even if you just want to improve on the first go-round. I love hearing from you, it always makes my day. If you get a chance I'd love to hear what you think, and as always if you try this technique or just have a re-do, I'd love to see what you come up with. If you like today's card and would like to +1 or Pin it, I've put the buttons on my sidebar for your convenience. Friends and Followers are always welcome too! :)
On a non-stamping related note, I've started a new blog called A Better Shan. It's an honest look at my attempts to be a better me, in all aspects of my life starting with my journey to a healthier weight right down to weigh-ins. I'll have some recipes and links on there too for some healthy/ier noms. I just started it, but if you have a chance to stop by and join me on my journey, I'd love to have you along for the ride.
Thanks so much for stopping by today. I hope you have a Great day! Till next time-
Remember- Life is often more about the storms than the peace they seek to overwhelm. It's not about Waiting for the Storm to pass, but Learning to Dance in the rain.
Be Safe,
Shan
Tuesday, June 26, 2012
A Patio Party Challenge - SSC #261 / My Challenge #27
Pin It
Hey y'all. Happy Tuesday! I hope your week has started off in a positive way. It's a beautiful day in the DMV. I love being able to look out of a window in my office. For the last 3 1/2 years I had an interior office with no windows and this makes me sooo very happy.
Wanna know what else makes me happy? Today's card. It's one I did Saturday evening after a rough afternoon. It makes me smile because, I stepped a little "out of the box" and didn't follow the sketch exactly. It's pretty close, but for me changing one element completely is a stretch. You know it's true! I used the Patio Party DSP and the Make A Cake stamp set that SU gave me for free, just for sponsoring someone during Sale-A-Bration this year. It's the first time I think I've used the stamp set and I think I'm going to enjoy playing with it. It has lots of different combinations that you can use.
Here's today's card-
I'm so happy with how it turned out! Wanna know a secret? I didn't even use my Stamp-A-Ma-Jig for the cake layers. *Gasp* Lol! (I was shaking that ole Scaredy Cat by the tail, yes I was!) I used a few of the new In-Colors for this. Primrose Petals for the base, and mats of Raspberry Ripple and Midnight Muse. The sentiment is from the Cupcake Builder set, how sweet is that font? I inked my cake stamps up with my Raspberry Ripple Stampin Write Marker and the pedestal with my Baja Breeze one. The center layer is colored in with Primrose Petals Classic Ink Pad and my Blender Pen. I took the colors for the pennants from the card and used my Crumb Cake marker for the poles, using the edge of a scrap piece of c/s as a guide, to darken them up a little and extend them all the way down to the cake. I hung my banners from a piece of Island Indigo Bakers Twine that I tied little bows to on each end. I secured the bows to the c/s with a Mini-Glue Dot that I rolled onto itself to make it smaller. The banners are secured front to back with another Mini-Glue Dot each in between the layers. They are left unsecured to the card so they can move a little and to make it easier to fit into an envelope. The Baja Breeze Seam Binding is wrapped around the card front and tied into a bow, easy peasy.


Hey y'all. Happy Tuesday! I hope your week has started off in a positive way. It's a beautiful day in the DMV. I love being able to look out of a window in my office. For the last 3 1/2 years I had an interior office with no windows and this makes me sooo very happy.
Wanna know what else makes me happy? Today's card. It's one I did Saturday evening after a rough afternoon. It makes me smile because, I stepped a little "out of the box" and didn't follow the sketch exactly. It's pretty close, but for me changing one element completely is a stretch. You know it's true! I used the Patio Party DSP and the Make A Cake stamp set that SU gave me for free, just for sponsoring someone during Sale-A-Bration this year. It's the first time I think I've used the stamp set and I think I'm going to enjoy playing with it. It has lots of different combinations that you can use.
Here's today's card-
 |
| Happy Birthday Card featuring Patio Party DSP & Make A Cake Stamp Set |
Here's the sketch I used. It's from the great ladies over at Stamping 411. Check them out, after you're done here though! They have the best sketches and lots of cool tutorials and information. Not to mention their DT ROCKS!
I changed the strip to my banners, otherwise I stuck to the sketch. I was pretty proud of myself, I have to say, with that move. :) Doesn't happen often, but I'll take it when it does!
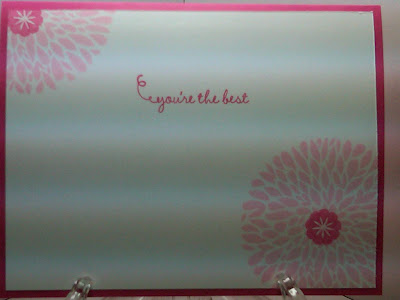
Here's the inside-

Once again I used the sentiment from the Create a Cupcake set. I just did a one layer cake for this panel. Pretty simple for me, as far as insides go, but I like it anyways.
Well, that's all I have for you today. I hope you liked it and I hope the fab ladies over at Stamping 411 do too! Your comments always make my day, so if you get a chance I'd love to hear what you think. If you liked today's card and would like to +1 or Pin it, I've put the buttons on my sidebar for your convenience. Friends and Followers are always welcome too! :)
Thanks so much for stopping by. I hope you'll come back soon. I've got lots to show you.
Till next time-
Remember- Life is often more about the storms than the peace they seek to overwhelm. It's not about Waiting for the storms to pass, but Learning to Dance in the rain.
Be Safe,
Shan
Pin It
Monday, June 25, 2012
MDS Monday - A Wedding Card
Pin It
Hey y'all. Happy Monday! I hope you had a great weekend. Mine was fabulous except for a little hitch Saturday afternoon. Our team meeting was a blast and I'll have my swap from the meeting to show you a little bit later on. Saturday evening I sat down and worked on some cards and a few more yesterday. I even ran for 45 minutes yesterday. Yea Shan! Ok so my run is not a lot faster than my walk, but it still counts right!?! I even got my MDS Monday project up and ready for you in time, although I have a challenge card I almost put up first. LOL! This is why I don't like to designate days for things like MDS, C&S, End of the Week Technique etc. I feel like a failure when they don't get posted correctly. *SMH* :)
This weeks challenge over at Utah Diva's International was to do something for the newlyweds. Here's my card-
Ok so the critic in me is just now noticing the center pieces are not centered top to bottom and I totally forgot to add my Blushing Bride pleated ribbon. AUGH! Will have to try and address that at home. I didn't have any "wedding " downloads so I decided to try & create one. I thought I'd make a cake. Somebody please tell me they realize that's where I was going. Anybody!?!
Since I didn't have any wedding images (and let me tell you I was not going to try and recreate that cake from the front) I added two sentiments from different sets. The top sentiment is from the same set as the front and is done in Raspberry Ripple. The bottom one is from Once Upon A Time and is stamped in Primrose Petals. I like how it turned out.
Well, that's all I have for you today. I hope you liked it and I hope it inspires you to think out of the box and try something new. You might just surprise yourself with what you come up with. Each element of today's card was created with elements that are a part of the MDS initial pack, except for the In-Colors and those are free updates. :) If you'd like to try My Digital Studio you can get a free 30 day trial. Just check out my website.
Thanks so much for stopping by today. Don't forget to check back soon to see what I've been creating for you. Your comments make my day, so I hope you'll take just a minute to let me know what you think. Friends and Followers are always welcome too! :)
Till next time-
Remember- Life is often more about the storms than the peace they seek to overwhelm. It's not about Waiting for the storms to pass, but Learning to Dance in the rain.
Be Safe,
Shan
Pin It
Hey y'all. Happy Monday! I hope you had a great weekend. Mine was fabulous except for a little hitch Saturday afternoon. Our team meeting was a blast and I'll have my swap from the meeting to show you a little bit later on. Saturday evening I sat down and worked on some cards and a few more yesterday. I even ran for 45 minutes yesterday. Yea Shan! Ok so my run is not a lot faster than my walk, but it still counts right!?! I even got my MDS Monday project up and ready for you in time, although I have a challenge card I almost put up first. LOL! This is why I don't like to designate days for things like MDS, C&S, End of the Week Technique etc. I feel like a failure when they don't get posted correctly. *SMH* :)
This weeks challenge over at Utah Diva's International was to do something for the newlyweds. Here's my card-
 |
| MDS Wedding Cake Card |
Ok so the critic in me is just now noticing the center pieces are not centered top to bottom and I totally forgot to add my Blushing Bride pleated ribbon. AUGH! Will have to try and address that at home. I didn't have any "wedding " downloads so I decided to try & create one. I thought I'd make a cake. Somebody please tell me they realize that's where I was going. Anybody!?!
Colors used were Basic Grey for the base, Whisper White, and Blushing Bride for the bottom layers. For the cake I used the Rounded Square Punch and filled with Basic Grey, lightened up, and Pink Pirouette. I used the Baroque Motif flourish in Raspberry Ripple and Whisper White to create the designs on the cake. For the top layer I flipped the flourish, and for the bottom layer I stamped two and mirror imaged one. I think it made a really cool image where they meet in the center, don't you? I slid the top two layers down just enough to hide the rounded edges so it looked like another layer sitting on top of the lower layer.
***Tip*** When you lighten the opacity of something you have layered, you will begin to see the lower image through the first one. To keep that from happening, copy that layer, color it white and move it behind the layer you want showing. This way the only thing showing through when you lighten is white space and not your lower layer. Depending on how many layers you may have to send it back a few times. (Hope this helps)
Because you know I like to do the insides even for MDS Monday's, here's the inside-

Since I didn't have any wedding images (and let me tell you I was not going to try and recreate that cake from the front) I added two sentiments from different sets. The top sentiment is from the same set as the front and is done in Raspberry Ripple. The bottom one is from Once Upon A Time and is stamped in Primrose Petals. I like how it turned out.
Well, that's all I have for you today. I hope you liked it and I hope it inspires you to think out of the box and try something new. You might just surprise yourself with what you come up with. Each element of today's card was created with elements that are a part of the MDS initial pack, except for the In-Colors and those are free updates. :) If you'd like to try My Digital Studio you can get a free 30 day trial. Just check out my website.
Thanks so much for stopping by today. Don't forget to check back soon to see what I've been creating for you. Your comments make my day, so I hope you'll take just a minute to let me know what you think. Friends and Followers are always welcome too! :)
Till next time-
Remember- Life is often more about the storms than the peace they seek to overwhelm. It's not about Waiting for the storms to pass, but Learning to Dance in the rain.
Be Safe,
Shan
Friday, June 22, 2012
An Unlikely Inspiration & a C&S Card
Pin It
Hey y'all. Happy Friday!!! :) How's your day going? Mine started off Amazing before I even left home, then I got to work and found out I had made the Stamping Showcase over at Stamping 411. Wow! Great way to end the week. Now if I can just get those 13 swaps made tonight, then life will be really fab! Lol :)
Question for you... Where do you find your inspiration? Some people like my stamping buddy Michelle Suit has said she'll see something when she's out and be inspired to go home and try and re-create it. My upline team-leader Robin Merriman sometimes takes cards from magazines and re-creates them with all SU product (Hey Robin, btw's...we all miss seeing these every week), some others say "it just came to me" (boy, I wish I was one of those people!). I try to stay open minded and see what presents its-self, but I'm afraid it doesn't happen as often as I'd like. I do however think it's funny, that I now see colors and think of them in comparison to SU colors. That's happened with today's card. I initially thought I'd find something to do with the color combination and then my new favorite stamp set came out and "BAM!", (why yes, I did just do an Emeril) I knew just what I needed to do.
Here's today's card-
I know, I know....Another Betsy's Blossom card. But this set is just so stinking easy and pretty and fun. Plus when you see the inspiration, you'll know why I had to use it! Here's a first, two actually- This is the first time I've done a card with Melon Mambo. I don't mean a card-base, I mean the first time I've cut the paper at all. It's also the first time the stamp pad had ever been used. If you look closely you'll see I did a little tone-on-tone stamping with Melon Mambo ink on the c/s. Why, have I resisted this color? So pretty! I also used Rich RazzleBerry, Regal Rose and Rose Red for my large blossoms and Pretty in Pink and Pink Pirouette for the smaller flowers.WOW! Is this a Pink card or what!?! I inked up part of the sentiment from Friendly Phrase is Melon Mambo with my Stampin Write Marker and stamped it on a scrap of Whisper White c/s. I punched it out with my oval punch, sponged the edges and then mounted it on a piece of Melon Mambo c/s, punched with my Scalloped Oval Punch. This was elevated with Dimensionals.

Pin It
Hey y'all. Happy Friday!!! :) How's your day going? Mine started off Amazing before I even left home, then I got to work and found out I had made the Stamping Showcase over at Stamping 411. Wow! Great way to end the week. Now if I can just get those 13 swaps made tonight, then life will be really fab! Lol :)
Question for you... Where do you find your inspiration? Some people like my stamping buddy Michelle Suit has said she'll see something when she's out and be inspired to go home and try and re-create it. My upline team-leader Robin Merriman sometimes takes cards from magazines and re-creates them with all SU product (Hey Robin, btw's...we all miss seeing these every week), some others say "it just came to me" (boy, I wish I was one of those people!). I try to stay open minded and see what presents its-self, but I'm afraid it doesn't happen as often as I'd like. I do however think it's funny, that I now see colors and think of them in comparison to SU colors. That's happened with today's card. I initially thought I'd find something to do with the color combination and then my new favorite stamp set came out and "BAM!", (why yes, I did just do an Emeril) I knew just what I needed to do.
Here's today's card-
 |
| C&S Betsy's Blossom Card |
Are you ready for the inspiration piece? Wait for it....Wait for it.... You're not going to believe it...

That's right! It's my over-the-door ironing board cover. Can you believe it. Tell me those don't look like Betsy's Big Blossom and I'll tell you that you need an eye exam! And just look at the colors...How could I not make today's card? LOL! It took me so long to make it because, I hate ironing so I don't see the inspiration very often. HAHAHA! I'm kind of a wash and wear kind of girl.
Here's a closeup of the flower-

Ok, so it's probably more of a "Quick and Easy" kind of card than a C&S, but tomatoes, tomatoes. Not really a way to make that saying look like you want it to sound without spelling one of the wrong. *SMH* So I used my Large Scallop Circle Punch to punch a piece of Melon Mambo out and then cut each one of the scallops so it would flare a little more. I then inked up my stamp with Pretty in Pink and "tap-danced" my Melon Mambo marker all over it and stamped on a scrap of Whisper White c/s. Isn't that a pretty effect? I did this twice. I then punched one out with my Large Scallop Circle Punch, and one with my smaller Scallop Circle Punch. I curled the edges of all 3 layer with my bone-folder for depth. All three flowers were adhered to each other with Tombow. I decided it needed just a little something extra so I added a Rich RazzleBerry button to the center with a Mini-Glue Dot. It's not the same color as the flower, but I thought it looked pretty anyways. I got 2 whole containers of these Bright Buttons for FREE, during Sale-A-Bration.
Here's the inside-
I stamped the rest of the sentiment from the front and then added my two flowers. Do you ever split your sentiments like that? I do it a lot. I think it's an easy way to get a little more bang for your buck. I inked up just the center portion of the medium flower with my Stampin Write Marker and stamped it in the center of the big blossom for a different look.
So what do you think? I love it! (Even though it's so pink) I think it's bright and cheery and I think it will bring a smile to someone's face one of these days. It doesn't get much better than that. I hope you like it and I hope it inspires you to take something ordinary as your inspiration and turn it in to something that makes you, and hopefully others, smile.
Thanks so much for stopping by today. I love hearing from you. Your comments always make my day so feel free to let me know what you think. If you'd like to +1 or Pin this, I've put the buttons on my side-bar for your convenience. Friends and Followers are always welcome as well.
I hope you have an Amazing weekend, filled with lots of time for Family, Friends and of course Creativity. Till next time-
Remember- Life is often more about the storms than the peace they seek to overwhelm. It's not about Waiting for the storms to pass, but Learning to Dance in the rain.
Be Safe,
Shan
Here's a closeup of the flower-

Ok, so it's probably more of a "Quick and Easy" kind of card than a C&S, but tomatoes, tomatoes. Not really a way to make that saying look like you want it to sound without spelling one of the wrong. *SMH* So I used my Large Scallop Circle Punch to punch a piece of Melon Mambo out and then cut each one of the scallops so it would flare a little more. I then inked up my stamp with Pretty in Pink and "tap-danced" my Melon Mambo marker all over it and stamped on a scrap of Whisper White c/s. Isn't that a pretty effect? I did this twice. I then punched one out with my Large Scallop Circle Punch, and one with my smaller Scallop Circle Punch. I curled the edges of all 3 layer with my bone-folder for depth. All three flowers were adhered to each other with Tombow. I decided it needed just a little something extra so I added a Rich RazzleBerry button to the center with a Mini-Glue Dot. It's not the same color as the flower, but I thought it looked pretty anyways. I got 2 whole containers of these Bright Buttons for FREE, during Sale-A-Bration.
Here's the inside-

I stamped the rest of the sentiment from the front and then added my two flowers. Do you ever split your sentiments like that? I do it a lot. I think it's an easy way to get a little more bang for your buck. I inked up just the center portion of the medium flower with my Stampin Write Marker and stamped it in the center of the big blossom for a different look.
So what do you think? I love it! (Even though it's so pink) I think it's bright and cheery and I think it will bring a smile to someone's face one of these days. It doesn't get much better than that. I hope you like it and I hope it inspires you to take something ordinary as your inspiration and turn it in to something that makes you, and hopefully others, smile.
Thanks so much for stopping by today. I love hearing from you. Your comments always make my day so feel free to let me know what you think. If you'd like to +1 or Pin this, I've put the buttons on my side-bar for your convenience. Friends and Followers are always welcome as well.
I hope you have an Amazing weekend, filled with lots of time for Family, Friends and of course Creativity. Till next time-
Remember- Life is often more about the storms than the peace they seek to overwhelm. It's not about Waiting for the storms to pass, but Learning to Dance in the rain.
Be Safe,
Shan
Card chosen for Stamping 411 Showcase
Pin It
Hey y'all. Just wanted to give a quick shout-out to the Fabulous Ladies over at Stamping 411. One of my cards (I submitted two) was chosen, for the Stamping Showcase as an Operators Pick. Here's the link if you missed it earlier. Don't forget to check them out. They do great sketches and always have dimensions for you. I don't know about you, but that's one of the hardest parts for me is figuring out the measurements for each element.
Thanks for stopping by!
Be Safe,
Shan Pin It
Thursday, June 21, 2012
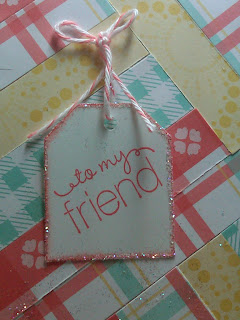
End of the Week Technique #37 Bargello / Thinking Thoughts of Hope for a Friend
Pin It
Hey y'all. Happy Thursday! Just one more day till the weekend. Holy cow and I still have 13 swaps to design and make before Saturday Morning, and no time tonight to work on them! AUGH!!!!! So excited though to have our team meeting Saturday and then begin taking a techniques class (hopefully learn some fun new stuff to post here). Gonna be a busy but fun day. Hope your weekend is shaping up too. :)
Sadly, I found out earlier this week that a team-mate has had a re-occurrence of her Breast Cancer. Even after over 23 years of being a nurse (Amazing for the simple fact that I'm only 29, lol!) the one thing that has always frustrated me was the utter Randomness of Disease and of Violence. I decided to make a card for her and this is what I came up with. I hope she likes it and I hope she gets a laugh when she figures out how much Tombow I used to get it together. My Tombowaddiction reliance is a common laughing point in our team. I'm not sure if she follows this or not, but if she does, "Linda, this is coming your way. Try and act surprised when it arrives."
Here's today's card-
Ok, so two things about today's card-
I stamped it in Blushing Bride and used one of the new Apothecary Accents Framelets to cut it out. Next I sponged the edges and then let Tink have her way. I was worried at first that the color wouldn't be "pink" enough, but after a little Two-Way Glue and some Dazzling Diamonds, I love how the color turned out! This was popped up on Dimensionals.
Here's the inside-

Down at the bottom I used the flourish and the "H for Hope" stamp. Both were stamped in Blushing Bride. For the flourish, I stamped off once. The flourish is outlined as well with Two-Way Glue pen and Dazzling Diamonds.
Here's a closer look-

I sure do wish the sparkle translated in pictures. It's really pretty.
Now for today's technique, here's what you'll need- DSP 4-6 different designs (same color family), adhesive or adhesive sheets, paper cutter.
Basically here's what you are going to do, I'm including a video to show you.
1- Cut strips of your DSP the same width for the example 3/4", and 6-7" long.
2- Adhere them to a piece of cardstock, alternating the placement of the patterns until you get a pattern you like. In the video she uses a Zyron to make her c/s sticky. Since SU doesn't sell Zyron's I chose to just use Tombow liberally on the back of each piece of DSP. SU sells "Multi-purpose Adhesive Sheets" but I didn't have any. Tombow will work if you don't have any adhesive sheets lying around either.
3- Once everything is adhered you will cut "across" the strips so you get all of the DSP patterns on one strip of c/s.
4- Adhere these to strips to another piece of c/s alternating the patterns until you get one you like i.e. chevron, zig-zag etc. (Believe it or not if you look at my card you can see the "pink c/s with the white stripes and the white cardstock with the pink floral image are in a "zig-zag pattern" They're the easiest to see.
5- Trim off any excess c/s hanging off the edges of your c/s base.
6-Optional- I ran my c/s / DSP through my Big Shot with my Lattice EF.I did this for two reasons, 1- to help "embed" the DSP and ensure it was firmly attached to the c/s base and 2- because I thought it would make it look a little more like a quilt. Embossing is totally optional.
7- Mount your finished piece on your card. I used Tombow instead of Dimensionals because I had already planned to use them for my ribbon and for ease of mailing.
8-Admire your work and smile when you think of the joy receiving you card will bring to someone.
Here's the video. She does a really good job of explaining. Somehow though, it took me much longer to make my card then it did for her. :)
I think this is a really neat technique and I'm going to try it again with DSP that has more contrast and I'll be sure to post that and let you see how it turns out. This is a really good technique to use up your scraps of DSP. I hope you'll give it a try. As always, if you do, I'd love to see what you create.
Well, that's all I have for you today. I really Hope my firend likes it and I hope you liked it too. My hope is that it inspires you to try something new. It doesn't have to be this, just something. After all that's the goal of this blog... to "Just Try". I'd love to hear what you think. Your comments always make my day! Friends and Followers are always welcome too! :) If you have a moment to send up a little prayer for my stamping friend that would be great too!
Thanks so much for taking the time to stop by today. I hope you'll come back tomorrow, I have a Clean and Simple card for you. No, it's still not one layer, but it is pretty.
Till next time-
Remember- Life is often more about the storms than the peace they seek to overwhelm. It's not about Waiting for the storms to pass, but Learning to Dance in the rain.
Be Safe,
Shan
Pin It
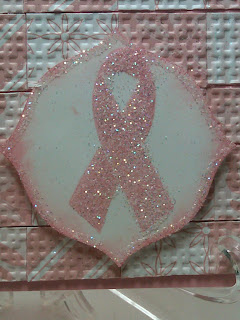
Hey y'all. Happy Thursday! Just one more day till the weekend. Holy cow and I still have 13 swaps to design and make before Saturday Morning, and no time tonight to work on them! AUGH!!!!! So excited though to have our team meeting Saturday and then begin taking a techniques class (hopefully learn some fun new stuff to post here). Gonna be a busy but fun day. Hope your weekend is shaping up too. :)
Sadly, I found out earlier this week that a team-mate has had a re-occurrence of her Breast Cancer. Even after over 23 years of being a nurse (Amazing for the simple fact that I'm only 29, lol!) the one thing that has always frustrated me was the utter Randomness of Disease and of Violence. I decided to make a card for her and this is what I came up with. I hope she likes it and I hope she gets a laugh when she figures out how much Tombow I used to get it together. My Tombow
Here's today's card-
 |
| Bargello Technique "Pink Ribbon" Card |
1- All cardstock/DSP (except the two pieces of Whisper White), ink, and stamps are retired. I rarely do this but it's what I needed for the card. You can do the technique with whatever c/s, DSP you have on hand.
2- When I laid out my strip for this technique, I had the card in "landscape". The pattern is there you just have to turn your head 90 degrees to see it. I'm not sure when, or why, the orientation got changed. In fact, I didn't even notice it until I began writing this. *SMH!* Remember when I said earlier this week that I show everything I make even when it doesn't turn out "blog perfect"? I present yet another example. I'm still very happy with the card, I just am a little befuddled as to how I manage to do things sometimes.
Note to self- I do many things well even when I'm tired. Obviously, cutting and pasting isn't one of them. LOL!!!!! Note to everyone- While this is a really neat technique, if you're a little on the OCD side, (your's truly) this may not be the ideal technique for you...just saying...ask me how I know!
For this card I used a base of Blushing Bride. My Bargello technique uses DSP from the 2010-2012 In-Color Collection. The ribbon is an a-la-carte stamp from last year's catalog. If you can find it, it's great to have because you can make cards for so many causes with it. On the inside I used Sincere Salutations, and two stamps from last years special set benefiting Breast Cancer Awareness. I actually got that set to use for Domestic Violence Awareness, here's one of the cards I made with it, which, unfortunately is the same month as Breast Cancer Awareness.
Here's a close-up of the ribbon-

I stamped it in Blushing Bride and used one of the new Apothecary Accents Framelets to cut it out. Next I sponged the edges and then let Tink have her way. I was worried at first that the color wouldn't be "pink" enough, but after a little Two-Way Glue and some Dazzling Diamonds, I love how the color turned out! This was popped up on Dimensionals.
Here's the inside-

Down at the bottom I used the flourish and the "H for Hope" stamp. Both were stamped in Blushing Bride. For the flourish, I stamped off once. The flourish is outlined as well with Two-Way Glue pen and Dazzling Diamonds.
Here's a closer look-

I sure do wish the sparkle translated in pictures. It's really pretty.
Now for today's technique, here's what you'll need- DSP 4-6 different designs (same color family), adhesive or adhesive sheets, paper cutter.
Basically here's what you are going to do, I'm including a video to show you.
1- Cut strips of your DSP the same width for the example 3/4", and 6-7" long.
2- Adhere them to a piece of cardstock, alternating the placement of the patterns until you get a pattern you like. In the video she uses a Zyron to make her c/s sticky. Since SU doesn't sell Zyron's I chose to just use Tombow liberally on the back of each piece of DSP. SU sells "Multi-purpose Adhesive Sheets" but I didn't have any. Tombow will work if you don't have any adhesive sheets lying around either.
3- Once everything is adhered you will cut "across" the strips so you get all of the DSP patterns on one strip of c/s.
4- Adhere these to strips to another piece of c/s alternating the patterns until you get one you like i.e. chevron, zig-zag etc. (Believe it or not if you look at my card you can see the "pink c/s with the white stripes and the white cardstock with the pink floral image are in a "zig-zag pattern" They're the easiest to see.
5- Trim off any excess c/s hanging off the edges of your c/s base.
6-Optional- I ran my c/s / DSP through my Big Shot with my Lattice EF.I did this for two reasons, 1- to help "embed" the DSP and ensure it was firmly attached to the c/s base and 2- because I thought it would make it look a little more like a quilt. Embossing is totally optional.
7- Mount your finished piece on your card. I used Tombow instead of Dimensionals because I had already planned to use them for my ribbon and for ease of mailing.
8-Admire your work and smile when you think of the joy receiving you card will bring to someone.
I think this is a really neat technique and I'm going to try it again with DSP that has more contrast and I'll be sure to post that and let you see how it turns out. This is a really good technique to use up your scraps of DSP. I hope you'll give it a try. As always, if you do, I'd love to see what you create.
Well, that's all I have for you today. I really Hope my firend likes it and I hope you liked it too. My hope is that it inspires you to try something new. It doesn't have to be this, just something. After all that's the goal of this blog... to "Just Try". I'd love to hear what you think. Your comments always make my day! Friends and Followers are always welcome too! :) If you have a moment to send up a little prayer for my stamping friend that would be great too!
Thanks so much for taking the time to stop by today. I hope you'll come back tomorrow, I have a Clean and Simple card for you. No, it's still not one layer, but it is pretty.
Till next time-
Remember- Life is often more about the storms than the peace they seek to overwhelm. It's not about Waiting for the storms to pass, but Learning to Dance in the rain.
Be Safe,
Shan
Wednesday, June 20, 2012
Just Try, Try, Again.... SSC #260- Part Deux
Pin It
Hey y'all. Happy Humpday! I hope you're having a great week so far. :) It's a scorcher here in the DMV today, 90's, close to 100 with the humidity and heat index. Lucky for me, I'm getting my walking & running done inside. You know what I 'd love to reward myself with....ok, besides a refreshing beverage, a nice cupcake. However that would pretty much use up my all the activity points I just earned so how about I share a calorie/points free version? Ok, so you can't taste it, but I hope it makes you smile anyways, and just think everytime you smile you're using up calories. I like burning calories! According to this article quoting a plastic surgeon, it takes one more muscle to smile than to frown. Just one more reason to smile today. :D Anyways, hopefully this card will make you smile.
Oh, and before I forget- to all those people that let me rant yesterday about my frustrations over the card I made, thanks for not telling me to "Be Quiet" and to "Just Deal". To those of you that took the time to message me or leave nice comments, Thanks so much!!!! You made my day and really made me glad I had persevered and pushed on instead of giving up. Bear Hugs to you, "Grrrrrrrrr". :)
So, I decided to give the Stamping 411 challenge another try. Here's what I came up with-
Here's the sketch-

I stuck to sketch, just turning the orientation. I decided since this was my second attempt, I would challenge myself just a little extra. First- I used one of new In-Colors, Summer Starfruit, for my base and a mat. In case you haven't read it here before, I think this is the "Peach Parfait" of the new In-Colors. Still not sure I like it, but I'm determined to give it a shot. I think it looks best with really saturated colors and of course, our DSP's make it look pretty good...maybe it'll grow on me. Second, see that Baja Breeze seam binding.... OMGoodness! Do you know how many times I pulled that up and then stuck it back down? Soooo many! I'm sure it's hard for those of you that don't know me IRL to imagine the absolute "fits" it gave me to not have nice neat ruffles and folds. The OCD was in high gear let me just tell you! I kid you not, I spent at least 15 minutes laying that ribbon down. LOL!, Silly I know. Are you smiling yet? Boy-Howdy do I wish SU had kept the pleated ribbons. No muss, no fuss, no fits. Oh well, I like how it turned out in the end.
If you're not smiling yet, look at this-
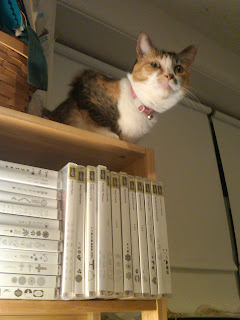
Yep, that's my studio assistant, Bitty Kitty, looking down at me from her perch at the top of my stamping area. Of course in her mind, she's not my assistant, I'm hers. She's just making sure I get my cards done to help pay for her mortgage. Those of you with cats will totally get that. Those without...just imagine what she's thinking of me and my meltdown over ribbon, that should make you smile!
I should have taken a closer picture of my little cupcake, but I was tired and forgot to. But if you look real close, you can see the added details. I first thought about getting out my paper crimper, but since it just retired I wanted to see what I could do to get the same look without it. I punched my cupcake base out of Crumbcake c/s, using my Cupcake Builder Punch, and then using my Simply Scored Tool, made score lines ever 1/8th inch. when I flipped the c/s over it looked like a cupcake wrapper. Score! I then swiped a sponge with some left over Soft Suede on it, over the ridges to make them stand out more. The "frosting" was stamped with Primrose Petals. I stamped off three times then stamped onto Very Vanilla c/s and punched it out with my Cupcake Builder Punch as well. I then outlined it with Tombow and then put swirls of Tombow in the center for "frosting swirls" and dipped it in a mixture of Vanilla embossing powder and Dazzling Diamonds. I can't find the blog link to it but I think it was Selene Kempton's blog that had a project using this combination and called it Frosting. Works great like this, but also with heat embossing. I popped the frosting portion up with Dimensionals.
Here's the inside-
I inked up my new set Friendly Phrases in Midnight Muse and stamped onto a piece of Very Vanilla c/s. I then stamped my cupcake using Crumb Cake and Primrose Petal, both of which were stamped off first. Next, I let Tink have her way with the frosting. No dimensional frosting here like the front of the card, just enough to make it shine (and smell good).
Well, that's all I have for you today. I hope you liked today's card and I really hope it inspires you to re-try something you wish you had done a little more to your liking before. I'd love to hear what you think. Your comments always make my day. Friends and Followers are always welcome too! :)
Thanks so much for stopping by. I hope you have an Amazing day filled with lots of smiles. Till next time-
Remember- Life is often more about the storms, than the peace they seek to overwhelm. It's not about Waiting for the storms to pass, but Learning to Dance in the rain.
Be Safe,
Shan
Pin It
Hey y'all. Happy Humpday! I hope you're having a great week so far. :) It's a scorcher here in the DMV today, 90's, close to 100 with the humidity and heat index. Lucky for me, I'm getting my walking & running done inside. You know what I 'd love to reward myself with....ok, besides a refreshing beverage, a nice cupcake. However that would pretty much use up my all the activity points I just earned so how about I share a calorie/points free version? Ok, so you can't taste it, but I hope it makes you smile anyways, and just think everytime you smile you're using up calories. I like burning calories! According to this article quoting a plastic surgeon, it takes one more muscle to smile than to frown. Just one more reason to smile today. :D Anyways, hopefully this card will make you smile.
Oh, and before I forget- to all those people that let me rant yesterday about my frustrations over the card I made, thanks for not telling me to "Be Quiet" and to "Just Deal". To those of you that took the time to message me or leave nice comments, Thanks so much!!!! You made my day and really made me glad I had persevered and pushed on instead of giving up. Bear Hugs to you, "Grrrrrrrrr". :)
So, I decided to give the Stamping 411 challenge another try. Here's what I came up with-
 |
| Celebrate Card featuring 2012-2014 In Colors, Patio Party DSP , Friendly Phrases & Cupcake Builder Stamp Set & Punch |
Here's the sketch-

I stuck to sketch, just turning the orientation. I decided since this was my second attempt, I would challenge myself just a little extra. First- I used one of new In-Colors, Summer Starfruit, for my base and a mat. In case you haven't read it here before, I think this is the "Peach Parfait" of the new In-Colors. Still not sure I like it, but I'm determined to give it a shot. I think it looks best with really saturated colors and of course, our DSP's make it look pretty good...maybe it'll grow on me. Second, see that Baja Breeze seam binding.... OMGoodness! Do you know how many times I pulled that up and then stuck it back down? Soooo many! I'm sure it's hard for those of you that don't know me IRL to imagine the absolute "fits" it gave me to not have nice neat ruffles and folds. The OCD was in high gear let me just tell you! I kid you not, I spent at least 15 minutes laying that ribbon down. LOL!, Silly I know. Are you smiling yet? Boy-Howdy do I wish SU had kept the pleated ribbons. No muss, no fuss, no fits. Oh well, I like how it turned out in the end.
If you're not smiling yet, look at this-

Yep, that's my studio assistant, Bitty Kitty, looking down at me from her perch at the top of my stamping area. Of course in her mind, she's not my assistant, I'm hers. She's just making sure I get my cards done to help pay for her mortgage. Those of you with cats will totally get that. Those without...just imagine what she's thinking of me and my meltdown over ribbon, that should make you smile!
I should have taken a closer picture of my little cupcake, but I was tired and forgot to. But if you look real close, you can see the added details. I first thought about getting out my paper crimper, but since it just retired I wanted to see what I could do to get the same look without it. I punched my cupcake base out of Crumbcake c/s, using my Cupcake Builder Punch, and then using my Simply Scored Tool, made score lines ever 1/8th inch. when I flipped the c/s over it looked like a cupcake wrapper. Score! I then swiped a sponge with some left over Soft Suede on it, over the ridges to make them stand out more. The "frosting" was stamped with Primrose Petals. I stamped off three times then stamped onto Very Vanilla c/s and punched it out with my Cupcake Builder Punch as well. I then outlined it with Tombow and then put swirls of Tombow in the center for "frosting swirls" and dipped it in a mixture of Vanilla embossing powder and Dazzling Diamonds. I can't find the blog link to it but I think it was Selene Kempton's blog that had a project using this combination and called it Frosting. Works great like this, but also with heat embossing. I popped the frosting portion up with Dimensionals.
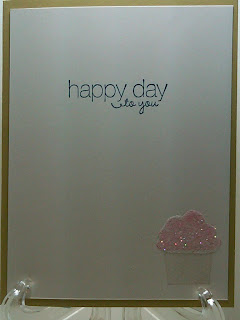
Here's the inside-

I inked up my new set Friendly Phrases in Midnight Muse and stamped onto a piece of Very Vanilla c/s. I then stamped my cupcake using Crumb Cake and Primrose Petal, both of which were stamped off first. Next, I let Tink have her way with the frosting. No dimensional frosting here like the front of the card, just enough to make it shine (and smell good).
Well, that's all I have for you today. I hope you liked today's card and I really hope it inspires you to re-try something you wish you had done a little more to your liking before. I'd love to hear what you think. Your comments always make my day. Friends and Followers are always welcome too! :)
Thanks so much for stopping by. I hope you have an Amazing day filled with lots of smiles. Till next time-
Remember- Life is often more about the storms, than the peace they seek to overwhelm. It's not about Waiting for the storms to pass, but Learning to Dance in the rain.
Be Safe,
Shan
Tuesday, June 19, 2012
A Challenging Challenge / SSC #260 / My Challenge #26
Pin It
Hey y'all. Happy Tuesday! I hope you're having a good week so far. Sorry about no post yesterday. I had a long weekend. I spent 6 hours finishing up swaps Friday night, had a team get-together Saturday morning followed by DMB Saturday night (Amazing as always!), then I ended up babysitting all day Sunday and was sick yesterday.Whew! I need a vacay from my weekend. Lol.
So if you've followed me for any length of time you know a few things to be true and consistent about me (outside of the fact that I'm a little OCD when it comes to my stamping/crafting) (ok, a lot!), I'm a Scaredy Cat about trying new things (I sure did pick the right name), and I stick by my blog motto- "Just Try"
1- I'm trying to expand and grow my creativity by continually challenging my self i.e. weekly challenges, MDS, making my self do things that I find difficult like C&S etc.
2- I'm pretty honest when it comes to what I think about my work. If I'm not happy with it, I try to decide whether it's my OCD and quest for perfection that's marring my happiness, (you know...will someone else like this and I'm just being overly critical) or is it just an "ugly card". Luckily I don't have too many cards that I really dislike.
3- I show the good and the bad. In fact pretty much everything I create ends up here...sometimes it may take a while but it does. While I love seeing everyone else's beautiful creations, it's sometimes frustrating to only see "blog perfect" items. It seems like I'm in the rare percentage of people who turns out cards they're not happy with. I rarely see a post where the person says "Not sure I like this". I'm not saying I never see it, but I very rarely see it.
4- I feel like the purpose of my blog other than to grow as a designer is to (hopefully) inspire others. I have some blogs on my feed that are so over the top creatively, that I'm just look at it and go "Yep, never going to happen for me". So to that end I make sure I post cards like today's so that maybe if someone else is looking at all the "fabulous cards" and feeling overwhelmed they can see mine and remember that we all have good and bad creative days. Of course it goes back to my motto for this blog... Just try.
All things said, I'm not saying this is an "ugly card", definitely not sure I like it (but, I don't hate it), it's just not what I envisioned and that's the frustrating part. Often I look at a sketch and am able to figure out a plan. Every once in a while I look at a sketch and know exactly what I want and it ends up there. This one, the plan came together pretty quick, color combo, stamp set and when I put it together it just didn't look like it had in my mind.
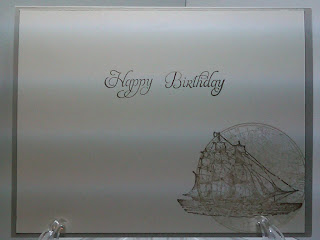
Here's today's card-
And here's the sketch from Stamping 411-

First off, let me say that I love the sketch and my dis-satisfaction is with my interpretation of the sketch. I decided to step out of my comfort zone and try a "concept" driven card and I think that's where I failed (at least in my mind).
Here's how my thought process went-
1- The circle made me think of the compass in the Open Seas set (I originally had a scalloped circle behind it)
2- From there I thought about a "simple card" and decided the manifest would be simple for the open space behind the compass. The ship was an afterthought when I felt the card was really failing.
3- Follow me here with the concept- instead of the scalloped layer, I thought using my edgelet would create "the feeling of waves/water" it was after all being built around "The Open Seas" I edged this piece with some Island Indigo sponging and then lightly sponged over the piece to add some depth and to make it not such a contrast to the Island Indigo piece below it. I was hoping the Island Indigo Bakers Twine would also help to unify the two pieces.
4- When it didn't seem to be coming together, I removed the scalloped circle and added the fussy cut ship. I wish I had taken a picture of it then, but at that point I had already been working on this for over an hour and was getting tired.
Oh, well... I "just tried" even if it didn't turn out. The sad thing is in my mind, it worked out great . :'(
Here's the inside-
When I was looking for some Very Vanilla for the inside, I found a piece that already had the sentiment stamped in Soft Suede. I decided to use it and then just added the globe and ship. This is actually where I got the idea to try putting a ship on the front.
So, since I got my inspiration from the SSC, I'm going to submit it anyway. However, I imagine I'm going to go home tonight and "Just Try" again...hopefully with results that make me happier!
Well, that's all I have for you today (and isn't it enough). Hopefully this has inspired you to "Just Try" even when it seems like it's not working. Even though I'm not happy with today's card, at least I didn't give up. So I guess, that makes it a winner anyway. :)
Thanks so much for stopping by today. I hope you come back soon. (Trust me they're not all like this!)
Till next time-
Remember- Life is often more about the storms than the peace they seek to overwhelm. It's not about Waiting for the storm to pass, but Learning to Dance in the rain.
Be Safe,
Shan Pin It
Hey y'all. Happy Tuesday! I hope you're having a good week so far. Sorry about no post yesterday. I had a long weekend. I spent 6 hours finishing up swaps Friday night, had a team get-together Saturday morning followed by DMB Saturday night (Amazing as always!), then I ended up babysitting all day Sunday and was sick yesterday.Whew! I need a vacay from my weekend. Lol.
So if you've followed me for any length of time you know a few things to be true and consistent about me (outside of the fact that I'm a little OCD when it comes to my stamping/crafting) (ok, a lot!), I'm a Scaredy Cat about trying new things (I sure did pick the right name), and I stick by my blog motto- "Just Try"
1- I'm trying to expand and grow my creativity by continually challenging my self i.e. weekly challenges, MDS, making my self do things that I find difficult like C&S etc.
2- I'm pretty honest when it comes to what I think about my work. If I'm not happy with it, I try to decide whether it's my OCD and quest for perfection that's marring my happiness, (you know...will someone else like this and I'm just being overly critical) or is it just an "ugly card". Luckily I don't have too many cards that I really dislike.
3- I show the good and the bad. In fact pretty much everything I create ends up here...sometimes it may take a while but it does. While I love seeing everyone else's beautiful creations, it's sometimes frustrating to only see "blog perfect" items. It seems like I'm in the rare percentage of people who turns out cards they're not happy with. I rarely see a post where the person says "Not sure I like this". I'm not saying I never see it, but I very rarely see it.
4- I feel like the purpose of my blog other than to grow as a designer is to (hopefully) inspire others. I have some blogs on my feed that are so over the top creatively, that I'm just look at it and go "Yep, never going to happen for me". So to that end I make sure I post cards like today's so that maybe if someone else is looking at all the "fabulous cards" and feeling overwhelmed they can see mine and remember that we all have good and bad creative days. Of course it goes back to my motto for this blog... Just try.
All things said, I'm not saying this is an "ugly card", definitely not sure I like it (but, I don't hate it), it's just not what I envisioned and that's the frustrating part. Often I look at a sketch and am able to figure out a plan. Every once in a while I look at a sketch and know exactly what I want and it ends up there. This one, the plan came together pretty quick, color combo, stamp set and when I put it together it just didn't look like it had in my mind.
Here's today's card-
 |
| Sketch Challenge Featuring Open Seas Stamp Set |
And here's the sketch from Stamping 411-

First off, let me say that I love the sketch and my dis-satisfaction is with my interpretation of the sketch. I decided to step out of my comfort zone and try a "concept" driven card and I think that's where I failed (at least in my mind).
Here's how my thought process went-
1- The circle made me think of the compass in the Open Seas set (I originally had a scalloped circle behind it)
2- From there I thought about a "simple card" and decided the manifest would be simple for the open space behind the compass. The ship was an afterthought when I felt the card was really failing.
3- Follow me here with the concept- instead of the scalloped layer, I thought using my edgelet would create "the feeling of waves/water" it was after all being built around "The Open Seas" I edged this piece with some Island Indigo sponging and then lightly sponged over the piece to add some depth and to make it not such a contrast to the Island Indigo piece below it. I was hoping the Island Indigo Bakers Twine would also help to unify the two pieces.
4- When it didn't seem to be coming together, I removed the scalloped circle and added the fussy cut ship. I wish I had taken a picture of it then, but at that point I had already been working on this for over an hour and was getting tired.
Oh, well... I "just tried" even if it didn't turn out. The sad thing is in my mind, it worked out great . :'(
Here's the inside-

When I was looking for some Very Vanilla for the inside, I found a piece that already had the sentiment stamped in Soft Suede. I decided to use it and then just added the globe and ship. This is actually where I got the idea to try putting a ship on the front.
So, since I got my inspiration from the SSC, I'm going to submit it anyway. However, I imagine I'm going to go home tonight and "Just Try" again...hopefully with results that make me happier!
Well, that's all I have for you today (and isn't it enough). Hopefully this has inspired you to "Just Try" even when it seems like it's not working. Even though I'm not happy with today's card, at least I didn't give up. So I guess, that makes it a winner anyway. :)
Thanks so much for stopping by today. I hope you come back soon. (Trust me they're not all like this!)
Till next time-
Remember- Life is often more about the storms than the peace they seek to overwhelm. It's not about Waiting for the storm to pass, but Learning to Dance in the rain.
Be Safe,
Shan Pin It
Friday, June 15, 2012
A Quick and Easy Fathers Day Card & Lots of Good Memories
Pin It
Hey y'all. Happy Friday! I hope your week has been a good one and that it flew by quicker than mine did, lol. Do you have plans for the weekend? I've got a busy one planned. A big team meeting tomorrow morning, gotta go home and emboss the heck out of my swaps. Then tomorrow afternoon, our yearly girls get together for DMB. Yep, Dave. Matthews. Baby.!!!! (Ok, seriously I know the "B" is for band) My sis and I see them every year. On good years two or three times. :) Tomorrow our other best friend Penny is coming up from Richmond to join us. We've been doing this together for about 12 (maybe longer) years now. It's the one day a year that we are guaranteed to just have girl time. Sunday, it's time for us to show all the Great Dads in our life just how wonderful we think they are.
Sadly, I know not everyone has a great relationship with their dads. It's a sad fact that some men make better "donors" than dad's. I initially had one of those "donors". Sad but true. Then by some Amazing Blessing from God himself, my mom met my "Dad" when I was about 12. We always said he was an "Angel" sent from heaven.
No. Really. He's an Angel. Seriously, that's his last name, my last name. But, he's a real "Angel" of a man too, so it all works. Well, God Bless Him, he took on a pre-teen me and was brave enough to not only keep me but make me his by adopting me. Like I said, truly an Angel. Now I was a pretty good kid but, let's face it, he did get me at the worst time he could have. And poor daddy, nothing really to prepare him for me. I'm sure he can thank me for the majority of his grey hairs. On the other hand, at least I prepared him, mostly, for dealing with my two baby brothers Ethan and Eion. BTW- I love those sweet little guys. It's so sweet when I call and talk to the youngest Eion, he always calls me "sister", as in "Hey Sister". Too cute! On a side note- want to know what's not cute? Him telling his classmates about me...as in when all of his friends say they have sisters in such & such grade and Eion goes "Well I have a sister too and she's..... Let's just say Eion doesn't quite have the concept of me still being 29! ROFL!!!!! Kids say the darnedest things! Sweet Ethan however doesn't out me. Love you boys if someones reading this for you! MWAH!!!!
So here's the card I made for daddy this year-
It's pretty clean and simple, but that's the kind of guy my dad is. This is a CASE of Brenda Keenan (she did her shirts with DSP) that I saw on Stampin Connection a web site just for SU Demonstrators. I was going to send him a different shirt card that I made and then I saw how to do this one and knew it was the one.
Pin It
Hey y'all. Happy Friday! I hope your week has been a good one and that it flew by quicker than mine did, lol. Do you have plans for the weekend? I've got a busy one planned. A big team meeting tomorrow morning, gotta go home and emboss the heck out of my swaps. Then tomorrow afternoon, our yearly girls get together for DMB. Yep, Dave. Matthews. Baby.!!!! (Ok, seriously I know the "B" is for band) My sis and I see them every year. On good years two or three times. :) Tomorrow our other best friend Penny is coming up from Richmond to join us. We've been doing this together for about 12 (maybe longer) years now. It's the one day a year that we are guaranteed to just have girl time. Sunday, it's time for us to show all the Great Dads in our life just how wonderful we think they are.
Sadly, I know not everyone has a great relationship with their dads. It's a sad fact that some men make better "donors" than dad's. I initially had one of those "donors". Sad but true. Then by some Amazing Blessing from God himself, my mom met my "Dad" when I was about 12. We always said he was an "Angel" sent from heaven.
No. Really. He's an Angel. Seriously, that's his last name, my last name. But, he's a real "Angel" of a man too, so it all works. Well, God Bless Him, he took on a pre-teen me and was brave enough to not only keep me but make me his by adopting me. Like I said, truly an Angel. Now I was a pretty good kid but, let's face it, he did get me at the worst time he could have. And poor daddy, nothing really to prepare him for me. I'm sure he can thank me for the majority of his grey hairs. On the other hand, at least I prepared him, mostly, for dealing with my two baby brothers Ethan and Eion. BTW- I love those sweet little guys. It's so sweet when I call and talk to the youngest Eion, he always calls me "sister", as in "Hey Sister". Too cute! On a side note- want to know what's not cute? Him telling his classmates about me...as in when all of his friends say they have sisters in such & such grade and Eion goes "Well I have a sister too and she's..... Let's just say Eion doesn't quite have the concept of me still being 29! ROFL!!!!! Kids say the darnedest things! Sweet Ethan however doesn't out me. Love you boys if someones reading this for you! MWAH!!!!
So here's the card I made for daddy this year-
 |
| Easy Shirt card with Tie |
It's pretty clean and simple, but that's the kind of guy my dad is. This is a CASE of Brenda Keenan (she did her shirts with DSP) that I saw on Stampin Connection a web site just for SU Demonstrators. I was going to send him a different shirt card that I made and then I saw how to do this one and knew it was the one.
God Blessed daddy with an abundance of love and patience with me. He however did not bless him with good color vision. Poor daddy! So when buying his shirts and ties they were mostly all in the same color family. If they weren't white, they were in blues and greens. I liked to get creative though and buy him pretty ties to match. I'm sure he won't need this post to "get" this card. lol I used a base of Crumb-Cake c/s because it reminded me of his Khaki pants. Even though the blue in the tie seems to show up well in the picture, in real life it didn't show up as much against a blue background, so I made a Lucky Limeade shirt. The tie is from our Twitterpated, love that name, DSP. I kept it super simple on the inside, just stamping Happy Father's Day from my Teeny Tiny Wishes set.
I really wish my daddy lived closer so I could see him, and the family (Kathy, I love you too!), more often. But I know that even though we don't see each other often he knows he's #1 in my heart and I'm forever grateful for the love he has given me these past....17 years or so.
I Love you Bunches Daddy!!!! I love you more than rainbows, more than glitter (that's a lot!), and last but not least, I even love you more than Chocolate!(don't tell chocolate, kay) You're the best dad E.V.E.R!
I hope you liked today's card and I really hope my dad likes it and remembers just how much I love him when he sees it. Remember, it's not too late to make a special card for that special dad in your life! Even if it can't make it to him in time, make it and take a picture to text or e-mail him and let him know there's some special love coming his way.
That's all I have for you today. I love hearing from you , so if you liked today's card, leave me a message. They always make my day!
Thanks so much for stopping by today. I hope you'll come back soon. I'm going to try and carve out some time on Sunday to make some more new projects for you for next week. I hope you have an Amazing weekend filled with lots of time for Family, Friends, and of course time for creativity!
Till next time-
Remember- Life is often more about the storms than the peace they seek to overwhelm. It's not about Waiting for the storm to pass, but Learning to Dance in the rain.
Be Safe,
Shan
Thursday, June 14, 2012
MDS Monday- A CASE of Myself
Pin It
Hey y'all. Happy Thursday! Just one more day till the weekend. Woo-Hoo!
In case you're wondering, "Yes", I am aware that this is not Monday, but MDS Thursday just doesn't have the same ring to it. :) I had a busy weekend, last weekend, and didn't get to do anything with my MDS. Since I told you guys on Monday that I would try and get something put together, here it is. I figure late is better than nothing, right?
The challenge over at Utah Divas International was to do something "graduation" related. I decided to CASE myself. Here's what I came up with-
I thought I had the same stamp set I originally used in MDS, but I didn't. I did however have "Define Your Life" and I figured I could work with that. I really L.O.V.E. how using the drop shadow feature really gives the impression of a real paper card and not just a picture on the computer. So realistic! Know what else I love? The ability to change the sizes of everything. For my tassels, I used the white Grosgrain ribbon that comes with the program. Normally it fits all the way across the card and then some. I just kept decreasing the size until I got it where I wanted it. I added two to each cap because I wanted the impression of of movement. I have to say I'm pretty happy with how this turned out. Usually, I test something out on MDS and then make it instead of making it and then trying to convert it.

I just realized I had red and white tassels on the original card. Darn it! Oh well, it was the starting off point. :)
Here's the inside-

I really liked the arrow I put in my inspiration piece because I embossed it, cut it out, and raised it up with dimensionals. I had planned on doing that, with this card, until I found out I didn't have the right stamp set. I still liked the idea of it though, so I punched and filled an arrow, increased the size so it could be a background image, added the text and then lightened the opacity so my sentiment could be read over it. The sentiment is one I wrote just to tie the front and inside together. I just realized I could have put a cap inside as well. :( My only excuse is, that I was doing this at around 11pm last night, as I was waiting for my laundry to finish, and I was tired. Maybe I'll try adding it and see how it looks. I'm pretty happy with it overall though, so who knows.
Well, that's all I have for you today. I hope you thought it was worth the wait. :) Your comments make my day, so if you liked it or have any feedback about today's project I'd love to hear from you! Friends and Followers are always welcome too! :)
Thanks so much for taking the time to stop by today. I hope you have an Amazing day and that you come back real soon to see what else I have in-store for you.
Till next time-
Remember- Life is often more about the storms than the peace they seek to overwhelm. It's not about Waiting for the storm to pass, but Learning to Dance in the rain.
Be Safe,
Shan
Pin It
Hey y'all. Happy Thursday! Just one more day till the weekend. Woo-Hoo!
In case you're wondering, "Yes", I am aware that this is not Monday, but MDS Thursday just doesn't have the same ring to it. :) I had a busy weekend, last weekend, and didn't get to do anything with my MDS. Since I told you guys on Monday that I would try and get something put together, here it is. I figure late is better than nothing, right?
The challenge over at Utah Divas International was to do something "graduation" related. I decided to CASE myself. Here's what I came up with-
 |
| MDS Graduation Card |
I thought I had the same stamp set I originally used in MDS, but I didn't. I did however have "Define Your Life" and I figured I could work with that. I really L.O.V.E. how using the drop shadow feature really gives the impression of a real paper card and not just a picture on the computer. So realistic! Know what else I love? The ability to change the sizes of everything. For my tassels, I used the white Grosgrain ribbon that comes with the program. Normally it fits all the way across the card and then some. I just kept decreasing the size until I got it where I wanted it. I added two to each cap because I wanted the impression of of movement. I have to say I'm pretty happy with how this turned out. Usually, I test something out on MDS and then make it instead of making it and then trying to convert it.
Here's my inspiration piece (and the link) in case you didn't see it the first time around-

Here's the inside-

I really liked the arrow I put in my inspiration piece because I embossed it, cut it out, and raised it up with dimensionals. I had planned on doing that, with this card, until I found out I didn't have the right stamp set. I still liked the idea of it though, so I punched and filled an arrow, increased the size so it could be a background image, added the text and then lightened the opacity so my sentiment could be read over it. The sentiment is one I wrote just to tie the front and inside together. I just realized I could have put a cap inside as well. :( My only excuse is, that I was doing this at around 11pm last night, as I was waiting for my laundry to finish, and I was tired. Maybe I'll try adding it and see how it looks. I'm pretty happy with it overall though, so who knows.
Well, that's all I have for you today. I hope you thought it was worth the wait. :) Your comments make my day, so if you liked it or have any feedback about today's project I'd love to hear from you! Friends and Followers are always welcome too! :)
Thanks so much for taking the time to stop by today. I hope you have an Amazing day and that you come back real soon to see what else I have in-store for you.
Till next time-
Remember- Life is often more about the storms than the peace they seek to overwhelm. It's not about Waiting for the storm to pass, but Learning to Dance in the rain.
Be Safe,
Shan
Wednesday, June 13, 2012
A Smooch and A Challenge Mojo Monday #245
Pin It
Hey y'all. Happy Humpday!I don't know about you, but the week is dragging for me. It totally seems like it should be Friday already. *SMH* Oh well, just two more days. :)
I have another challenge card for you today. This one's from the nice ladies over at Mojo Monday. If you haven't played along with them yet, check 'em out. (just after remember to finish up here too) They've got lots of great sketches and the DT cards are fabulous! Theirs is one my go-to sites for sketch inspirations.
Here's today's card-
Can you believe it!?! I mixed DSP's again!!! *Happy Dance* I have to say I'm really happy with how this turned out, even if I didn't quite get the dimensions on the center panels just right. At least I didn't get out the ruler and mathematically calculate the correct dimensions. (if you haven't followed me for long...Yes, that is a real thing!) I used a base of Tangerine Tango, which I'm not sure I had ever used as a base before, and I used a button which I rarely do. I used my Big Shot and Perfect Polka Dots Embossing Folder for a little added dimension and detail. Love that folder! Don't you just love this DSP, I do. It's one of my all time favorite collections, so bright and cheery. Everything is adhered using Tombow except my flower layer which is popped up with two Dimensionals and the button which is adhered with a Mini-Glue Dot. This makes for a fairly flat card for mailing.

Aside from the dimensions on the center panel, it's true to the sketch. Now if I can just figure out those dimensions I think this will be a good layout to keep in my rotation.
Here's the inside-

I wasn't sure what I wanted to do with the inside, so I kept it simple and put a matching strip of DSP for a bright accent. My sentiment is from the Kindness Matters set which I got for free during last year's Sale-A-Bration. Love Free! I also love the font. I inked it up in Tangerine Tango and my card was done.
So, what do you think? Hopefully it will brighten someone's day. I'd love to hear what you think. Your comments always make me smile, except this morning when I woke up to spam for the first time! *BOO-HISS!!!* If you like today's card and would like to +1 or Pin it, I've put the buttons on my sidebar for your convenience. Friends and Followers are always welcome too! :)
Thanks so much for stopping by today. I hope your day is as Fabulous as you are! Till next time-
Remember- Life is often more about the storms, than the peace they seek to overwhelm. It's not about Waiting for the storms to pass, but Learning to Dance in the rain.
Be Safe,
Shan
Pin It
Hey y'all. Happy Humpday!I don't know about you, but the week is dragging for me. It totally seems like it should be Friday already. *SMH* Oh well, just two more days. :)
I have another challenge card for you today. This one's from the nice ladies over at Mojo Monday. If you haven't played along with them yet, check 'em out. (just after remember to finish up here too) They've got lots of great sketches and the DT cards are fabulous! Theirs is one my go-to sites for sketch inspirations.
Here's today's card-
 |
| Thank You Card with Summer Smooches DSP and Bright Blossoms Stamp Set |
Here's the Mojo Monday Sketch-
Aside from the dimensions on the center panel, it's true to the sketch. Now if I can just figure out those dimensions I think this will be a good layout to keep in my rotation.
Here's the inside-

I wasn't sure what I wanted to do with the inside, so I kept it simple and put a matching strip of DSP for a bright accent. My sentiment is from the Kindness Matters set which I got for free during last year's Sale-A-Bration. Love Free! I also love the font. I inked it up in Tangerine Tango and my card was done.
So, what do you think? Hopefully it will brighten someone's day. I'd love to hear what you think. Your comments always make me smile, except this morning when I woke up to spam for the first time! *BOO-HISS!!!* If you like today's card and would like to +1 or Pin it, I've put the buttons on my sidebar for your convenience. Friends and Followers are always welcome too! :)
Thanks so much for stopping by today. I hope your day is as Fabulous as you are! Till next time-
Remember- Life is often more about the storms, than the peace they seek to overwhelm. It's not about Waiting for the storms to pass, but Learning to Dance in the rain.
Be Safe,
Shan
Tuesday, June 12, 2012
End of the Week Technique #36 - Tapdancing / SSC #259 / My Challenge #25
Pin It
Hey y'all. Happy Tuesday! It a rainy, gloomy day here in the DMV. :( I hope it's sunny and warm wherever you are. If not, I hope today's card brings a little sunshine and joy to your day. Yes, I know it's a little early in the week for my EWT but I needed to post so I could enter in the challenge over at Stamping 411, so you get it a little early. :)
Here's today's card-
I just love all the bright colors in this DSP collection. In fact I made 2 different cards for two different challenges with it yesterday. Bet you're glad to not be seeing Betsy's Blossoms. LOL


Hey y'all. Happy Tuesday! It a rainy, gloomy day here in the DMV. :( I hope it's sunny and warm wherever you are. If not, I hope today's card brings a little sunshine and joy to your day. Yes, I know it's a little early in the week for my EWT but I needed to post so I could enter in the challenge over at Stamping 411, so you get it a little early. :)
Here's today's card-
 |
| Happy Birthday Card featuring Summer Smooches DSP and Bright Blossoms Stamp Set |
I just love all the bright colors in this DSP collection. In fact I made 2 different cards for two different challenges with it yesterday. Bet you're glad to not be seeing Betsy's Blossoms. LOL
This card is so straightforward. A base of Tempting Turquoise, and mats of Daffodil Delight and Rich Razzleberry. I used two different patterns of DSP from the Summer Smooches collection. I was so happy how the combination turned out. Most of you, that have followed me for any length of time, know I have issues with combining DSP. Dunno why, I just do. Guess it's the Scaredy Cat in me. But I tried it anyway. Yea Shan! The Daffodil Delight layer is elevated with Dimensionals as is the Rich Razzleberry layer and each of the circle layers. All other adhering was done with Tombow. I love the new ribbon and it seemed to be just the right size for today's card.
I used this sketch over at Stamping 411 for my inspiration-

Have you checked those Fabulous ladies out yet? If not, You really should! They always have great sketches and their DT does amazing samples. One of the things I like the most about their challenge is they give measurements. So Nice! What a time saver!!!! (Especially if you're a little OCD about those kinds of things.) My only variations from the sketch are that I matted my circles and that meant I needed to increase the dimensions of the center rectangles. Otherwise I stuck to the sketch.
Here's the inside-

I used my new stamp set, Itty Bitty Banners for the sentiment, inking it up with my Tempting Turquoise Stampin Write Marker. I then stamped the image in the bottom, using this weeks EWT, with the same 3 colors from the front of the card. This technique is soooo stinking easy, you're not going to believe it!
Here's a closer look-
 |
| Tap Dancing Technique with Bright Blossoms Stamp set |
Here's what you need for this technique- Stamp set of your choice (solid image) and two or more colors. You need markers for your accent color/s. I used my Stampin Write Marker in Rich Razzleberry.
1- Ink up your image with the lighter of your colors.
2- Lightly tap your marker over the image using the "brush end" It will look like dark lines of color over your stamp. (This works really well over larger backgrounds, especially our background stamps, but I didn't have any of those.) If you want to add a second color, simply repeat this step.
3- Once you have the coverage you want, huff on your stamp to make sure it's moist and then stamp. See, I told you this was easy!
4- Smile when you see your one of a kind effect, and smile even bigger when you think about the joy receiving this will bring to someone special!
What do you think? I didn't plan on doing this technique for this stamp set, but was looking for something a little different when I was making this card and thought I'd give it a shot. Surprise! I know right! Me being spontaneous? What's the world coming too!?! I'm going to try this technique on some bigger stamps as I get them. Right now though, that means Betsy's Blossoms. Maybe I'll give it a week or so, huh.
Well, that's all I have for you today. I hope you like today's card and I really hoped you liked today's technique, even though it's such a small sample, and that it inspires you to try something new today. As always, if you create using this technique, I would love to see what you come up with. I love hearing from you, so if you liked today's card/technique or have a request for something you'd like to see, feel free to drop me note. Hearing from you makes my day! If you'd like to +1 or Pin today's card I've put the buttons on my sidebar for your convenience. Friends and Followers are always welcome as well! :)
Thanks so much for stopping by. Hope to see you back here soon.
Till next time-
Remember- Life is often more about the storms than the peace they seek to overwhelm. It's not about Waiting for the storms to pass, but Learning to Dance in the rain.
Be Safe,
Shan
Well, that's all I have
Pin It
What do you think? I didn't plan on doing this technique for this stamp set, but was looking for something a little different when I was making this card and thought I'd give it a shot. Surprise! I know right! Me being spontaneous? What's the world coming too!?! I'm going to try this technique on some bigger stamps as I get them. Right now though, that means Betsy's Blossoms. Maybe I'll give it a week or so, huh.
Well, that's all I have for you today. I hope you like today's card and I really hoped you liked today's technique, even though it's such a small sample, and that it inspires you to try something new today. As always, if you create using this technique, I would love to see what you come up with. I love hearing from you, so if you liked today's card/technique or have a request for something you'd like to see, feel free to drop me note. Hearing from you makes my day! If you'd like to +1 or Pin today's card I've put the buttons on my sidebar for your convenience. Friends and Followers are always welcome as well! :)
Thanks so much for stopping by. Hope to see you back here soon.
Till next time-
Remember- Life is often more about the storms than the peace they seek to overwhelm. It's not about Waiting for the storms to pass, but Learning to Dance in the rain.
Be Safe,
Shan
Well, that's all I have
Monday, June 11, 2012
Watercolored Motorcycle Card / Sweetshop Sketch Challenge #162
Pin It
Hey y'all. Happy Monday! I hope you had a great weekend. Mine was packed. No MDS Monday today however. I think I got a little behind on my hydration yesterday as I was power washing and painting my front porch railings, because I ended up with a wicked migraine. I will try and get to it today.
Today's card is a special one I made for a special guy in my life. He loves to ride, so I got this stamp set specifically to make a card for him. I know it's retired, hope you won't hold it against me. This card fits the Sweet Stop Sketch Challenge. If you haven't checked them out yet, go on by when you get a chance. They have lots of great sketches.
Here's today's card-
This card is a first for me. This is the first card I've designed where I used my Aqua Painter and Watercolor Paper to create a watercolored image. I really enjoyed doing this and will be doing more. Ok, I enjoyed watercoloring the sky and grass. It was the rest of the focal point that gave me such grief. This was attempt #7. Ok, Ok, Ok, so my OCD was partially to blame. It took me a couple of tries to figure out that I needed to Heat Emboss my stamped image. Then it took another 4 tries to get the color for the bike just right.
Here's a close-up of the focal image-
My friend's bike is a beautiful, Royal Blue color, but we don't really have anything that color so I ended up mixing colors, finally settling on Not Quite Navy and Concord Crush layered together. I thought I might be able to use Pacific Point, but believe it or not, Not Quite Navy and Pacific Point look very similar to each other in watercolor. After I got the color just where I wanted it, I colored over these spots with my VersaMarker and then applied Clear Embossing Powder and Heat Embossed to give the blue areas I glossy finish. I also tried (unsuccessfully) on one of the early attempts to use my VersaMarker & Pewter Heat Embossing Powder, to make some of the metal stand out. :( I used Wild Wasabi for the grass and a mixture of Bashful Blue and Marina Mist for the sky. (I have to say I'm really excited by how this turned out!) I then sponged the edges with Not Quite Navy and Wild Wasabi. This panel was then popped up with dimensionals on my two colored panels, which were run through the Big Shot in my Lattice Embossing Folder.They were then mounted with dimensionals as well.
Pin It
Hey y'all. Happy Monday! I hope you had a great weekend. Mine was packed. No MDS Monday today however. I think I got a little behind on my hydration yesterday as I was power washing and painting my front porch railings, because I ended up with a wicked migraine. I will try and get to it today.
Today's card is a special one I made for a special guy in my life. He loves to ride, so I got this stamp set specifically to make a card for him. I know it's retired, hope you won't hold it against me. This card fits the Sweet Stop Sketch Challenge. If you haven't checked them out yet, go on by when you get a chance. They have lots of great sketches.
Here's today's card-
 |
| Watercolored & Embossed Masculine Card with SU Motorcycle Stamp |
Here's a close-up of the focal image-
 |
| Watercolored and Embossed Image, SU Motorcycle Stamp |
My friend's bike is a beautiful, Royal Blue color, but we don't really have anything that color so I ended up mixing colors, finally settling on Not Quite Navy and Concord Crush layered together. I thought I might be able to use Pacific Point, but believe it or not, Not Quite Navy and Pacific Point look very similar to each other in watercolor. After I got the color just where I wanted it, I colored over these spots with my VersaMarker and then applied Clear Embossing Powder and Heat Embossed to give the blue areas I glossy finish. I also tried (unsuccessfully) on one of the early attempts to use my VersaMarker & Pewter Heat Embossing Powder, to make some of the metal stand out. :( I used Wild Wasabi for the grass and a mixture of Bashful Blue and Marina Mist for the sky. (I have to say I'm really excited by how this turned out!) I then sponged the edges with Not Quite Navy and Wild Wasabi. This panel was then popped up with dimensionals on my two colored panels, which were run through the Big Shot in my Lattice Embossing Folder.They were then mounted with dimensionals as well.
For the metallic background I used a piece of cardboard that comes with our DSP, covered it with our Glue Stick then adhered regular Aluminum Foil over it and ran it through my Big Shot with the same Lattice Embossing Folder. If you look closely you can see that even though both elements used the embossing folder, they are very different in appearance. I used the debossed side for the background and the embossed side for the Not Quite Navy and Wild Wasabi panels. I also lightly sponged over them to show make the embossing stand out a little more. The background panel was adhered with Tombow to a base of Night of Navy.
No inside to show you today. It's hard for me to do with most of my masculine cards. After I had mounted everything to the base I felt like something was missing....maybe some brads or something. Not sure. I still kind of feel like it needs something, but I'm ok with it missing whatever it's missing. At the end of the day what really matters is that my friend liked it and he did. I told him I felt like something was missing and he told me he loved it just like it was because I had made it for him. :) Hard to argue with that.
That's all I have for you today. I hope you enjoyed it and I hope it inspires you to get out your Aqua Painters and try something new. I'd love to hear what you think. Your comments always make my day. If you'd like to +1 or Pin this, I've put the buttons on my sidebar for your convenience. Friends and Followers are always welcome too! :)
Thanks for stopping by. I hope you have a great day and that you're able to come back soon.
Till next time-
Remember- Life is often more about the storms, than the peace they seek to overwhelm. It's not about Waiting for the storm to pass, but Learning to Dance in the rain.
Be Safe,
Shan
Friday, June 8, 2012
End of the Week Technique #35 - Brayered and Embossed Checkered Background
Pin It
Hey y'all. It's Friday! (Oh Noes! I just said that to my self and now that awful "It's Friday" song is swimming around my head on auto-repeat! Help, someone quick...ear-worm!!!! AUGH ): ) Oh well, I hope your week's been great and I haven't just shared my ear-worm with you. LOL :)
I have a really simple technique for you today. It can go from a simple background to a Wow focal point, depending on your color combinations and other card elements. I probably see this technique once a month or so during my blog reads. I first tried it last fall, with my upline Robin, I think it was at a team meeting, on a holiday card. I thought I'd try it today on a fun, bright, baby card.
Here's today's card-
I showed this to a friend the other day and she just loved it. I started with a base of Certainly Celery. Next came my checkered background using Certainly Celery and Daffodil Delight. I knotted a piece of our new stitched ribbon in Daffodil Delight and secured the ends under the card with a little SNAIL. My sweet little ducky is popped up with dimensionals. So quick and easy!
How Stinkin' Cute is he?!? Love him. I stamped him in Staz-On on a scrap of Whisper White c/s. If you look closely you can see the sentiment below him. I had actually intended for it to be seen, but my water turned out darker than I had planned. *blush* *SMH* Don't you love it when people post things that aren't "perfect" and then admit it?!? I know I sure do. I used my second smallest Labels Framelet to cut him out. He fit perfectly. It makes me so happy when things work like that. I used my Blener Pends and Classic Ink Pads to color. Here's what I used- So Saffron, Daffodil Delight, and Tangerine Tango for my little cutie-pie. Certainly Celery and Baja Breeze for the umbrella, Baja Breeze and Marina Mist for the hat and Marina Mist for the water. Once I had the water colored in though I realized I had made a little "Ooopsie" or as we like to say "I had created a design opportunity." What to do, what to do? Yep, I channeled my inner Pooh Bear. Think...Think...Think and not my inner Eyeore (Oh, Bother!) I had a lightbulb moment, love when those happen. Let Tink come out to play. Well I did and I think the results are fabulous. You can still make out the "for baby" if you look close, otherwise it just looks like extra shading in the water. "Thanks Tink!"

Pin It
Hey y'all. It's Friday! (Oh Noes! I just said that to my self and now that awful "It's Friday" song is swimming around my head on auto-repeat! Help, someone quick...ear-worm!!!! AUGH ): ) Oh well, I hope your week's been great and I haven't just shared my ear-worm with you. LOL :)
I have a really simple technique for you today. It can go from a simple background to a Wow focal point, depending on your color combinations and other card elements. I probably see this technique once a month or so during my blog reads. I first tried it last fall, with my upline Robin, I think it was at a team meeting, on a holiday card. I thought I'd try it today on a fun, bright, baby card.
Here's today's card-
 |
| Brayered and Embossed Checkered Background Baby Card with Easy Events Stamp Set |
Here's what you need for this technique- Brayer, Big Shot, Stripes Embossing Folder, Ink Pads (I used two colors but you can also use just one color for a more tone-on-tone look) and of course cardstock, your choice of colors, I used Whisper White.
Here are the steps-
1- Pick out your colors. I chose two, but like I said you could choose one and it would still give a nice effect. (I'll try to do this soon and post it.)
2- Ink up your brayer with the first color and roll it on the inside cover of your Stripes Embossing Folder (this is the side that has "Sizzix" written on it. Make sure that you have even coverage on all of the raised portions.
3- Position your c/s, wherever makes you happy in the folder. (I lined mine up with the top and side so everything my lines would be straight, but then you all know I'm a "little OCD" hahaha) Carefully Close it and run it through your Big-Shot. Remove your c/s.
4- Re-ink your folder. If you're going to use the same color, go ahead and re-ink your brayer. If you're changing colors, rinse your brayer and embossing folder, tap water is fine, until the water runs clear. This won't take long. Dry both well, then re-ink your brayer with your new color and ink the folder again.
5- Turn your c/s 90 degrees (1/4 turn), position your c/s and run it through again. You will now have the checkered, or plaid look you see above. Because I used such a large piece of c/s it didn't get colored completely when I ran it through, so I just inked it up again and moved my c/s up making sure to line up with the previously embossed areas so my spacing stayed even.
6- Enjoy your new background or accent piece. Smile when you think of the joy and smiles it will bring to the face of your card's recipient. (Always the best part for me!)
***TIP*** You may want to try running a piece of your c/s dry through your Big Shot with this embossing folder first. You may need to adjust which platform level you use on with your machine. I did this with one tab down. If you look real close, you can see a little "wrinkling, for lack of a better word" in some of the white spaces. I think my machine is a little tight. Everyone's is different. Next time I will do it with no tabs. It's still a beautiful card, but the OCD in me wants it perfect of course. :)
Here's my sweet little ducky-
 |
| Easy Events Duck and Labels Framelet |
Here's the inside-

The sentiment is from Petite Pairs. Seriously, if you only get one sentiment set, get this one. I use it all the time. I think it's probably one of my best stamp purchases. I actually mounted them both on the same block and stamped just one time. ***TIP*** If you do this, please make sure to do a test stamp on your grid paper (or other scrap paper) to ensure everything is lined up just like you want it. I got lucky and had it right the first time. Yea, Shan! My precious little froggy is from last year's Ronald McDonald set. It's retired now, but it wasn't when I made the card. I colored him in with Wild Wasabi, that was an In-Color when I first did Stampin' Up years ago. A little love from Tink and he's so handsome you just know he's really a prince. If these two cute little fellas don't make you smile, well then I'm just at a loss.
So what do you think? I hope you liked today's card and I hope it inspires you to try something new. If you liked today's card and would like to +1 or Pin it, I've put the buttons on my sidebar for your convenience. Your comments always make me smile, so feel free to let me know what you think. Friends and Followers are always welcome too! :)
That's all I have for you today and for this week. I hope you'll come back and see me soon.
Thanks for stopping by. You are so appreciated. Till next time-
Wishing you a weekend filled with Family, Friends and of course lots of time for creativity.
Remember- Life is often more about the storms than the peace they seek to overwhelm. It's not about Waiting for the storm to pass, but Learning to Dance in the rain.
Be Safe,
Shan
Thursday, June 7, 2012
Betsy's Blossoms -Clean and Simple
Pin It
Hey y'all. Happy Thursday! I hope you're having an Amazing day and week. Just one more day to go till the week-end. *happy dance*
Today's card is one I designed for my recent New-Year's Open House. I got to introduce 3 old friends and 1 new one to the joys of stamping. Let me tell you, these girls stamped like they were old pros and they all had so much fun doing it! None of them thought they would be able to recreate this card and were all delighted by the beautiful cards they made.
My friend April often laughs at me and says I can't make a one-layer card. I tried to for my Open House, knowing there would be new stampers, and still couldn't manage it. I know later today April will be laughing. :D
Even though it's not one-layer, this is still a super simple card to make and would be especially good for beginners or a 2-4-5 type class.
Here's today's card-
I am in L.O.V.E, LOVE with this set. It's so fab, lately I've had to make myself not pick it up and choose another set to play with. Know what else I love? The New In-Colors and the New Pads! LOVE Them! This card came together so quick, I was done before I knew it. :) I used Midnight Muse, Raspberry Ripple, Gumball Green and Summer Starfruit to stamp my images. For the tag I inked up & stamped my sentiment from Petite Pairs, added a few flowers and punched it out with my Decorative Label Punch. A little sponging around the edges and some dimensionals and the front was done. See, Easy-Peasy!

I stamped my flower in Raspberry Ripple, fussy cut it and then layered it over my stamped leaf image with my favorite adhesive, Tombow. As an after-thought I decided to let Tink have a little fun and added some Dazzling Diamonds to the center.
I didn't get pictures of everyone's cards, but here's one from my Open House-
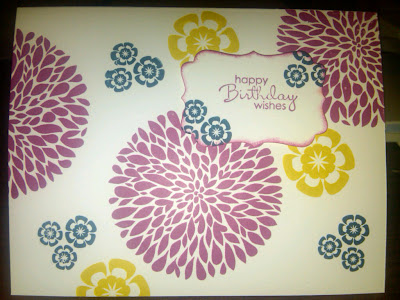
This was my Friend Julia's card. I think she did a great job for her first time to ever stamp. Don't you think so too? I love how she made it her own by changing up the colors. Way to go Jules!
Well, that's all I have for you today. I hope you liked today's card and that it inspires you to create something Clean and Simple today. If you like today's card and want to +1 or Pin it, I've put the buttons on my sidebar for your convenience. I always love hearing from you, so feel free to leave me a comment. They always make my day! Friends and Followers are always welcome too. :)
I hope you'll stop back by tomorrow for this week's End of the Week Technique.
Thanks for stopping by. Hope you have a great rest of your day!
Till next time-
Remember- Life is often more about the storms than the peace they seek to overwhelm. It's not about Waiting for the storm to pass, but Learning to Dance in the rain.
Be Safe,
Shan
Pin It
Hey y'all. Happy Thursday! I hope you're having an Amazing day and week. Just one more day to go till the week-end. *happy dance*
Today's card is one I designed for my recent New-Year's Open House. I got to introduce 3 old friends and 1 new one to the joys of stamping. Let me tell you, these girls stamped like they were old pros and they all had so much fun doing it! None of them thought they would be able to recreate this card and were all delighted by the beautiful cards they made.
My friend April often laughs at me and says I can't make a one-layer card. I tried to for my Open House, knowing there would be new stampers, and still couldn't manage it. I know later today April will be laughing. :D
Even though it's not one-layer, this is still a super simple card to make and would be especially good for beginners or a 2-4-5 type class.
Here's today's card-
 |
| Clean & Simple Card with Betsy's Blossoms, Petite Pairs and New In-Colors |
Here's the inside-

I stamped my flower in Raspberry Ripple, fussy cut it and then layered it over my stamped leaf image with my favorite adhesive, Tombow. As an after-thought I decided to let Tink have a little fun and added some Dazzling Diamonds to the center.
I didn't get pictures of everyone's cards, but here's one from my Open House-

This was my Friend Julia's card. I think she did a great job for her first time to ever stamp. Don't you think so too? I love how she made it her own by changing up the colors. Way to go Jules!
Well, that's all I have for you today. I hope you liked today's card and that it inspires you to create something Clean and Simple today. If you like today's card and want to +1 or Pin it, I've put the buttons on my sidebar for your convenience. I always love hearing from you, so feel free to leave me a comment. They always make my day! Friends and Followers are always welcome too. :)
I hope you'll stop back by tomorrow for this week's End of the Week Technique.
Thanks for stopping by. Hope you have a great rest of your day!
Till next time-
Remember- Life is often more about the storms than the peace they seek to overwhelm. It's not about Waiting for the storm to pass, but Learning to Dance in the rain.
Be Safe,
Shan
Subscribe to:
Posts (Atom)