Showing posts with label Teeny Tiny Wishes. Show all posts

Sunday, December 9, 2012

Gently Falling & Inspiration

Pin It
Hey y'all. I hope you're having a great weekend. I had a few minutes earlier so I went into my craft room and made a card I'd been wanting to make for a while. I hope you like it. :)

Where do you find inspiration? Sometimes I find it in the most unlikely places. A few weeks ago I posted a card that was inspired by the evening sky as seen from my bathroom window. Today I have a card that was inspired by a print at my friend's (and team-mate) house. The print is in her powder room on the main level and even though I had seen it many times, for some reason it suddenly just hit me that I could make something similar and so I did. Here's what I came up with-


Here's my inspiration- (sorry about the poor lighting, the flash kept bouncing of the glass)

There's a funny story that goes with this. I took the picture and then showed it to my friend Brenda. I told her it was my new inspiration piece. She said "Wow! That's really pretty." We had a pretty good laugh when I told her I hoped she liked it since it was hers. LOL!

Here's a close-up. I used Gently Falling which is still one of my favorite sets-


I started with a base of Always Artichoke. Next I stamped a piece of Naturals White with the French Script background stamp in Crumb Cake. I used a post-it note to mask a 2 x 2 area and sponged Soft Suede around that. My leaf was stamped in Soft Suede on a 2 x 2 piece of Naturals White c/s and then the edges were heavily sponged. This pieces was adhered with Dimensionals to give a little additional dimension to the card.

Here's the inside-


I left it simple to go with the overall theme of the card. The sentiment is from Teeny Tiny Wishes. I hope you like it and that it encourages you to find inspiration in the things that bring you joy in your everyday life. Sometimes I forget that it really is the small things that can bring a lot of joy. I was really happy that this turned out like I envisioned it.

I love hearing from you and read all of your comments If you liked today's card or have any questions about it, I hope you'll take a moment to leave me a comment below. If you'd like to +1 or Pin it, I've put those buttons on my blog for your convenience. Friends and Followers are always welcome too! :)

Thanks so much for taking time out of your busy day to stop by my little corner of the world. You are very appreciated! Till Next Time-

Remember- Life is often more about the storms than the peace they seek to overwhelm. It;snot about Waiting for the storms to pass, but Learning to Dance in the rain.

Be Safe,
Shan Pin It

Wednesday, November 14, 2012

Go Ahead & Cry / NAC #20 ? My Challenge #47

Pin It
Hey y'all. Happy Wednesday! Boy, here I was thinking I was doing good because it was only Tuesday and then I realized I'm a day behind because of the Holiday. Oh well, at least I'm getting to post. I hope you're having a great week so far. I'm almost situated in my new job, so hopefully things will be getting a little more back to normal. For those that have followed me for a while now, I'm finally out of my boot, hopefully for good and trying to get back to exercising. I started at a new gym tonight and managed a 30 minute walk run 15/15 and am still able to walk so I'm thinking that's a good thing. :) Thanks for all the thoughts, prayers and well wishes you sent my way!

I'm so excited about today's card! You know I love those fabulous ladies over at Nacho Average Challenge and I make sure to get their challenge in every week. (Some times earlier than later, lol) They've got a color challenge this week and you know how I feel about them, but I'm very happy with how my card turned out. I love when people give measurements for their cards especially ones with lots of layers so guess what?  I have them for you and will put them at the end of the post. Why? Because that's just the kind of friend I am. :) It took me 2 hours to make this card and the bulk of that was trying to figure out the layer measurements. :( Here's what I came up with-

Sympathy Card featuring Lean On Me Stamp Set
Here are the colors I had to work with-

 Nac20color


Summer Starfruit is still not one of my favorite colors, but I have to say it's growing on me. I think it works best with strong, really saturated colors and Midnight Muse is one of my favorites to pair it with! I started with a base of Midnight Muse. To that I added a layer of Summer Starfruit that I ran through my Big Shot in my new Argyle  Embossing Folder. Love all that fabulous texture! One of the nice things about that folder is how nice it really looks on either sid, embossed or de-bossed. Next came a layer of Baja Breeze that was embossed with the Perfect Polka Dots Folder. These three layers were all Tombowed together.

My next layer is Midnight Muse and I used one of my scalloped border punches to add detail to the one end. I stamped my image on Naturals White with Black Staz-On and used my Blender Pens and Classic Ink Pads to color it in. I love all the color variations you can get with that technique! Here's a close-up view-


 I wrapped my Midnight Muse Striped Ribbon around the Naturals White layer and secured it with SNAIL. I then secured this to the Midnight Muse layer with Tombow. This panel was adhered with Dimensionals and the front of my card was done. Yea! :)

Here's the inside-

Inside of Sympathy Card with Everything Eleanor and Teeny Tiny Wishes
I used Teeny Tiny Wishes for my sentiment and stamped it in Midnight Muse. Here's a close-up of my pretty little flower because you know I think the inside should be pretty too!


I stamped this in Midnight Muse as well and then colored it in with some Baja Breeze. A little love from Tink finished it off.

Before I forget, Here's the card measurements-
The base is a standard  base of 8 1/2 x 5 1/2 scored and folded at 4 1/4.
Summer Starfruit- 4 1/2 x 3 1/4
Baja Breeze- 4 1/2 x 2 1/4
Midnight Muse- 3 1/2 x 2 1/4 and then cut with punch
Naturals White- 3 x 2
Hope this helps! :)

Well, that's all I have for you today. I hope you liked it and I hope the fabulous ladies over at NAC like it too! If you liked today's card or have questions about it, I hope you'll take a moment to leave me a comment below. If you'd like to +1 or Pin today's card I've put those buttons here for you. Friends and Followers are always welcome too!

Thanks so much for taking time out of your busy day to visit my little corner of the world. You are very appreciated! I hope you make it by again soon. Till Next Time-

Remember- Life is often more about the storms than the peace they seek to overwhelm. It's not about Waiting for the storms to pass, but Learning to Dance in the rain.

Be Safe,
Shan
Pin It

Wednesday, October 17, 2012

Not So Scary Boooo / The Great Pumpkin Blog Hop #12 / CAS(e)#1 / My Challenge #43

Pin It
Hey y'all. Happy Humpday! I hope you're having a great week so far. It's not been the best week for me, what with my honey moving cross-country, but I'm getting through. It's a good thing I have this blog and have to create or I fear I would be sitting on the couch or worse yet huddled under the covers. I did get some good news today though, I've been offered a new job and I accepted it. I start back in a Federal Position on November 1st. Yea! I also got confirmation about a Vendor Fair this Saturday. It's my first one so I'm very excited. I'm really trying to be my normal happy self. I figure I'll just Fake it till I Make it. I just hope it doesn't take a year to "make" it. :)

You know what else makes me happy today? It's Wednesday and that means it's time for another edition of The Great Pumpkin Blog Hop! Woo-Hoo! Next week is the last week, but that means there's still time for you to play along. Terry over at Going' Over The Edge is our Hostess with the Most-est (Boy that sounds a lot better than it looks in print!) and she is drawing one name for a $50.00 SU Gift Certificate at the end of the Hop. How Fabulous is that? Be sure to scroll all the way to the bottom of my blog for the Hop. You can see all the entries from there and you can even enter you're own creation there as well. Don't forget to check back throughout the week to see all the wonderful entries.

I found a new Challenge site this week as I was going through my RSS, and I thought I'd give it a try. It's CAS(e) This Sketch and since C&S is so hard for me I figured I can never have enough inspiration in that Department. :) I hope you'll check them out when you get a chance.

Here's what I came up with-

Halloween Card featuring
Googly Ghouls Stamp Set & Owl Punch

Wow! This is so far from my normal, it's really hard for me to believe I did it. Not sure what I think, how 'bout you? It's not my favorite of the season, but I think it's growing on me. I started with a base of basic Black c/s and added a layer of Basic Gray which I adhered with Tombow. My border was created with the Large Scallop Edgelet. My sentiment was stamped in VersaMark and then Heat Embossed with Iridescent Ice for a subtle but shimmery look. This strip was then also adhered with Tombow. I've seen these cute little ghosts for years and finally got my Owl Builder Punch so I thought I'd make one too. Sometimes I'm soooo late to the party, you know what I mean? I punched him out of Whisper White c/s, added a little Dazzling Details to make him Shimmer, added some googly eyes and he was finished. I think he's kinda cute, and not at all scary. I used two Dimensionals to make him float above the sentiment border.

Here's the sketch I was working with-


 I think it's pretty close. I hope the ladies over at CTS think so too. Here's a closer look at my sweet, little, non-scary, friend-


I'm pretty happy with how he's floating above the "boooo" and all the shimmer. Hard to go wrong with that.

Here's the inside-


I stamped Boooo across the bottom in VersaMark and embossed it again with Iridescent Ice. The Happy Halloween is from Teeny Tiny Wishes and is stamped in Black Staz-On. I kept it pretty simple to go with the overall theme of the card. What do you think? Do we like it?

That's all I have for you today. I hope you liked it and I hope Terry and the team over at CTS liked it too. I love hearing from you, so if you liked today's card or have questions about it, I hope you'll leave me a message below. I read all of them and they really do make my day! If you'd like to +1 or Pin today's card, I've put those buttons on my blog for your convenience. Friends and Followers are always welcome too! :) Don't forget to scroll all the way down to the Blog Hop.

Thanks so much for taking time out of your busy day to stop by my little corner of the world. You are very appreciated! Till Next Time-

Remember- Life is often more about the storms than the peace they seek to destroy. It's not about Waiting for the storm to pass, but Learning to Dance in the rain.

Please also Remember that October is National Domestic Violence Awareness Month-
Love Does Not Hurt! 

Be Safe,
Shan
Pin It

Thursday, October 11, 2012

End of the Week Technique #51 - Easel Cards / Domestic Violence Awareness

Pin It
Hey y'all. Happy Thursday. I hope you're having an Amazing week and gearing up for the weekend. Just one more day, woo-hoo. :)

I'm a little disappointed in my self that we are 11 days into the month of October and I haven't done a "Purple Post" yet. Most of you know that October is Breast Cancer Awareness Month. Did you know though, that it is also Domestic Violence Awareness Month? I bet most of you will answer "No" to that question. It's unfortunate that two of the biggest health concerns for women fall on the same month. It's a tragedy that one gets all the attention and the other very little. Football players wear pink, the White House gets bathed in pink lights, there are Nationally known walks and runs all in pink, but none of this happens in purple. One reason Domestic Violence is such an epidemic in not only our country but world-wide is that more people don't talk about it. The silence of it's victims and of the communities it's victims live in only contributes to the strength of this scourge. It's time to remember that Love Does Not Hurt! Please keep this in mind not only this month but throughout the year. We can only stop this epidemic of pain and suffering by shining a light on it. If you know someone that is in an abusive relationship, be it physical, emotional, financial or any other type, please let them know you care and are not willing to let them continue on alone.

Ok, off my soap-box-, although I can't promise that you won't hear it again. :) Today's card is an easel card. I did one of these way back when I first began my blog, just in a different shape, so it's been a while. I thought it was time to do another one and to do one in a shape I thought went well with the month. Here's today's card-


I used the Bigz Butterflies Die and my Big Shot to make this and it came together so quickly. Although this particular style easel card will stay open on it's own (the butterfly wings catch on the notched section) I chose to add a stop as well. I had wanted to add a purple ribbon, but the stamp I have would have been too big. :(

Here's a little bit different angle-

Sorry for the "huge" picture I wanted to show some of the detail.
I used Wisteria Wonder and Whisper White c/s and Wisteria Wonder Classic ink to sponge the edges of the c/s and Elegant Eggplant ink to stamp the sentiment. The sentiment was cut out with the Word Window Punch, sponged with Wisteria Wonder and then edged with a little love from Tink in the form of Dazzling Diamonds. It was then adhered with Dimensionals to make a lovely sentiment and an additional stand. The butterfly wasn't originally sparkly, but I felt it needed just a little something extra so Tink gave it a little love as well and I think that was just the right touch. Since the c/s is so light, an additional greeting could be written on the back of the base piece.

For today's technique you will need the following- Embossing tool (I used my Big Shot), Butterflies Die, scoring tool (I used my Simply Scored Tool) Embellishments as desired (I used the Perfect Polka Dots E.F., Word Window Punch, Dimensionals, Two-Way Glue Pen, Dazzling Diamonds and a sentiment from Teeny Tiny Wishes).

Although you can make an easel card in any shape and without the aid of a die, I chose the butterfly die, because of the symbolism of butterflies. To me the change they go through is similar to the change/rebirth someone emerging from an abusive relationship goes through.

Here's what you will do-
1- Cut and score your c/s in the size you will need for your particular shape. Mine c/s was approximately 8 x 3 1/2 scored to form a 4 x 3 1/2 piece of c/s. I placed this over my butterfly die with the folded edge just below the top of the wings so that when I ran it through my Big Shot I ended up with 1 cut out piece of c/s instead of 2. Next you will need to decide where to score your top piece. I simply scored across the center where there was already a notch in the design.

Ooooh, sorry that's blurry!
2- Fold and re-enforce your score line down-wards.
3- Cut out another piece of c/s using the same design but this time cut out the entire image.
4- Adhere your new cut-out image to the bottom portion of your scored c/s. I used Tombow to adhere my two pieces together. 
*Tip* apply the adhesive to your scored piece of c/s and not your top cut-out image. If you apply adhesive to the top image and you apply extra it could later get stuck to the area above the score line and then your card will not function correctly.
5- If needed by your design add an element to the base of your card to act as a "stop" to keep your card open.
6- Optional - Embellish as desired. You will likely want to do this before doing your final adhering. I ran my top piece of c/s through the Perfect Polka Dots E.F. for a little added texture and also did my sponging after the fact. (You live and You learn and then you embellish just a little more!)
7- Smile when you see your finished project and smile even more when you think about the smile that it will bring to it's recipients face. (This really is the best part)

That's all I have for you today. I hope you liked today' technique and card and I hope it inspires you to try something new today. There are many different types of easel cards and I will be trying more including some that don't include dies, but to be honest, I've been so busy with different issues this past week I didn't have the time to figure out a design from scratch. Hopefully I will be able to do this soon. I love hearing from you, so if you liked today's card or technique or have questions, I hope you'll leave me a message below. I read them all and they really do make my day! If you'd like to +1 or Pin today's card, I've put the buttons on my blog for your convenience. Friends and Followers are always welcome and thoroughly appreciated! :)

Thanks so much for taking time out of your busy day to stop by my little corner of the world. You are very appreciated! Till next time-

Remember- Life is often more about the storms than the peace they seek to overwhelm. It's not about Waiting for the storms to pass, but Learning to Dance in the rain.

Please also remember that Love Does Not Hurt-

Be Safe,
Shan

Pin It

Friday, September 28, 2012

Spin-ny Gingie

Pin It
Hey y'all. Happy Friday! Just a quick post today as I'm actually a little busy. I hope you've had a great week and are looking forward to an Amazing weekend. I'm going to Annapolis tomorrow for lunch with a bunch of friends but other than that, not sure what the weekend holds yet.

I did today's card a few weeks back. It's one of my favorite types of cards and it just makes me happy. I hope it makes you happy too....

Holiday Spinner Card featuring
Scentsational Season & Snowflake Soiree Stamp Sets

Isn't he cute? This is one of the cards I showed my friend Brenda last week to show her the versatility of this set. She was tickled when she saw him spinning his way across the card. This was a very quick and easy card but it sure makes an impact. I started with a base of Very Vanilla c/s and added DSP  from the Be of Good Cheer collection. I cut two pieces, one for the front and another to layer underneath. A lot of times the mat or card base shows behind the slide and while there's nothing wrong with that look (I've used it before) I wanted it to look like my sweet little Gingie was just spinning his way across the DSP. For my border I used a scrap of Cherry Cobbler c/s that I punched with my Dotted Scalloped Ribbon Border Punch and cut in half. It was adhered to the bottom of the DSP with Tombow. This panel was adhered with Dimensionals so Gingie could spin.  The slide is cut using the Word Window Punch. I know you've heard me say it a million times before, o.k. maybe not a million but it's a lot, but this is a must have punch. In fact, if you're only getting one punch to start with, this is the one. Just so you know, the other two must haves would be the Decorative Label and Large Scalloped Circle. Just line up your punch on one side of the paper an punch your way across to the other. I actually punched too close to the sides. :( You know I tell it like it is. But there was no way I was going to cut another piece of DSP that size. I just needed to make it work. So, in order to keep the DSP from tearing when Gingie spun to fast towards the ends, I added Dimensional "stops" under the DSP to keep him from spinning to close to the edge.  

My sweet little cookie was inked with Soft Suede and then stamped off once to give a softer color. He was cut out with the coordinating Holiday Framelet. The bow-tie is punched from the Owl Builder Punch. A few little pearls for his buttons and he was finished.    :) The sentiment is from Snowflake Soiree an was stamped in Soft Suede onto a scrap of V.V. c/s and punched out with the Decorative Label Punch. It was sponged lightly around the edges with Cherry Cobbler Classic Ink and adhered with more Dimensionals and the front was done.

Here's the inside-


This sentiment is from Teeny Tiny Wishes. I really don't know what I did before I purchased this set. My tasty little friend is stamped again and then a little visit from Tink made him even yummier, hard to believe that's possible. :)

That's all I have for you today. What did you think? I wish you could see it in person. He's just so darn cute spinning head over heels across this card. In addition to the diagonal strip being unexpected, it also gives him more room to spin and therefore gives more opportunities for smiles. I hope he inspires you to make a fun card soon. As soon as I saw this little guy, I knew he would be perfect for this type of card and I was right. I hope you think so too! If you liked today's card or have questions about it I hope you'll take a moment to leave me a message below. I love hearing from you and read all of your comments. They really do make my day. If you'd like to +1 or Pin it, I've put those buttons on my blog for your convenience. Friends and Followers are always welcome too! :)

Thanks so much for taking time out of your busy day to stop by my little corner of the world. You are very appreciated! I hope you have an Amazing weekend filled with lots of time for Family, Friends, and of course Creativity. Till Next Time-

Remember- Life is often more about the storms than the peace they seek to overwhelm. It's not about Waiting for the storms to pass, but Learning to Dance in the rain.

Be Safe,

Shan
Pin It

Thursday, August 30, 2012

End of the Week Technique #45 - Water-Coloring with Markers

Pin It
Hey y'all. Happy Thursday! Just one more day until the holiday weekend. Woo-Hoo!

Know what else is just a day away? The end of our Spooktacular Savings Promotion. If you join my team before close of business tomorrow  now extended through September 16th, you get a FREE kit including the Googly Ghouls stamp set, a custom letterpress tray and all the materials needed to create your own special Halloween Home Decor. Want to know what's even better than that? You can then customize it for use throughout the year. It's the gift that keeps on creatively giving. Picture to follow later in this post. So for $99.00 you can get $125.00 worth of Traditional Stamping items or over $545.00 worth of Digital items (MDS2+ & $45.00 worth of digital downloads) or $500.00 worth of Digital and $45.00 worth of Traditional items. It's totally customizable to how you enjoy crafting. In addition to this when you place an order in your first 45 days you get 30% off the total price and 20% off any additional orders. Though there is Absolutely NO Commitment to ever ordering anything else again. Win-Win and Absolutely No Obligation, pretty nice!

Well, I got to thinking of when I first started and how I would have used that money to it's best potential. I wasn't doing any digital designing back then, so I would have definitely gone for traditional product. I already had a little cardstock and a few stamps, what I didn't have was ink. Now as you can imagine, it's hard to stamp without ink! I only had a few colors so I was really limited in what I could create. That's where the idea of the markers and this week's EWT came in. I had heard that you could use wax paper and our SU Markers to "watercolor" designs and new I wanted to try. So I sat down and created this card-

Thinking of you Card featuring
Wonderful Winterland Stamp Set and
Storytime DSP
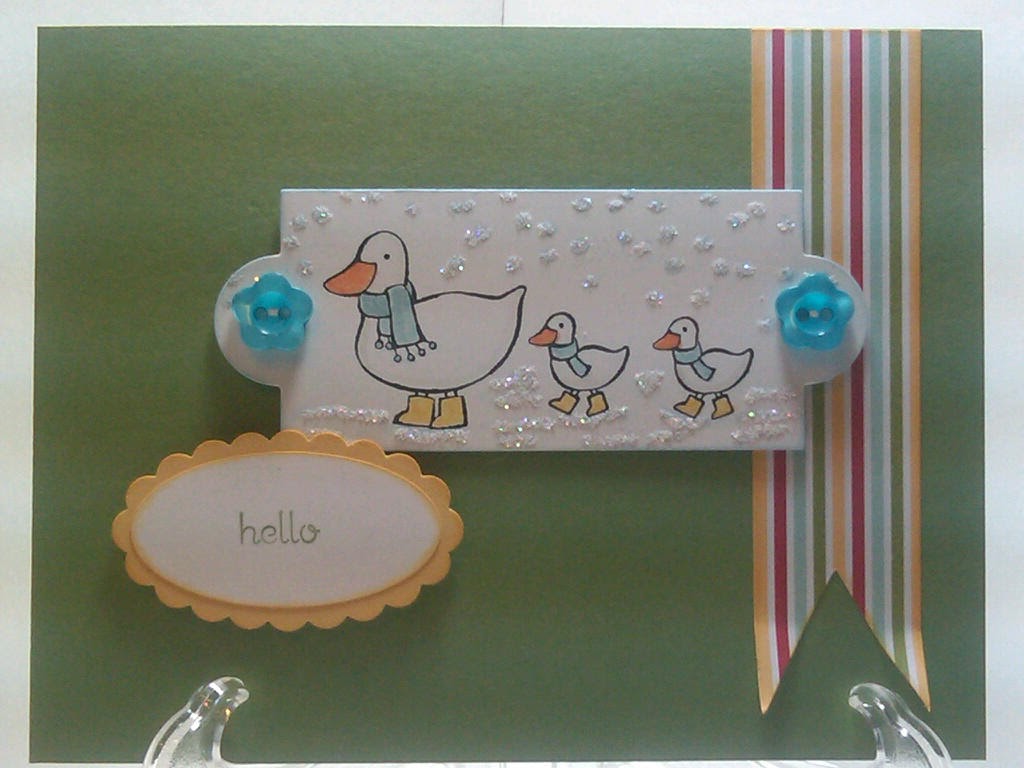
Do you Love it? I do and you won't believe just how easy it was to create! I love getting the most bang for my buck and I love stamp sets that have multiple images and can be used for more than just one occasion. This Wonderful Winterland set can be used from the time it starts getting cool all the way through till spring. In fact if you inked this particular stamp up with a pen instead of the pad you could omit the scarf and make it a Spring/Summer stamp and literally use it all year long.

How sweet is that image!?! It actually only has the Momma duck and one little duckling but I wanted an extra sweet baby so I used my Stamp-A-Ma-Jig and added the third one in. So easy! I stamped them in Black Staz-On so I could water-color them and not have the inked outline bleed into my colors.

This is a very Clean and Simple layout, can you believe it, two in one week! I chose my color palate from the Storytime DSP that I used to cut my flag.  I think it's 3/4" wide. I attached this to my Wild Wasabi base with a little Tombow and left just the ends free so I could give them a little curl for dimension and the appearance of motion. I stamped my ducks in Black Staz-on, everything was inked/colored with my SU Markers. After stamping my sweet little family I used my Apothecary Accents Framelet to cut them out. I colored them in (Tutorial to follow) added the snowflakes, from the same set and the snow to the ground. This panel was then adhered with Dimensionals. Two buttons from the Brights pack, which I got for Free, were adhered with Mini-Glue Dots. Faux thread was added by coloring between the button holes with my White Gel Pen. My sentiment is from Easy Events. It says "hello baby" but I only inked the word hello with my Wild Wasabi marker. I stamped it on a piece of Whisper White c/s and punched it out with my Oval Punch. The edges were sponged before attaching it to a piece of So Saffron c/s that I punched out with my Scalloped Oval Punch. This was then adhered with Dimensionals and my card front was completed.

Here's the inside-

Thinking of You Card featuring
Winter Wonderland and Teeny Tiny Messages
Another C&S style inside. The sentiment is from Teeny Tiny Wishes and is stamped in Wild Wasabi on a Whisper White background. The edges of the c/s are sponged as well. I stamped one sweet little duckling in the corner to continue the theme from the front. A little watercoloring and Dazzling Diamonds and this card was d.o.n.e!

Don't you just want to pick him up and put him your pocket? Ok maybe your pocket's too small but I bet your purse isn't! :)


Here's a closer look at the focal point-


I've talked about watercoloring with the Blender Pens before but always with our Classic Ink Pads, using the ink in the lid method. As much as I love that Technique, it can be a little expensive to get all the pads at one time. In fact I got the Many Marvelous Markers before I got most of my pads for that very reason. I just wish I had know about this months ago, I might have waited a little longer to get all my pads and bought more stamps and paper first.

Here's a few numbers for you. We have 38 core colors. Each pad is $5.95. If you buy the pads individually (a little at a time) you would pay $226.10 for them all.  If you buy them all by color family they are $49.95 a piece for the colors and $39.95 for the Neutrals because there are only 8 of those. That's a total of $189.80 for all 38 core colors. However if you order the Many Marvelous Colors pack, you get all 38 core colors in a handy dandy tote that not only closes securely but has extra slots for your 10 In-Color Markers as well. How much for all this inky fun? You pay just $109.95. That's a 42% savings over the individual sets and a 53% savings over buying them individually! WOW!!! Yes! You read that correctly! By purchasing the Marker Set you save between 42 and 53% over purchasing the pads.

What can you do with the markers? I'm glad you asked. They are dual-end markers so you can use the brush tip to color images (direct to paper), and you can use the fine tip to either color in smaller images or for journaling. You can also use the markers to apply color directly to your stamps, it works equally well for solid or line images. And now I'm happy to show you that you can also watercolor with your markers. So while it may take you just a little longer to ink up your stamps with markers than the Clasic Ink Pads it's a Great option especially when you're just starting out or a little strapped for cash, and let's face it these days, that's a lot of us. Isn't it nice to know you can come here and find out something other than just the newest thing about me that makes you Lol?  You live and you learn and maybe just maybe you come around here every-once-in-a-while and stumble upon something new and fun.

Here's what you need for this week's EWT- Black Staz-On ink pad, Marker/s in the colors of your choice (I used SU obviously so I can only attest to how well they work with this technique), Stamp set and card stock in your preferred color and here's where the magic happens...Wax Paper, Yep, you read that right, good old fashion Wax Paper. I bet you've got some in your kitchen cabinets right now. Tear off a piece, get your other supplies and get ready to have some watercoloring F.U.N.!

Here's what you do ( I wish I had more pictures but it's kinda hard to color with your right hand and take pictures with your left at the same time)
1- Stamp your image in Black Staz-On. Trust me on this...you can't use regular ink from a pad or marker for this. Well, I guess technically you could but all of your colors are going to come out wonky as soon as they hit the outline because they're going to mix with the black. Ask me how I know. Yep I forgot to stamp in Staz-On one day and couldn't figure out why my Marina Mist was all of a sudden a violet color. *SMH*
2- Chose your color palate. You can only prep one color at a time, so decide which color you want to start with. Take the "brush-tip" end and color a small circle onto your wax paper. You will have a small pool of color, like the color in the lid technique, it will just be a little less wet.


 I put all the colors in this picture with the corresponding markers so you could see, but I took this picture after I was done with my project.

Using Wax Paper  & SU Markers to Watercolor

For my card I used Pumpkin Pie, Daffodil Delight, Sahara Sand, Baja Breeze and Bashful Blue. I used the Sahara Sand to give a little depth to the ducks. Look on the bellies and heads and you can see a little bit of shadowing. The Bashful Blue was colored lightly, just a wash of color really, for the snowflakes and the snow on the ground. I then used a little Two-Way Glue Pen and Dazzling Diamonds to maximize the effect.

3- Using your Blender Pen, dip your tip into the pool of color on your wax paper and then color in your project. You may want to test the depth of color on your grid paper first. I usually dab off a small amount before applying the color to my image because I like to be able to layer my colors to get the depth of color that I want. Remember- you can always add color but you can't take it away. How easy is that!?!
4- Re-apply the color to the wax paper as needed to complete your coloring.
5- Smile when you see what you've created and smile even more when you think about the joy and the smiles it will bring to its recipient!

This is really an Amazing use of these pens that I loved so much to start with. I love my Classic Ink Pads, don't get me wrong, but if I had known about this technique last year I would have $189.80 in more stamps & extras and I would be getting the new improved pads to boot. If you are looking to maximize your crafting dollars this is one way I highly recommend. If you sign up as a demonstrator you can get all these colors plus a pack of 3 Blender Pens and still have just over $5.00 to spend on accessories like some Dazzling Diamonds Glitter or 2 packs of Dazzling Details Glitter Adhesive, a $125.00 value for just $99. Oh and remember that Spooktacular Offer I told you about?

Here's what you get-


You get everything you see here, Stamp Set, Frame, Stickers, Rhinestone Jewels, Bakers Twine and Ribbon. Ok, if you choose Clear Mount Stamps instead of Wood Mount the Mounting Block doesn't come in your kit, but I'll throw that in as my gift to you. Then you're ready to get creating. You'll even be invited to my House for an Exclusive Party where we'll design our kits together. Not a Halloween person? You can simply paint the frame a neutral color and design other layouts that you can change up for each season/holiday.

That's all I have for you today. I hope you liked today's card/technique and I hope it inspires you to try something new. Get out your wax paper and markers and have some fun. If you have comments or questions about today's technique I hope you'll leave me a message below. If you need supplies you can hop on over to my Online Store and get them delivered right to your door or better yet click on "Join the Fun" and get started saving on all of your crafting supplies.

Thanks so much for taking time out of your busy day to stop by my little corner of the world. You are very appreciated! If you liked today's card and want to leave me a little blog love below, your comments make my day every time. I read them all. Thanks so much for the support and encouragement! If you'd like to +1 or Pin today's card the buttons are here on my blog for your convenience. Friends and Followers are always welcome too! Till next time-


Remember- Life is often more about the storms than the peace they seek to overwhelm. It's not about Waiting for the storms to pass, but Learning to Dance in the rain.

Be Safe,
Shan


Pin It

Tuesday, July 3, 2012

Sending You Love SSC #261 / My Challenge #28

Pin It
Hey y'all. Happy Tuesday. I hope you are cool and getting ready for a Fabulous 4th of July tomorrow. I'm planning on spending the day with friends. It's nice to get a little mid-week break but it's kinda hard to plan on going out to see the fire-works knowing I have to be back at work bright and early on Thursday morning. I guess I'll either watch them on t.v. or catch up on my dvr'd shows. :)

It's time for another challenge card. I'm so excited to know that I have done at least one challenge a week this year which means I'm keeping up with my New Year's Resolve for a least one thing. I really feel like this has been such a positive thing for me to do and that I'm growing creatively and becoming more confident in my designs and my design choices. I challenge you if you are not doing challenges (wow, I challenge you to challenges.....hahahahaha) find some you like and do some on a consistent basis. It doesn't have to be weekly like me. Even if you do one challenge a month, I'm sure you'll find a difference in how you look at things creatively.

This week's challenge card is another Stamping 411 card. These ladies are Amazing! They have great sketches and the design team samples are great. Of course I try not to look at the D.T. samples until after I have my card in mind, so I feel like I'm coming up with my own idea and not influenced by their work. I know I say this all the time, but not only are the sketches wonderful, but they take all the guess-work out of the equation by giving you measurements to get you started. The OCD in me goes a little wonky when I have to figure out measurements, especially if there are multiple layers. In case you missed the posts, I have been known to mathematically figure out the correct dimensions by measuring the sketches and then figuring out the correct proportions. :( Like I said, it gets a little wonky sometimes.  Here's this week's card-

Challenge Card Featuring
Easy Events Stamp Set and Twitterpated DSP

Other than the fact that I can see that my ribbon is somehow not level, I'm really pretty happy with this card. For those of you that are new here- I'm a little inept at mixing and matching DSP papers even though I know they all go together. It literally gives me anxiety. Since I know the OCD is not going anywhere (completely), I figure the least I can do is try to conquer small bits of it. Hey, I'll take small victories wherever I can! When I saw this week's sketch I knew it would be perfect for lots of mixing and matching. Although I'm not sure just how well I succeeded, I did try and it doesn't look like a "Hot Mess" so, I'll take it as a small win. I know it's hard to see in this picture but the scalloped pink layer is DSP, meaning I have 5 different pieces of DSP on this card. Woo-Hoo! *Happy Dance* Flowers and Patterns and Stripes, Oh My!

I took my color inspiration from the main DSP panel with the flowers and then went from there. I used a base of Baja Breeze with a layer of Island Indigo to hold all of my DSP. That layer is raised up with Dimensionals. I used my Scalloped Border Edgelet on the pink DSP and then used my Adorning Accents EF on it as well. I love the added touch, plus the top of the embossed area gave me a level area to mount my floral piece to. :) *Bonus* I inked up the sweet little birds from the Easy Events stamp set with Black Staz-On so I could color with my blender pens. 

Ok, truth be told I did it with Staz-On the second time. I almost always forget the first time. Do you do that to or is it just me? I didn't even think about it until my Bashful Blue birds turned a weird violet color because it was mixing with my Classic Black Ink. *Head-desk* So I had to start again. I also switched the sentiments and used one from another stamp in the set. Love how that worked out. This was punched out with my 1 3/4" circle punch, sponged lightly with Island indigo and then mounted with Dimensionals to a piece of Baja Breeze c/s that was punched out with my Large Scalloped Circle Punch. I sponged it lightly with some Island Indigo as well and mounted it with some Dimensionals. A little love from Tink made the little heart and the bird's wings sparkle just a bit. Oh, the wings on the birds are Pacific Point and the heart is Primrose Petals.

Here's the sketch-


Oh, I miss that cute little butterfly! The new one is very pretty, but this one always made me smile.

Here's the inside-


What a pain to stamp those little birds separately! The branches are so close together. This was my 4th attempt to get them just right. It sure would be nice if there was a Staz-On Pen like the Versamark one! You can't tell but their wings and hearts got Tinked here on the inside too. Although it was a pain, I think the inside turned out so pretty. The sentiment is from Teeny Tiny Wishes and is stamped in Island Indigo. The edges of the W.W. c/s were sponged with it as well.

I hope you liked today's card as much as I enjoyed challenging myself during the making of it. LoL! I really do love hearing from you and I read all of my comments, so if you get a second to drop me a line, it would make my day. If you liked today's card and would like to +1 or Pin it, I've put the buttons on my side-bar for your convenience. Friends and Followers are always welcome too! :)

Thanks so much for taking the time to stop by today! I hope I've inspired you today to try something that you don't feel comfortable with. I wish you all a safe and happy holiday full of Family, Friends and of course time for creativity. Hope to see you back here real soon. Till next time-

Remember- Life is often more about the storms than the peace they seek to overwhelm. It's not about Waiting for the storms to pass, but Learning to Dance in the rain.

Be Safe,
Shan


Pin It

Tuesday, May 15, 2012

Early Father's Day Card- Stampin 411 SSC #255 / My Challenge #21

Pin It
Hey y'all. Happy Tuesday! It's another rainy, gloomy day here in the DMV. At least it's not cold....glass half full and all that. :) I hope it's warm and sunny wherever you are.

It's time for this week's challenge card. I actually found a couple different ones that I liked this week but decided to go with this one over at Stampin 411. You can always count on them for a great sketch. I chose it because I thought it would provide a good frame for the focal point I had in mind.

Here's today's card-

Father's Day Card, Origami Shirt, SSC #225

I'm sooo happy with how this card turned out. I'm sure, like me, you've seen these little shirts everywhere. I've seen them in this size and in a bigger one too, but I love that this one is made with a piece of 4 x 6 cardstock so you can get 6 of these cute shirts out of one piece of DSP. Woot! I used the Letters to Santa DSP for mine. This was so easy! I'm definitely doing one for my upcoming Father's Day Stamp-Camp.

Want to know the hardest part about this card? Tying the paper "thread" I used on the buttons. I used my Paper Cutter to cut real thin strip of Bashful Blue c/s and threaded the button holes with it. I used the Mini-Buttons that SU sent me for free during one of their promotions. Love It! I oh-so, carefully tied it in the back and then Tombowed the ends up to the middle to secure it. A Mini-Glue Dot gave a little extra security and attached the buttons to my shirt-front.

Here's the Challenge Sketch I used for my inspiration-


Love this Sketch! I stuck pretty close to it too, even leaving the orientation the same. The only elements missing are the bow and the small pink layer which it seems like most people are interpreting as a ribbon layer. I just couldn't find a way to incorporate the bow and because my boxes were a little bigger than the sketch I left out the small pink layer. Hope the fine ladies over at Stampin 411 will think it fits. :)

So, if you've been following along with me at all, you probably know about my inability to mix and match DSP. *SMH* I tried with this, I really did! I had the other DSP's in this set out to use but just couldn't do it. So instead I added a lot of texture with my Embossing Folders. It's so funny, because I just now realized that the sketch incorporates the Stripes  and Lattice Folders. I almost used both but at the last minute decided to just stick with the Stripes. I did however use the folder to make a "plaid" background on my Certainly Celery panels that echos the plaid DSP on my shirt. I also used the Stripes Embossing Folder on my Bashful Blue layer at the bottom of my card-front.

I drew my colors directly from my DSP, only leaving out the Riding Hood Red. The base is Marina Mist, paired with Chocolate Chip, Bashful Blue, and Certainly Celery. I sponged the edges of my Whisper White piece with Bashful Blue. I also sponged this color over the stripes to make them stand out a little more. Some Certainly Celery sponged over those panels helped make the embossing "pop". I used Stampin Dimensionals on all of the center panels to elevate them. The Bashful Blue layer is Tombowed directly to the card-front.

Here's the inside-


How sad am I, that I had nothing special to put on the inside of my card? :'( There are some origami ties tutorials out there, I may have to try. If they're not too bulky, perhaps I can add one. I'm sure a guy wouldn't notice or be upset at the lack of a "little something extra" on the inside, but I sure do! I did sponge around the edge of my W.W. c/s for a little added dimension, but I just want more. The sentiment is from Teeny Tiny Wishes. I really don't know how I made it this long without that set and to think I was still reluctant to buy it. Silly Shan!

Well, that's all I have for you today. I hope you liked today's card and I hope it inspires you to try something new. Why don't you swing over to Stampin 411's page and play along too? If you liked today's card I hope you'll leave me a comment. I love hearing from you! Also, if you liked it, please feel free to +1 or Pin it. I've put the buttons on my sidebar for your convenience. Friends and Followers are always welcome too!

Till next time-

Remember- Life is often more about the storms than the peace they seek to overwhelm. It's not about Waiting for the storms to pass, but Learning to Dance in the rain.

Be Safe,
Shan
Pin It

Thursday, April 19, 2012

Another Mixed Bunch Thank-You

Pin It
Hey y'all. Happy Thursday! Just one more day until the weekend. YEA!

I have a Quick and Easy card for you today. A few weeks back I got my first online order. Wow, it was so surprising to get that e-mail from Stampin Up saying someone had stopped by and placed an order. Surprising in a totally unexpected, fabulous kind of way. Well, I sent an e-card to that wonderful person, but I wanted to make them a card too. I knew just the stamp set I wanted to use too and it was due in that week. *Happy Dance* Well my stamp set came but not the punch I was going to use, so it took me a few extra days to be able to make this card. It's in the mail now, so if it's recipient is reading my blog and seeing it here first, just know it's on it's way and you are very appreciated!

Here's today's card-

Heat Embossed Mixed Bunch Card
Like I said, this is a Quick and Easy card and I had so much fun making it as a special Thank-You! I used Calypso Coral as my base and stamped two of the images from my new Mixed Bunch stamp set randomly (I just can't bring myself to like that word (:  ) all over the front of  my card. I used Calypso Coral Classic Ink for a tone on tone look. (Love that look!)

Next I stamped my floral images with Versamark and then Heat-Embossed them with Silver embossing powder. Then it was just a few simple punches and my focal point was ready to put together. I punched an extra flower from my Summer Smooches DSP to coordinate and used my bone folder to curl all my "petals" down on the bottom layer and up on the top layer. A few dimensionals in-between all the layers and my pretty little flower focal point was finished. All it needed was a sentiment and I used one from my Teeny Tiny Wishes. I stamped it in Calypso Coral on a scrap of Very Vanilla c/s, flagged the end, sponged the edges, curled it to give it some extra flair and dimension and adhered it with a few Mini-Glue dots. See, I told you, Quick and Easy! :)

Here's the inside-


The sentiment is from Three Little Words and it will be retiring at the end of next month. I sponged the edges of my Very Vanilla c/s for a little added depth and then stamped my floral image on the bottom. Want to know a secret? I didn't intend for the image to be lighter in the center. I guess I just didn't press down good enough and it ended up that way. I liked it though,one of those happy little accidents that happens so often in stamping. It looks like a tone on tone, rock and roll image. 

I didn't write on the card, I wrote my message on a sticky note, so it's recipient could use the card when she needed a Thank-You card for someone. I hope she likes it! What do you think?

If you'd like to get a special card, made just for you, I'd love to make one for you! Anyone that places an order in my Online Store will get a special card, from me. Now's a great time to shop since our retired list is out. Also, our current Occasions Mini catalog is ending at the end of this month. I sure hope that the Mixed Bunch stamp set and Mixed Bunch Punch will be in the new catalog that comes out on June 1st, but I have no idea and we won't know until then. If you love it or any of the other great items in our Mini, don't let them go without getting your favorites.

You can shop in my ONLINE STORE 24-7, you don't even have to get dressed up to do your shopping. :) Bonus!

Well, that's all I have for today. I hope you liked it and I hope this post hasn't ruined the surprise for it's recipient! :)

If you liked today's card, please feel free to leave me a comment. I love hearing from you! Also, feel free to +1 it or Pin it. I've put the buttons on my sidebar for your convenience. Friends and Followers are always welcomed too.

I hope to see you back here tomorrow.

Till next time-

Remember- Life isn't about Waiting for the storm to pass, but Learning to Dance in the rain.

Be Safe,
Shan


Pin It

Monday, April 2, 2012

Triple Treat Welcome

Pin It
Hey y'all. Happy Monday! I hope everyone had a great weekend.

Mine was full of fun as my best guy friend and I spent it out and about with friends. We went out with some of his classmates Friday evening and didn't get in until 3:30. Been a while since I was out that late. Saturday night we celebrated a friend's birthday and had lunch yesterday before I ran errands and cleaned house. Unfortunately, I didn't win the huge Lottery. Just imagine all the creative fun I could have had with that! LOL!

Another bit of excitement on Saturday, I welcomed my first team member. Jovanka got a great deal by signing up during Sale-A-Bration and I'm so excited for her. She was at the birthday party Saturday night, so I got busy and made her a little "Welcome" card to show her how excited I was about her coming on  board.

Here it is-


It uses the Triple Treat Flower, which is one she'll be getting to play with soon since she got it in her starting kit. She wasn't too sure about getting it to start with, but decided she liked it after she got her card. :)

I started with a base of 4 1/4 x 8 1/2 piece of Island Indigo scored and folded to make a 4 1/4 square card and randomly stamped the flower in the same ink, for a tone-on-tone look. I knew I was going to add the punched flower, but didn't really have a plan for how when I stamped the card. This initially gave me pause but it all worked out.

I stamped the flower 3 times, all on Very Vanilla c/s. The bottom flower was stamped in Island Indigo and punched out with the Fancy Flower Punch. The middle layer was stamped in Pool Party and punched out with the 5-Petal Flower Punch and the top flower was inked in Pool Party but then I "tap-danced" over it with Island Indigo for a different look. I didn't have the 1/2" Circle Punch, so I made-do and used the smallest flower in the Boho Blossoms Punch. I have to say, I'm pretty pleased with how it turned out. All three layers are popped up with dimensionals.

When I went to position my punched flower I was just going to layer it over the stamped image I had in the center of my card, but then my flower would have been at an odd angle that I wasn't real happy with. I was trying not to add too many layers because I really wanted the flower to be the focal point...

Then I saw it! The stamped image just looks like another layer underneath the punched layers. How cool was that little realization? I stamped the sentiment "just for you" from Teeny Tiny Wishes onto a scrap of Very Vanilla and punched it out with my Small Oval Punch. It fit just right! A little Island Indigo sponging and some dimensionals and the front was done.

Here's the inside-


I kept it simple. I didn't have any "Welcome" stamps that I could use like some of the demonstrators have, so I got a little creative. I used the "Welcome Baby" stamp from my Petite Pairs set and just inked it up with my Stampin Write Marker. A little sponging around the edge and Jovanka's card was done!

I know you're probably wondering where my extra little pretty is for the inside. I couldn't think of what to put in there. I was stumped. As I'm writing this I realize I could have put a few Boho Blossoms in there, but as it turns out, there wasn't any room after I wrote my note. The good news is she was excited about her card, and I'm excited to have one of my friends join with me, so she can have lots of fun and get a great discount on the supplies she already loves. Win-Win!

Well, that's all I have for you today. I hope you liked my little card. I hope it inspires you to have a little fun creating and maybe try something new.

If you liked today's card, I would love it if you left me a comment. It's great when I get to hear from you! Also, if you liked it, please feel free to +1 or Pin it. I've added the buttons to my side-bar for your convenience. Friends and Followers are also welcome. :)

I hope you'll come back tomorrow for another project.

Till next time-

Remember- Life isn't about Waiting for the storm to pass, but learning to Dance in the rain.

Be Safe,
Shan Pin It

Friday, March 16, 2012

Embedded/Embossed St Patrick's Day Card With A Blessing For You

Pin It
Hey y'all. Happy Friday! Are you ready for the weekend? I know I am. I'm also ready for 4pm cuz that's when I get to head down to Verizon to pick up my New I-Pad.

I'm so excited! *Happy-Dance* I have waited so long for one and now I'm getting the Big-Daddy of 'em. It's especially exciting since I seemed to have killed yet another computer. I do believe my Net-Book is D.E.A.D. I have had my I-Touch for years now & my I-Pod as well, hopefully this will bode well for me & Apple products. Sadly, Target didn't have the one I wanted so I couldn't use my Red Debit to save $40 (you have one of those and are saving money right?) so I have to go give Verizon more, but it is what it is.

This card however, makes me Very Happy and I hope it makes you happy too. It's the paper version of this weeks MDS card. I have to say it took me almost as long to punch out all those little hearts and cut the stems & position them just right as it did to create them on the computer.

Here's my card-


I started with a base of Garden Green. I then used a layer of Whisper White and sponged the edges with Garden Green. I used my Small Heart Punch to make the "leaves" of my Shamrocks and I simply free-hand cut the stems out of more Garden Green c/s. I laid them out in what I tried to make appear a random (I hate trying to do that!) pattern around my Lucky 4-Leaf Clover in the center. I wanted the effect to be as if they had been thrown up in the air and scattered around the center clover. Not quite sure I succeeded. To me, they still look to be almost in a straight line down the center. AUGH!

After lightly securing them I put them in my Square Lattice Embossing Folder and ran it through my Big Shot and you get this beautiful Embedded/Embossed Effect. I love it! I used Tombow to secure it to the card base. The sentiment is from Teeny Tiny Wishes and is stamped on Whisper White in Garden Green, Punched out with the Designer Label and then sponged lightly.I backed it with more Garden Green c/s and popped it up with dimensionals.

A sweet little rhinestone in the center of my 4-Leaf Clover finishes off the front of my card.

Here's the inside-


I used my MDS to print the sentiment and because I was afraid my colors wouldn't match just right to do the shamrock in the corner I simply punched one out and put it there myself. I miscalculated a little on the sizing so the border's not quite even, so I fudged it a little by sponging the edge. :)

Not sure if you can read the sentiment so I got a closer picture. It's one of my favorite blessings and I only just found out that it's attributed to St. Patrick. Pretty appropriate to add it to today's card.


This is my wish for all of you my friends who may read this. I hope you have not only a safe and happy St. Patrick's Day but this is my wish for you Always!

Well, that's all I have for you today. I hope you liked today's card and I hope you'll come back tomorrow. I know I don't normally post on Saturday's but I have one more St. Patrick's Day card for you, so I hope to see you then.

If you liked today's card, I would love it if you left me a comment. It's great when I get to hear from you! Also, if you liked today's card, please feel free to +1 or Pin it. I've added the buttons to my side-bar for your convenience. Friends and Followers are also welcome. :)

Till next time-

Remember- Life isn't about Waiting for the storm to pass, It's about learning to Dance in the rain.

Be Safe,
Shan Pin It