Showing posts with label Stampin Write Markers. Show all posts

Thursday, August 30, 2012

End of the Week Technique #45 - Water-Coloring with Markers

Pin It
Hey y'all. Happy Thursday! Just one more day until the holiday weekend. Woo-Hoo!

Know what else is just a day away? The end of our Spooktacular Savings Promotion. If you join my team before close of business tomorrow  now extended through September 16th, you get a FREE kit including the Googly Ghouls stamp set, a custom letterpress tray and all the materials needed to create your own special Halloween Home Decor. Want to know what's even better than that? You can then customize it for use throughout the year. It's the gift that keeps on creatively giving. Picture to follow later in this post. So for $99.00 you can get $125.00 worth of Traditional Stamping items or over $545.00 worth of Digital items (MDS2+ & $45.00 worth of digital downloads) or $500.00 worth of Digital and $45.00 worth of Traditional items. It's totally customizable to how you enjoy crafting. In addition to this when you place an order in your first 45 days you get 30% off the total price and 20% off any additional orders. Though there is Absolutely NO Commitment to ever ordering anything else again. Win-Win and Absolutely No Obligation, pretty nice!

Well, I got to thinking of when I first started and how I would have used that money to it's best potential. I wasn't doing any digital designing back then, so I would have definitely gone for traditional product. I already had a little cardstock and a few stamps, what I didn't have was ink. Now as you can imagine, it's hard to stamp without ink! I only had a few colors so I was really limited in what I could create. That's where the idea of the markers and this week's EWT came in. I had heard that you could use wax paper and our SU Markers to "watercolor" designs and new I wanted to try. So I sat down and created this card-
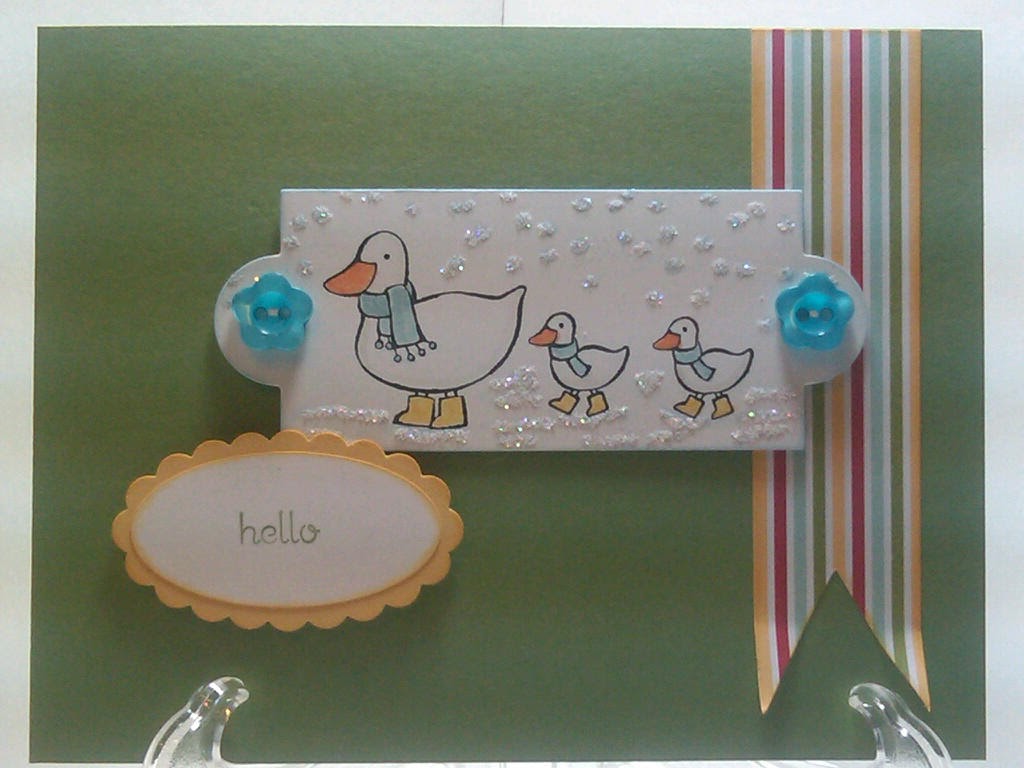
Thinking of you Card featuring
Wonderful Winterland Stamp Set and
Storytime DSP
Do you Love it? I do and you won't believe just how easy it was to create! I love getting the most bang for my buck and I love stamp sets that have multiple images and can be used for more than just one occasion. This Wonderful Winterland set can be used from the time it starts getting cool all the way through till spring. In fact if you inked this particular stamp up with a pen instead of the pad you could omit the scarf and make it a Spring/Summer stamp and literally use it all year long.

How sweet is that image!?! It actually only has the Momma duck and one little duckling but I wanted an extra sweet baby so I used my Stamp-A-Ma-Jig and added the third one in. So easy! I stamped them in Black Staz-On so I could water-color them and not have the inked outline bleed into my colors.

This is a very Clean and Simple layout, can you believe it, two in one week! I chose my color palate from the Storytime DSP that I used to cut my flag.  I think it's 3/4" wide. I attached this to my Wild Wasabi base with a little Tombow and left just the ends free so I could give them a little curl for dimension and the appearance of motion. I stamped my ducks in Black Staz-on, everything was inked/colored with my SU Markers. After stamping my sweet little family I used my Apothecary Accents Framelet to cut them out. I colored them in (Tutorial to follow) added the snowflakes, from the same set and the snow to the ground. This panel was then adhered with Dimensionals. Two buttons from the Brights pack, which I got for Free, were adhered with Mini-Glue Dots. Faux thread was added by coloring between the button holes with my White Gel Pen. My sentiment is from Easy Events. It says "hello baby" but I only inked the word hello with my Wild Wasabi marker. I stamped it on a piece of Whisper White c/s and punched it out with my Oval Punch. The edges were sponged before attaching it to a piece of So Saffron c/s that I punched out with my Scalloped Oval Punch. This was then adhered with Dimensionals and my card front was completed.

Here's the inside-

Thinking of You Card featuring
Winter Wonderland and Teeny Tiny Messages
Another C&S style inside. The sentiment is from Teeny Tiny Wishes and is stamped in Wild Wasabi on a Whisper White background. The edges of the c/s are sponged as well. I stamped one sweet little duckling in the corner to continue the theme from the front. A little watercoloring and Dazzling Diamonds and this card was d.o.n.e!

Don't you just want to pick him up and put him your pocket? Ok maybe your pocket's too small but I bet your purse isn't! :)


Here's a closer look at the focal point-


I've talked about watercoloring with the Blender Pens before but always with our Classic Ink Pads, using the ink in the lid method. As much as I love that Technique, it can be a little expensive to get all the pads at one time. In fact I got the Many Marvelous Markers before I got most of my pads for that very reason. I just wish I had know about this months ago, I might have waited a little longer to get all my pads and bought more stamps and paper first.

Here's a few numbers for you. We have 38 core colors. Each pad is $5.95. If you buy the pads individually (a little at a time) you would pay $226.10 for them all.  If you buy them all by color family they are $49.95 a piece for the colors and $39.95 for the Neutrals because there are only 8 of those. That's a total of $189.80 for all 38 core colors. However if you order the Many Marvelous Colors pack, you get all 38 core colors in a handy dandy tote that not only closes securely but has extra slots for your 10 In-Color Markers as well. How much for all this inky fun? You pay just $109.95. That's a 42% savings over the individual sets and a 53% savings over buying them individually! WOW!!! Yes! You read that correctly! By purchasing the Marker Set you save between 42 and 53% over purchasing the pads.

What can you do with the markers? I'm glad you asked. They are dual-end markers so you can use the brush tip to color images (direct to paper), and you can use the fine tip to either color in smaller images or for journaling. You can also use the markers to apply color directly to your stamps, it works equally well for solid or line images. And now I'm happy to show you that you can also watercolor with your markers. So while it may take you just a little longer to ink up your stamps with markers than the Clasic Ink Pads it's a Great option especially when you're just starting out or a little strapped for cash, and let's face it these days, that's a lot of us. Isn't it nice to know you can come here and find out something other than just the newest thing about me that makes you Lol?  You live and you learn and maybe just maybe you come around here every-once-in-a-while and stumble upon something new and fun.

Here's what you need for this week's EWT- Black Staz-On ink pad, Marker/s in the colors of your choice (I used SU obviously so I can only attest to how well they work with this technique), Stamp set and card stock in your preferred color and here's where the magic happens...Wax Paper, Yep, you read that right, good old fashion Wax Paper. I bet you've got some in your kitchen cabinets right now. Tear off a piece, get your other supplies and get ready to have some watercoloring F.U.N.!

Here's what you do ( I wish I had more pictures but it's kinda hard to color with your right hand and take pictures with your left at the same time)
1- Stamp your image in Black Staz-On. Trust me on this...you can't use regular ink from a pad or marker for this. Well, I guess technically you could but all of your colors are going to come out wonky as soon as they hit the outline because they're going to mix with the black. Ask me how I know. Yep I forgot to stamp in Staz-On one day and couldn't figure out why my Marina Mist was all of a sudden a violet color. *SMH*
2- Chose your color palate. You can only prep one color at a time, so decide which color you want to start with. Take the "brush-tip" end and color a small circle onto your wax paper. You will have a small pool of color, like the color in the lid technique, it will just be a little less wet.


 I put all the colors in this picture with the corresponding markers so you could see, but I took this picture after I was done with my project.

Using Wax Paper  & SU Markers to Watercolor

For my card I used Pumpkin Pie, Daffodil Delight, Sahara Sand, Baja Breeze and Bashful Blue. I used the Sahara Sand to give a little depth to the ducks. Look on the bellies and heads and you can see a little bit of shadowing. The Bashful Blue was colored lightly, just a wash of color really, for the snowflakes and the snow on the ground. I then used a little Two-Way Glue Pen and Dazzling Diamonds to maximize the effect.

3- Using your Blender Pen, dip your tip into the pool of color on your wax paper and then color in your project. You may want to test the depth of color on your grid paper first. I usually dab off a small amount before applying the color to my image because I like to be able to layer my colors to get the depth of color that I want. Remember- you can always add color but you can't take it away. How easy is that!?!
4- Re-apply the color to the wax paper as needed to complete your coloring.
5- Smile when you see what you've created and smile even more when you think about the joy and the smiles it will bring to its recipient!

This is really an Amazing use of these pens that I loved so much to start with. I love my Classic Ink Pads, don't get me wrong, but if I had known about this technique last year I would have $189.80 in more stamps & extras and I would be getting the new improved pads to boot. If you are looking to maximize your crafting dollars this is one way I highly recommend. If you sign up as a demonstrator you can get all these colors plus a pack of 3 Blender Pens and still have just over $5.00 to spend on accessories like some Dazzling Diamonds Glitter or 2 packs of Dazzling Details Glitter Adhesive, a $125.00 value for just $99. Oh and remember that Spooktacular Offer I told you about?

Here's what you get-


You get everything you see here, Stamp Set, Frame, Stickers, Rhinestone Jewels, Bakers Twine and Ribbon. Ok, if you choose Clear Mount Stamps instead of Wood Mount the Mounting Block doesn't come in your kit, but I'll throw that in as my gift to you. Then you're ready to get creating. You'll even be invited to my House for an Exclusive Party where we'll design our kits together. Not a Halloween person? You can simply paint the frame a neutral color and design other layouts that you can change up for each season/holiday.

That's all I have for you today. I hope you liked today's card/technique and I hope it inspires you to try something new. Get out your wax paper and markers and have some fun. If you have comments or questions about today's technique I hope you'll leave me a message below. If you need supplies you can hop on over to my Online Store and get them delivered right to your door or better yet click on "Join the Fun" and get started saving on all of your crafting supplies.

Thanks so much for taking time out of your busy day to stop by my little corner of the world. You are very appreciated! If you liked today's card and want to leave me a little blog love below, your comments make my day every time. I read them all. Thanks so much for the support and encouragement! If you'd like to +1 or Pin today's card the buttons are here on my blog for your convenience. Friends and Followers are always welcome too! Till next time-


Remember- Life is often more about the storms than the peace they seek to overwhelm. It's not about Waiting for the storms to pass, but Learning to Dance in the rain.

Be Safe,
Shan


Pin It

Monday, October 31, 2011

BOO! Happy Halloween to You

Pin It
Happy Halloween Y'all!
I hope everyone is warm and dry today and has their power back on. For those of you not on the East Coast or who didn't see the news this weekend (or the WeatherChannel) we had a Nor'easter come through. Let me tell you, it is still October and it is NOT supposed to snow in October. Yes, I used that awful 4-letter word, but notice I used small letters and didn't give it Caps...that'll show it!

Well, the wet stuff hit here as I was on the way to my WOW Christmas Card class at my team leader, Robin Merriman's house. If you haven't checked her blog out, check her out here at http://www.trinityde​signstudio.blogspot.​com/   She has some really amazing stuff! Well, it continued on and thankfully, moved right on up the coast sparing the DMV most of the damage. Some of our outlying areas had up to 13 inches though.

The tragedies continued yesterday as Miami somehow managed to throw away the lead they had at halftime to lose in the last 5 minutes, Brady and the Pats barely managed to show up for their game (hopefully, they have now learned that onside kicks simply do not turn out well for their franchise), and the Cowboys, God love the South and the Cowboys, well, they finally showed up to their own game and at least got on the board.

There were however 3 high points to my day yesterday-
1- The Redskins showed up to their game only to let their QB lay on the ground under the opposing team (tee-hee) and they never made it on the score-board
2- I got breakfast, lunch, and dinner for the next 2 weeks cooked, packaged, and frozen including extra homemade Italian Wedding Soup. (Yea me!)
3- I got to Stamp!

Every Halloween I see all of our cute Halloween stamps and somehow I still have none. I still don't know how that has happened. SMH! I generally try to use all SU materials, but seeing as I didn't have any cute little Halloween Stamps, and I  had these, I made do. I vow to get Halloween stamps as soon as the catalog comes out next year!

My sweetie loves Halloween. He loves to decorate for it and to see the kids all dressed up, so I knew I had to make a special card for him. So here's his card-


I used a base of Basic Black cardstock. I layered that with Whisper White and then a layer from our Frightful Sight DSP. I knotted and tied a length of black grosgrain ribbon on top of the DSP, wrapping and securing the edges underneath with SNAIL adhesive. This whole layer was secured with Tombow (you know how much I love that stuff!) to keep it secure.

I used my Stamp-a-ma-jig to make sure my little fellas were aligned and spaced just like I wanted them. I tell you I don't know what I would do without that thing. It's so funny that at WOW this weekend some of my team-members that were also there were calling me OCD. I do believe that's my new nick-name. Seriously though, that thing is a Must-Have in your stamping toolbox!

I colored in my little dudes with my Stampin Write markers and at first only my shimmery dude got a little visit from Tink, and then I thought why should he be the only one?

"Spread The LOVE Tink!!!!!!"  I said, and just like that, look how AMAZING they all look!

Here's the inside-


I figured the boys shouldn't have all the fun, so I let Tink have at it here too, and made my sweet little witchy girl sooo cute.

Well, I hope you liked today's card. I hope my sweetie likes it too! I'm off to do work and study (I've got a project due Wed.) I'll be back at the end of the week for another installment of End of the Week Technique and maybe earlier if I can get a few minutes. If you liked today's card, I would love it if you left me a comment. It's great when I get to hear from you! Also, if you liked today's card, please feel free to +1 or Pin it. I've added the buttons to my side-bar for your convenience. Friends and Followers are also welcome. :)

Hope you all have a great day. Don't forget today is the last day to get your FREE Big Shot or FREE $100.00 in merchandise for signing up as a Demonstrator. No Tricks just Treats! The offer ends tonight at Midnight MST. Contact me so we can get you your FREE Treats!

Till next time,

Be Safe,
Shan Pin It

Monday, October 17, 2011

Letters to Santa Swaps

Pin It
Hey y'all. Happy Monday! I hope you're all having a good day. It's not raining here, (that's coming tomorrow,surprise, surprise), the Redskins lost, the Patriots won and even though the Cowboys lost to the Pats it was a close game so all in all, not bad for a Monday here in the good ole DMV. I hope you're able to say the same.

Are you ready to get to today's cards? I have 3 to show you. Yep, I said 3! Yesterday we had our team meeting and made fall wreaths with our Simply Scored Tools (It's so Amazing). The wreath is too, it's just a love, hate relationship. Class info to come later, and pictures too. Anyways, we had our meeting and I was Swap hostess and I chose Holiday Stamp Cards as the theme because I thought it would be a great opportunity to get some ideas for upcoming classes. We have such amazing stampers in my team and I knew not only would they make great cards, but that I would be challenged to deliver amazing cards as well.

One day I was cruising You-Tube for ideas and saw this card and knew I wanted to CASE it and when it came time for our swap I knew it was time. It's definitely one that you will need to watch the video for to get the measurements and cutting just right. I had to watch it a couple of times. I tweaked it just the tiniest bit to make it my own and am really excited to show it to you. You can see the original video HERE.

TIP(S)-  For making these cards come out awesome!
1.-When you first make this card make it with the video. Don't try to do it from memory. Ask me how I know!
2- Write the measurements down! They are NOT regular measurements. Don't think you can just remember them. Ask me how I know!
3-See how that center piece is angled? Does it remind you of High School Geometry? Yeah, Well I can save your live 30 ways from Sunday and you'd never know it had been in danger, but I can't balance my check book with out my I-phone App so don't get me started on too much mathematical, (even cutting these cards is too much sometimes) Well, anyways. it's one of those Geometry shapes, and you can stand it up like it is now or you can lay it on it's side. Don't lay it on it's side! It will only Confuse you and cause none of your pieces to fit and cause you to doubt that you cut your pieces correctly and cause you to cut everything out again. Trust me on this!!!!!!   Ask me how I know!
4. Last but not least, if you're using different DSP for the sides make sure you always cut your DSP facing the same way. If you flip it over because it will be easier to see your marks on the other side of the paper, your angles will end up facing the opposite directions. Trust me on this as well. Or don't, but just remember I am trying to save you some DSP. Ask me how I know! SMH!

See, all these mistakes I make so you don't have to. What a great friend I am!

I made the card in 3 pattern combinations. 1 just like the original and 2 that are different Here's the first one.


Instead of using Crystal Effects at the heel, toe and cuff, I used my, you guessed it, Two-Way Glue Pen and Dazzling Diamonds Glitter. I added the Rhinestone in the Center like in the video. I then threaded one of the new Jingle Bells from the Holiday Mini Catalog on some of our Linen Thread, knotted it and tied it around the stocking. To make sure it didn't slip down, I secured it with a Mini Glue Dot. I then took a 6 inch piece of Linen Thread and tied a bow and secured it above the bell with another Mini Glue Dot.

Now for the inside-
I used the Merry and Bright stamp from the Merry and Bright set and colored it in with my Early Espresso Stampin Write Marker and stamped it on a base of Whisper White Cardstock. I then took the 25 stamp from the same set and colored it in with Old Olive and Riding Hood Red. I stamped off once and then stamped, so the colors wouldn't be quite as bright. I then used the Two-Way Glue Pen and Dazzling Diamonds and WOW, even with my BB, it's all lit up and purty like!

You can see the original card HERE. Check out BoyGirlBoyDesigns when you get a chance. They have some really cute stuff there!

Here's the next one. Same concept, different color combination and pattern. I used Marina Mist for the base here.
I actually meant to go in and add a little glitter to some of the ornaments and forgot to. :-( My B!

And here's the inside-
I stamped both the ornaments and the sentiments from the Merry and Bright set in Marina Mist onto a base of Whisper White Cardstock and then went back and blinged out the ornaments. Can't have just the outside being pretty, now can we?

For the 3rd card I used Marina Mist again for the base but I used a different DSP for the center panel. The reverse side of DSP that should go with the center panel is a Crumb Cake stripe and I plan on putting it with a Cherry Cobbler Cardstock Base but I was having some issues with that so you'll see that card at a later date. But, I wanted to show you this to show you the versatility of the papers.

-
And now for the inside-
Once again, both stamps are from the Merry and Bright stamp set.  I stamped the sentiment in Marina Mist. The stamp in the corner matches the stamps on the front. I colored it using My Stampin Write Markers in Early Espresso and Marina Mist, stamping off once and then stamping onto my Whisper White carstock. I then used My Two-Way Glue Pen and Dazzling Diamonds Glitter to accent the ornament.
What do you think? I hope you like it. It's a  departure from my normal card and to be honest I was going to wait and put it in my End of the Week Technique Series because it is so different from any card I had seen, but you know what?.... I couldn't wait! I hope you like it and I really hope you try it! I have already made some Thank you cards with it as well and I think it will probably be one of my signature style specialty cards. If you make one, please send me a pic or a link. I'd love to see it!

If you liked today's card, I would love it if you left me a comment. It's great when I get to hear from you! Also, if you liked today's card, please feel free to +1 or Pin it. I've added the buttons to my side-bar for your convenience. Friends and Followers are also welcome. :)

As always, if you'd like to get the  supplies to make these cards or cards like them you can shop 24/7 in Shannon's Online Store  .    Check back later in the week to see what's new and for the the End of the Week Technique or better yet put me in your reader, sign up for e-mail alerts or follow me so you don't have to keep checking back in and you get to see what new in the world of glitter (lol).

Thanks for stopping by. I appreciate you!

Be Safe,
Shan Pin It