Showing posts with label Heat Embossed. Show all posts

Saturday, September 15, 2012

Holiday Frame and Ornament Card / NAC#11

Pin It
Hey y'all. Happy Saturday! I hope you're having a great weekend. Mines been sooo busy.

Do you ever feel like there's just not enough time in the day? I've totally felt that way this week. My best guy friend Jason's in town for class and I haven't been able to spend nearly as much time with him as I'd like too. :( I spent about 7 hours today getting my daughter's wedding invites finished. (I'll show them here soon) That includes running to Kinko's to get the insides printed. I'm so glad they had a big paper cutter but it still took me forever to get them all cut out. You know my OCD was in overdrive getting those things cut just right, don't you? But they are finally done and I'm happy to say the kids love them. I'm also happy to say that I found my dress for the ceremony and got started on a new scrapbook layout yesterday and was able to get this card completed a little while ago. It's a good thing too, because I've only got a few hours left to get it posted.

Here's what I came up with-


Holiday Card featuring
Holiday Frame and Lacey Brocade Embossing Folders, Core'dinations Paper and
Keepsake Ornaments Stamp Set and Holiday Ornaments Framelets


This is definitely not my normal style card. But, isn't it nice to do something different and be happy with it? That's one reason I challenged myself to do these challenges, to step out of my comfort zone. If you've followed me for any length of time you know I'm a pretty visual person and when I see a sketch, I rarely deviate from it. It wasn't so long ago that if I didn't have the exact shapes the sketch had in it, I just wouldn't do that sketch. I'm getting better but it's still hard for me. That happened with today's card. I didn't have an oval to create the center but then I thought about this embossing folder and, it's an oval (mostly) so I figured I'd use it. Well, I did but then discovered that it took up most of the card front and I wouldn't really have room for the same middle layer that the sketch had. Ugh!!!! I haven't missed one of the Nacho's challenges yet so I was determined to make it work. These sketches are supposed to be a jumping off point, an inspiration so I kept at it and let it be my inspiration, even it's not as faithful to the sketch as I would like it to be. Luckily, I think the fab ladies over at Nacho Average Challenge will not think to badly of me....You won't will you?????

Here's the sketch-


It's another great sketch. Lots of room for interpretation and I'm gonna have to try it again with a smaller centerpiece, so I can be a little more faithful to the sketch. I did get all the elements just not like they're laid out here. I used our new Core'dinations paper to make the center layer, it's just a little bigger.  This is such cool paper. I embossed it with my Lacey Brocade E.F. and used my new sanding block to make the embossing really pop. I also used the ribbon to "hold" my ornament instead of going all the way across the card. It's the Gumball Green stitched ribbon and I secured it with a Mini-Glue Dot.

Here's a closer look-


I used my Holiday Frame E.F. to emboss a piece of Very Vanilla c/s. Next I fussy cut the whole thing out and used some Dimensionals to raise it up. You know I liked this embossing folder when I first saw it in the catalog but after I got it and used it once I was so disappointed. (Thankfully not for too long, but still) Have you used it yet? It's really very pretty. The reason I wasn't happy with it was I stamped it and then realized it wasn't symmetrical.  AUGH!!! I had only used it once and thought I wouldn't be able to use it again. I just couldn't figure out why it was so oddly uneven. Then I read someones post about it and it all made sense. It's not symmetrical because it has all sorts of different images in it. If you look real close you can see a Christmas tree at the bottom and two snowflakes to either side. It also has some ornaments and stars hidden in there too. So, luckily I kinda feel like I can use it now, but it still throws me a little.  I've only really got 2 main colors on this which is also a pretty big departure for me. I stamped the ornament with Gumball Green and just a tiny little bit of More Mustard for the top of the ornament. I then added clear embossing powder to the top and Gumball Green embossing powder to the ornament and heat embossed the whole ornament. My Ornament Framelets made it easy for me to cut it out. Love me some framelets!!! The ornament is popped up with a Dimensional too.

Here's what I came up with for the inside-

Inside of Holiday card featuring
Greetings of the Season and Keepsake Ornaments Stamp Sets
I kept it very simple, but I think it's still very striking. The ornament came out so pretty. :)


Well, that's all I have for you tonight. I hope you like it and I hope those fab ladies over a NAC do too. They really do some great challenges so make sure to check them out. I'll be back Monday with something new for you. Hope the rest of your weekend is fabulous and you stop back by real soon.

Thanks so much for taking time out of your busy weekend to stop by my little corner of the world. You are very appreciated! Till next time-

Remember- Life is often more about the storms than the peace they seek to overwhelm. It's not about Waiting for the storms to pass, but Learning to Dance in the rain.

Be Safe,
Shan


Pin It

Friday, August 31, 2012

Double Embossed Evergreen Center Step Card (Wow, That's A Mouthfull) / NAC#9

Pin It
Hey y'all. Happy Friday! I hope you're getting ready to enjoy the long Holiday weekend. I plan on kicking back and relaxing as much as possible and hopefully my stooopid arches will continue to heal and I'll be able to run again or at least walk reasonably well. I am going to Jimmy Buffet Saturday night, but other than that my weekends wide open. Wanna come stamp and play!?!

I've been trying to figure out for the last few days what I wanted to do with the sketch over at Nacho Average Challenge's site this week. I've done all of their challenges so I wanted to make sure to get this one done too. It seemed like a pretty C&S sketch, but you know how I am with C&S! HAHAHA!!! Well I kept batting around ideas and had finally decided on the set I thought I wanted to use, I just had to figure out the rest of it.

Well, then inspiration struck! I won't tell you where I was and what I was doing when it struck, but it struck and I was so excited to get to the studio and get started. I got downstairs and discovered it was going to work. Woo-Hoo! *Happy Dance* Then all I had to do was figure out just  how I was going to do it. It's almost never just Clean & Simple or even Easy with me, but then you most likely already knew that. :)

Here's today's card- Sorry for the Ginormous Picture, I had to get it this big so you could see all the details.


Merry Christmas Center Step Card featuring
Evergreen Stamp set 

AUGH!!! I really wish you could see this in person. It's definitely one of those that when you finish it you say, "Wow! I made that!!!" You can't see the Gold Embossed lettering in that picture so here's another view (a little smaller) but this time you can't see the dry embossing. UGH!

Merry Christmas Center Step Card featuring
Evergreen Stamp set 

Here's the sketch I was using from NAC


I was thinking about a card I wanted to make for my baby brothers with the monster set and how I had been thinking of a step card and it hit me that a "center step card" would leave a middle section that was set apart from the sides and it reminded me of the sketch.

Oooohhhh, I was ready to get cracking. Just one problem, I had never made a center-step card. Yep, over a year of blogging, 246 posts and not one center step card. Well off to You-Tube for a little tutorial help. I got the measurements, went to the studio and got started. Luckily, I've learned to practice on old colored cardstock that I won't miss. I got it right on the first try. However, it wasn't going to fit in a regular envelope. Now I don't mind making envelopes, in theory, but I want a card I can mail or that someone else can mail with out any hassles. Time to try again. Now, I've told you guys this before. There's two kinds of math I can do easily. Tip Math and Medic/Nurse Math. I can't even keep my checkbook balanced without the app. *SMH* Let me just reassure you, this was not one either one of those kinds of math. I persevered though and after 2 more attempts had a center step card that would fit in a standard envelope. *Yea!*

Could I just be happy and leave it at that? Of course not! I didn't want to add DSP to the side panels because I really wanted my center panel to be the star. I couldn't however just leave the sides blank. I decided to try and Dry Emboss them. Now I'm sure someone, somewhere has done this before. I'm sure I can't be the first one to do it (although that would be really Super Cool!) but I've never seen it done before. It took me two more sample cards and multiple attempts on the first  three pieces too before I was able to get it right. I even took pictures, but of course I didn't remember to take them until after I had perfected it, but still you'll get the idea.

First off , the measurements for this card so it will fit a standard envelope and the Embossing Folders- I will make a Center Step Card a EWT and take step by step pictures next time.

1- Cut your c/s (I used Night of Navy) - 4 1/4" x 11"
2- Measure in 1" from both long sides and cut from 1" (up from the bottom ) to 6 1/2". This will give you the cuts that will become your center panel.
3- Score your outer scores. On the long sides score (from the outside edge to your cut lines) at 1", 2" and 6 1/2" (I used my Simply Scored for this)
4- Score your inner score. On the long edge score the center  at 5 1/2" from one cut line to the next.
5- The easiest way to fold is this. Lift your center panel up slightly and "Mountain Fold" on your 5 1/2" score line. "Mountain Fold" at both of your 6 1/2" score lines. "Valley Fold" at both 2" score lines and finish off with "Mountain Folds" on both of your 1" lines.

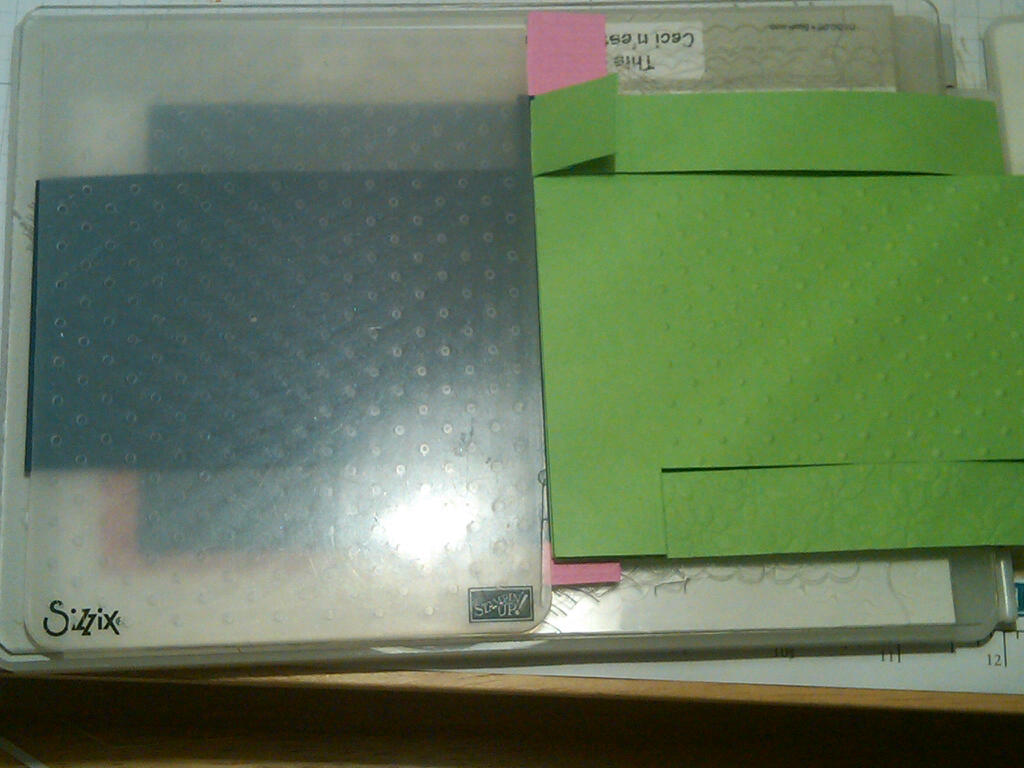
Now your card is folded. Take your first Embossing Folder, I used Petals-a-Plenty and place it so it's under your center panel and sandwiched over your two side pieces. Make your regular "sandwich" and run it through your Big Shot. I had mine with no tabs just the platform. Here's what it will look like-

Disregard the Embossed Center Panel. Like I said I went back and took pictures
 after I knew it had worked, but didn't want to run another piece of c/s through at that point.
You will have beautifully embossed side panels. I guess you could leave it with just the side panels done, but I wanted just a little something more. I know what you're thinking, "Shan trying to do something "More"? No way!?!" Yes-WAY!!!

Take your second Embossing Folder, I used Perfect Polka Dots, and place your center panel inside of it extending it fully across both side panels. Yes, this will flattened the embossing on your side panels a little but trust me when I say it makes for a very nice "subtle" embossed pattern and it also allows for your center panel to really be your focal point. You're going to need to add some shims to the bottom portion of your card. Ok, technically you don't but I found if when I didn't, and the card was "standing open" you could see the embossing was "bolder" in the very bottom of the side panels. It was just enough to bother me. If it doesn't bother you,  no worries, if it does this is how I fixed it.

See my samples. I told you old c/s. One is Pixie Pink and I'm not sure what the other is  Gable Green maybe.
I took the bottom one inch off a previous sample and slid it in from the bottom of the card behind the front bottom panel. I then took the green sample card (I forgot to stop cutting at 1" and cut all the way to the end of the c/s. This is another reason why you practice on old c/s.) and used it as a shim. When the card is "closed you will have 4 layers of c/s. Place this over the top of your bottom 1" section of c/s. As you can see that brings it up to the same height as the Embossing Folder. Build your sandwich as you normally would (for me No tabs, cutting plate under and over c/s and embossing folder) and run it through your Big Shot. This will allow you to emboss your center panel and get that inner lower portion of the side panels pretty close to the appearance on the top. If it's still a little too embossed for your tastes, you can also take your bone folder and carefully burnish just a little.


Look at the pretty Polka Dot Embossing on the center panel and the soft lightly embossed appearance on the side panel.

For my focal point I used my Crumb Cake Classic Ink Pad. I inked up my stamp and stamped off once before stamping the image onto my Naturals White Cardstock. I then inked up the words with my VersaMark pad and using my SAMJ (of course) stamped my second image. Gold Embossing Powder was added and set with my Heat Tool. The N.W. panel was adhered to an Always Artichoke panel with Dimensionals and then this whole panel was adhered to the center panel with more Dimensionals. Here are the Measurements for the center panel. Always Artichoke 3 3/8" x 3 7/8". Naturals White 3 3/4 x 3 1/4.

I had to move the "banner" portion of the sketch down so you could read all the words but otherwise I think I captured the sketch in a fun, unique way. I embossed the greeting Merry Christmas,  from Greeting of the Season, and adhered it in the same manner to the bottom front panel. The measurements for that piece are A.A. 7/8" x 1 3/8 and N.W. 3/4" x 3 1/5". Oh I also sponged the edges of the A.A. and N.W. pieces of c/s. I used Crumb Cake on the N.W. and it almost has a golden hue to it like the heat embossed areas. :)

I didn't even think of putting anything inside to write on. Hope you'll forgive me for that. After two hours of working on this card I honestly thought it was through. I think though that I will probably just add a piece of c/s to the back for a holiday note. I really wish you could see this card in person. It's just Wow!

Well, that's all I have for you today, but I guess since it was packed full with pictures and info, maybe you won't mind that I forgot something. I hope you liked it and I hope it inspires you to try something new, maybe a new card style or a challenge or better yet, do both! There's still time to play along with this challenge. If you have questions or comments about today's card, I  hope you'll take a moment to leave me a message. I love hearing from you, read them all and they really do make my day. Friends and Followers are always welcome too! :)

Thanks so much for taking time out of your busy day to stop by my little corner of the world. You are very appreciated! I hope you have a safe and happy holiday weekend, filled with lots of time for Family, Friends and of course Creativity. Hope to see you back here soon. Till next time-


Remember- Life is often more about the storms than the peace they seek to overwhelm. It's not about Waiting for the storms to pass, but Learning to Dance in the rain.

Be Safe,
Shan
Pin It

Monday, July 2, 2012

Cherry On Top Wine Bottle Tag Swaps

Pin It
Hey y'all. Happy Monday. I hope everyone survived the weekend ok. We had a blast at our concert in Hershey, Pa. even though it shut down about 30 minutes early because of the storm. We were getting lightning strikes near the stadium. We only had about 30 minutes of moderate rain and that was it. Boy were we surprised to get back to our room and get our messages about the Big Storms here at home. Although I didn't lose power at my house my A.C. died. It had been sluggish for a few weeks but it finally went sometime Friday or Saturday. :'( This meant getting a technician out to my house on OT yesterday. I won't even say how UGLY that was. All things considered, it could have been worse. The technician was nice and finally this morning I had some cool air in the house. It was 88 when I went to bed at 11.

Needless to say, no MDS Monday today. In fact, I wasn't even able to stamp. I got started a couple of times but it was simply too hot. So, for today, I have a project that I made a few weeks back for a team swap. It's similar to a previous post but I stepped it up some.

Here's today's project-

Embossed Wine Bottle Tag featuring
Happy Birthday With A Cherry On Top

I started with a base of Pool Party  and layered Daffodil Delight and Whisper White c/s on top of that. My previous tag just had squared off ends. For this swap I used my Scalloped Border Punch on all three layers. I then used my mat Pack and Piercer to make "holes" in each of the scallops. This mimics the design on the pedestal.

I inked the pedestal in Versamark and Pool Party Classic Ink and stamped it. Next I coated it in Clear Embossing Power and Heat Embossed it. This tag actually has pretty uniform color, but many didn't. At first I was upset that they weren't "perfect", but after heat embossing I decided I really liked the uneven look. (Bet you never thought you'd read that on this blog did you!?!) They turned out looking like old glazed ceramic pieces. Soooo pretty! I stamped the glass dome with Versamark and then covered it with Heat and Stick powder and Dazzling Diamonds, love the sparkly, crystal effect. The sentiment, cake layer, & cherry portion were all inked with Stampin Write Markers and stamped.

Wanna know another "you won't believe it" secret... I didn't use my Stamp-A-Ma-Jig! Not once!!! Go figure. This Scaredy Cat was Fearless that night! :) The top layer was popped up on Dimensionals. Then I got to wondering if there was anything else I could do to really make it special for swaps and I remembered I had some Real Red Dazzling Details, so I went back and added that to all of my swaps.

Here's a closer look-


I made 24 and not counting the time it took me to cut the c/s I spent about 4 hours straight making these. They were well received. :) In fact I ended up swapping them all and I do mean all. Do you ever forget to save one of your swaps out for yourself? I do it all the time! At least I remembered to take pictures. I realized near the end of the meeting that I had forgotten to save one and so I tucked my last remaining one down in my swap basket for myself. As I was getting ready to leave someone asked if I wanted to swap. I told her I had given out all but my last one which I was taking home because, silly me, I had forgotten to save one for myself. She saw which one it was and said. "Oh I saw those and was hoping to swap for one!" How could I not swap at that point!?! I couldn't. Like I said at least I took pictures. LOL! I can always make more, right? Right!

Can I just say, that was a lot of work on swaps. I had planned on doing about 50 of these for convention swaps. I think I would have been NUTZ, by the time I was done. :) Here's a picture of them all-

Wine Bottle Tag Swaps

Hopefully I will be returning home to a cool house tonight and will be able to get some stamping done. I hope you are cool wherever you might be as well.

I hope you liked today's project. These tags are one of my most requested items. They can be super simple or really stepped up like these. I hope you'll try some. I'm sure you'll have great luck with them. I have multiple posts with them so if you want to see more or get specific instructions just use the search feature here on my blog. I love hearing from you and read all comments, so if you get a chance I'd love to hear what you think about today's project. If you'd like to +1 or Pin it, I've put the buttons on my sidebar for your convenience. Friends and Followers are always welcome too! :)

Thanks so much for stopping by today. I hope you'll find your way back here soon! Till next time-

Remember- Life is often more about the storms than the peace they seek to overwhelm. It's not about Waiting for the storm to pass, but Learning to Dance in the rain.

Be Safe,
Shan

Pin It